
I previously posted about my set-up of an arduino-controlled turntable and automatic android camera trigger. It made some pretty awesome results.
I’ve now expanded that setup so that it triggers my Sony Nex-6 – either by a physical clicking of the button on the camera via a servo motor, or by infrared. I’ve included both because in an ideal world I want to use the IR remote, but I don’t actually have an IR LED at the moment.
By incorporating multiple cameras (and the set-up is easily extendable to more DSLRs and more Android phones), it means multiple angles can be captured per revolution of the turntable.
I want to make clear that I haven’t done anything spectacularly clever here, I’m just merging a couple of useful guides and posts from the internet. Assuming you got as far as the last post, with turntable and android phone, let me run through what I’ve changed.
The code:
All my changes to the AA-scan code, which includes the Arduino file and python files for Android and computer, are documented on github here: https://github.com/pfalkingham/AA-Scan
You now pass two optional arguments to the python code on the PC – imagename and image number. The former ensures that all the photos captured by the phone have a specific name, so you can change the name between sets and the second set won’t overwrite the first. You might want to do this if you need to turn the object over. image number determines how many photos get taken – it just divides 360 by that number to get the number of degrees to rotate the turntable by each time.
Photos are stored on the phone by default in internalStorage/Photog, rather than a temporary folder, again to avoid overwriting.
I added a bash script to be run on PC (windows subsytem for linux, or using a linux distro), that will automatically copy files over from the phone using FTP. For that, you’ll need to install Wifi FTP Server on your phone. You can set everything up so that photos transfer as they are taken, and something like Meshroom’s live reconstruction means it can start reconstructing while the photos are being taken. That doesn’t work with the DSLR images though, and to be honest I’ve not found the live reconstruction to be terribly efficient.
Additional modules:
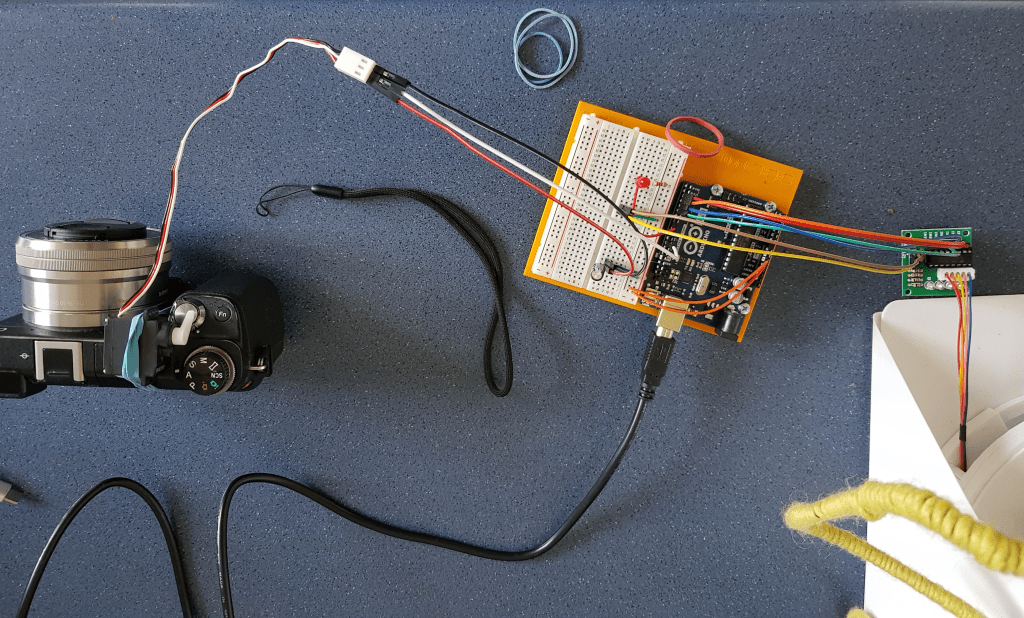
Servo motor to physically trigger the DSLR. I followed these instructions to add a servo motor to the arduino setup, and trigger the motor to move when the turntable has moved. It’s gracefully held onto the camera with bluetac and a rubber band, as you can see in the photo above and video below. It was hard to find a way to attach the servo in such a way that it didn’t just lift up when pressing the trigger. I may 3D print something in the future to clip it onto the camera more easily.
IR remote trigger. I’ve also coded in the ability to trigger the camera by flashing an IR LED hooked up to the Arduino, following these instructions. Unfortunately, I don’t actually have an IR LED at home with me, so for now I’ve thrown on a red LED just to see if it works. It turns out that the codes to send for various makes of camera have all be worked out by very clever people, and handily put into this github repository. All I needed to do was put these files into my c:\users\pfalk\Arduino directory, and add them in the Arduino IDE. That’s where the *.ino file creates a camera object, in this case at line 45 “Sony mycamera(8)” the ‘8’ being the pin on the board that the LED is hooked up to.
I think that’s everything. The result looks something like this:
How good is it? Very! I already showed you in my previous post the excellent reconstruction of a Rabbit vertebrae. That reconstruction used 720 photos just from the Android phone.
To demonstrate this new setup, I set it to just 50 steps (50 photos from Nex-6, and 50 from the Note 8, which was positioned a little lower and to the left as in the video above), and captured a cast Allosaurus tooth:
I’ve decimated it and put the model up on Sketchfab too:
I’m super pleased with this setup – I can get incredibly good models very quickly and with very little effort. I’m open to any improvements people might want to suggest!
[UPDATE] – I’ve since dispensed with the servo motor, and moved on to an IR LED

Very interesting, thanks. Your previous post on this subject and the Covid lockdown has given me the motivation to make my own turntable. The 3D printing is done and the steppers arrived from Amazon yesterday!
I have slight reservations about the reliability of your servo motor / shutter release setup. I use a Nikon D3100 DSLR and my intention was to control the turntable and camera from a single Arduino.
From what I’ve read (1) the D3100 has two control pins, one for focus and one for shutter release which should be fairly easy to control from the Arduino. I should be able to get the camera remote interface connector by chopping up my cheap Chinese made cable release. If I do it neatly then I should even be able to use the cable release afterwards!
( 1 – https://pinoutguide.com/DigitalCameras/nikon_d90_pinout.shtml )
The Servo has been great, but yes, if I were taking it off and putting it on with any regularity, it would be more than a bit flaky. Ideally, with an IR LED I could trigger the camera that way – presumably the Nikon could be triggered that way too?
I also looked into guides for hooking up a cable release, but that looked like a lot more effort!
Yeah, IR is the way to go I think. Unfortunately my D3100 is too ancient and too poverty-spec to have IR capability so I’ll have to do it the hard way!
Thanks to your inspiration I’ve built myself a similar turntable and currently controlling it and the camera via an Arduino. At the moment the Arduino rotates the turntable for one rotation in 10 degree steps and takes an image at each step. The camera is controlled via a butchered cable release and seems to work well.
Further enhancements are planned!
I don’t think that I can post images in these comments but this link might work – https://www.dropbox.com/s/p5huo684kkimgze/turntable.jpg?dl=0
It works very well, first model here – https://sketchfab.com/3d-models/sea-shell-2-270a6763b75e42f190381f13a28ccf32