This is one of those questions that I see cropping up regularly in discussions online and off; Should I shoot and process RAW photos, or will I get the same results with out-of-camera JPGs?
There is absolutely a school of thought among photogrammetry practitioners that everything should be absolutely top-quality: Prime lenses, shooting in RAW, DSLR only. I tend to play it a bit more fast and loose:
Clearly, using the best lens, and the best camera, assuming they’re used correctly, is going to get you better photos (crisper, more detail), which will be able to bring out more features in a photogrammetric model. And you’re not going to get great models of small objects if you don’t have a decent macro lens. But is there really enough difference between a RAW image and a JPG? There’s certainly a lot of scope for recovering details from RAW images – brightening dark areas, underexposing bright areas etc, but outside of relatively simple batch processing, you don’t really want to be manually adjusting hundreds of images – I’ll discuss this later.
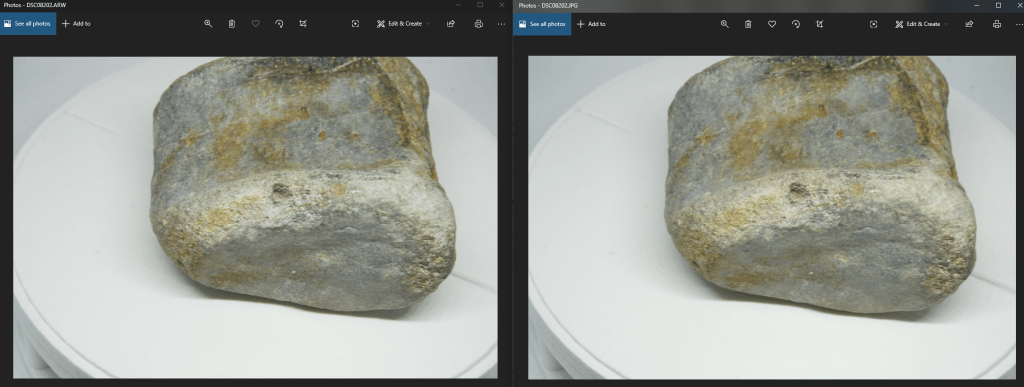
I wanted to do a simple test of RAW vs out-of-camera JPG datasets, just to see if there were any difference in either processing time or quality of the final model (both mesh and texture). I set up my Extended Automated Photogrammetry Setup, and used only my Sony Nex 6 with it’s 18-55mm lens (I was zoomed in to about 50mm). I collected photo sets of two fossils – a fairly boring (in terms of features) dinosaur vertebra (Iguanaodon I think?), and a really nice Ammonite I’ve had since I was a child. I set it up to take 100 photos on each revolution, and did three orientations for each specimen, combining all images for each specimen into single photo sets. The camera was set to shoot RAW and JPG, so every time it was triggered, it saved the photo in both formats.(due to a couple of minor hiccups, the total number of photos wasn’t 300, it was 317 for the Ammonite, and 321 for the vertebra).
All processing was done on my home desktop (16Gb DDR3, i7 4790K@4.4GHz, Nvidia 2060 super).
I ran all the data through Meshroom using a powershell batch script (below) that processed each dataset sequentially and recorded timings. You need a blank meshroom graph, which you can make by opening Meshroom, changing the settings you want, then save as.
"Iggy_JPG"
measure-command -expression {E:\Programs\Meshroom-2019.2.0\meshroom_photogrammetry.exe --input E:\Photog\Iggy_jpg\ --cache E:\Photog\iggjpgcache --pipeline .\BlankGraph.mg}
"IGGY_RAW"
measure-command -expression {E:\Programs\Meshroom-2019.2.0\meshroom_photogrammetry.exe --input E:\Photog\Iggy_raw\ --cache E:\Photog\iggrawcache --pipeline .\BlankGraph.mg}
"AMM_JPG"
measure-command -expression {E:\Programs\Meshroom-2019.2.0\meshroom_photogrammetry.exe --input E:\Photog\AmmoniteJPG\ --cache E:\Photog\AMMJPGCACHE --pipeline .\BlankGraph.mg}
"AMM_RAW"
measure-command -expression {E:\Programs\Meshroom-2019.2.0\meshroom_photogrammetry.exe --input E:\Photog\AmmoniteRAW\ --cache E:\Photog\AMMRAWCACHE --pipeline .\BlankGraph.mg}
Save the above as Runall.ps1, then you can open powershell and run $.\Runall.ps1 > output.log, and it’ll give you the time taken for each step. This script sees each photo set in E:\Photog, and runs my meshroom graph ‘BlankGraph.mg’, and uses a new cache folder for each so I can go back and check different stages if I want.
Meshroom happily accepts RAW files and processes them natively, just as it does JPG.The Meshroom template used default settings, except I enabled Guided Matching in the Feature Matching node, and I set texture algorithm to LSCM to produce a single texture file 4096×4096 (see my explanation of parameters here). I didn’t do any decimation or retopology in Meshroom.
I was going to duplicate this test in Metashape, but unfortunately Metashape can’t accept .ARW files directly – I’d have to convert them to digital negatives first.
Speed:
So, did processing RAW photos take any more or less time than JPGs?
Turns out, RAW was slightly quicker:
| Sample: | Time taken (h:m:s) |
|---|---|
| Ammonite JPG | 5:31:13 |
| Ammonite RAW | 4:33:51 |
| Vertebra JPG | 5:32:11 |
| Vertebra RAW | 5:07:39 |
Not massively, maybe a 10-20% difference in time taken. That might be important to you on big datasets, but it’s not huge. For this example, it matters little to me if I’m tying my computer up for 5 hours or 6 hours – either way it needs to run over night if I want to use my computer during the day.
Model Quality
First up, a quantitative measure – number of triangles:
| Sample: | Verts/Faces |
|---|---|
| Ammonite JPG | 523,766/1,047,528 |
| Ammonite RAW | 403,479/806,954 |
| Vertebra JPG | 738,389/1,476,780 |
| Vertebra RAW | 636,864/1,273,751 |
I provide the above numbers just for a quick reference, but as we all know, poly count isn’t a particularly accurate indicator of model quality. Interesting that the RAW models are both a couple of hundred thousand faces smaller.
Here’s the vertebra side-by-side in blender, rendered with a simple grey material (we’ll come to textures shortly):
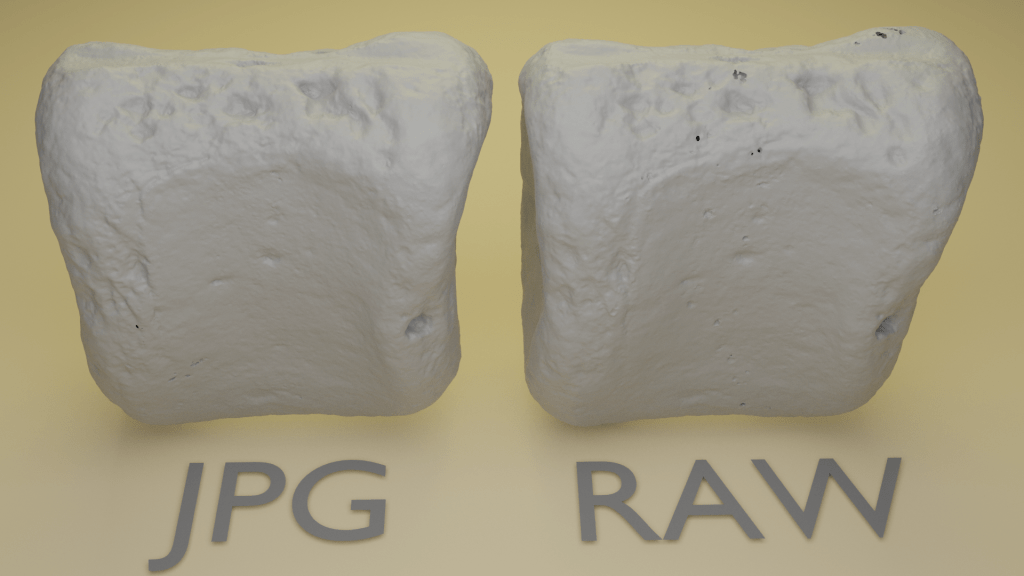
The models are almost identical. A couple of odd dimples on the front face of the RAW model, and some triangles with reversed faces at the top.
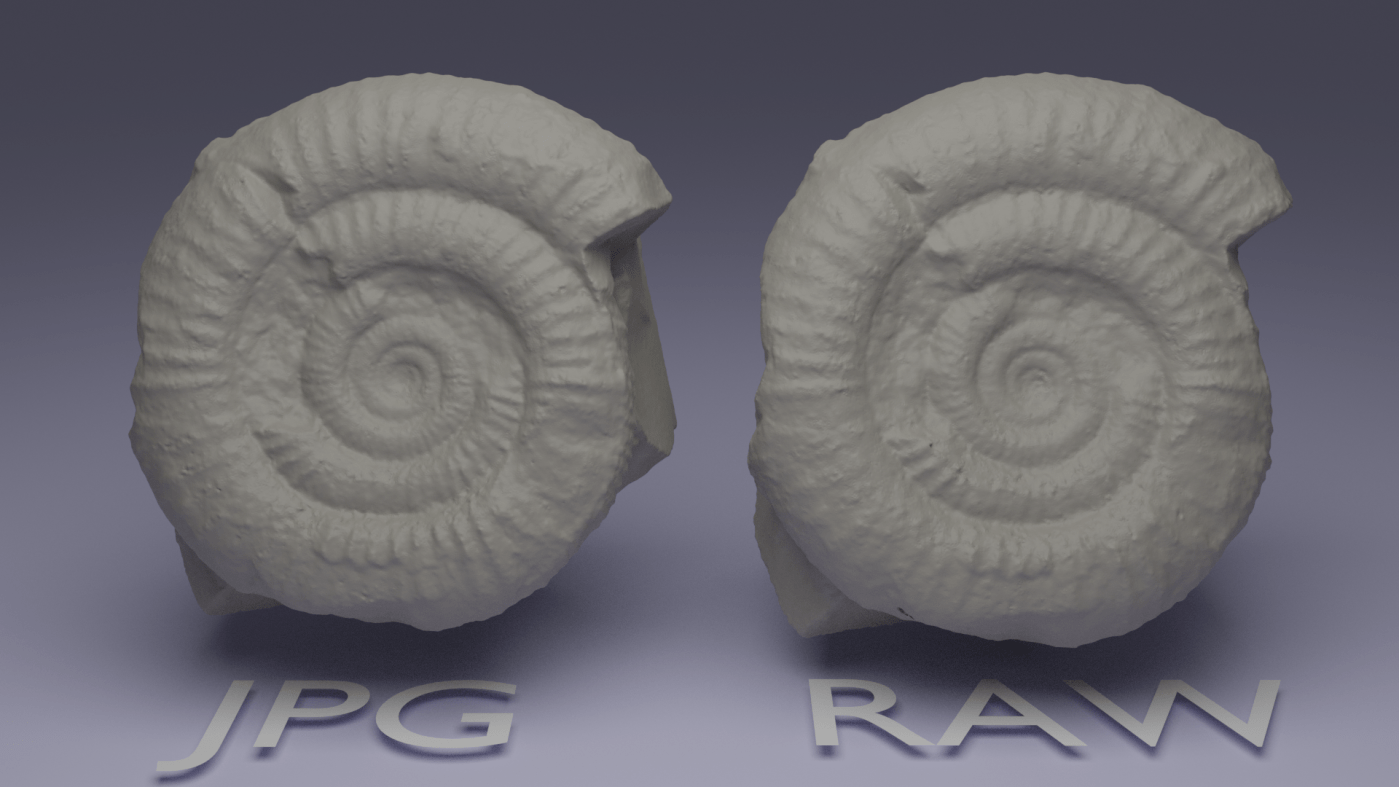
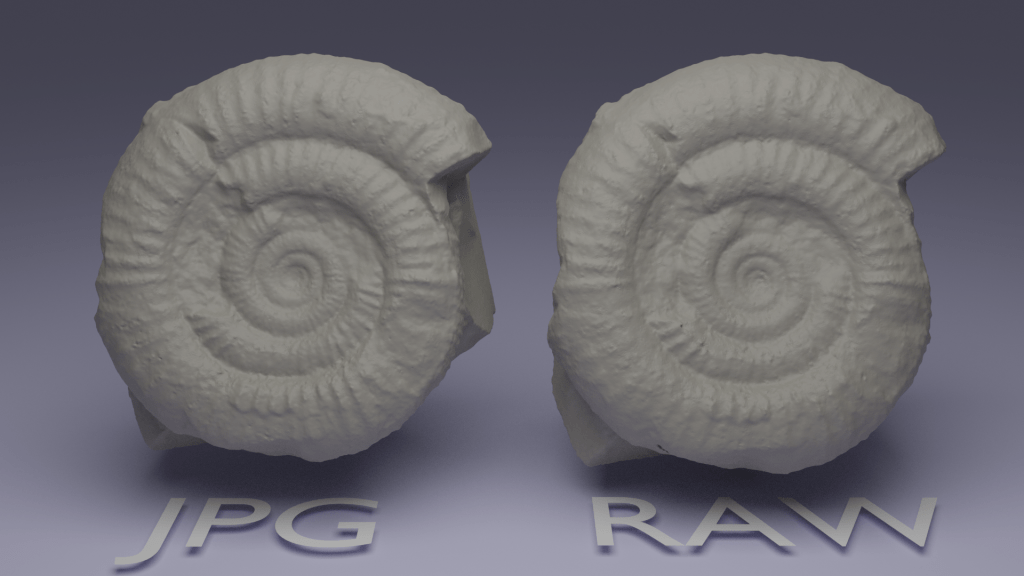
The same holds true for the Ammonite:
Texture Quality
There were some major differences in the contrast of the textures. Let’s start with the vertebra:
Clearly, the RAW photos produced a texture that is darker. I like it more aesthetically, but is it more accurate? Hard to say, because the colour of the specimen in-hand differs in different light conditions. I’d say the RAW model is closer to what the specimen looks like when I’m holding it in a normal-lit room, and the JPG-generated texture more closely resembles what the specimen looked like in the light box. I guess in that regard, the JPG texture is more accurate?
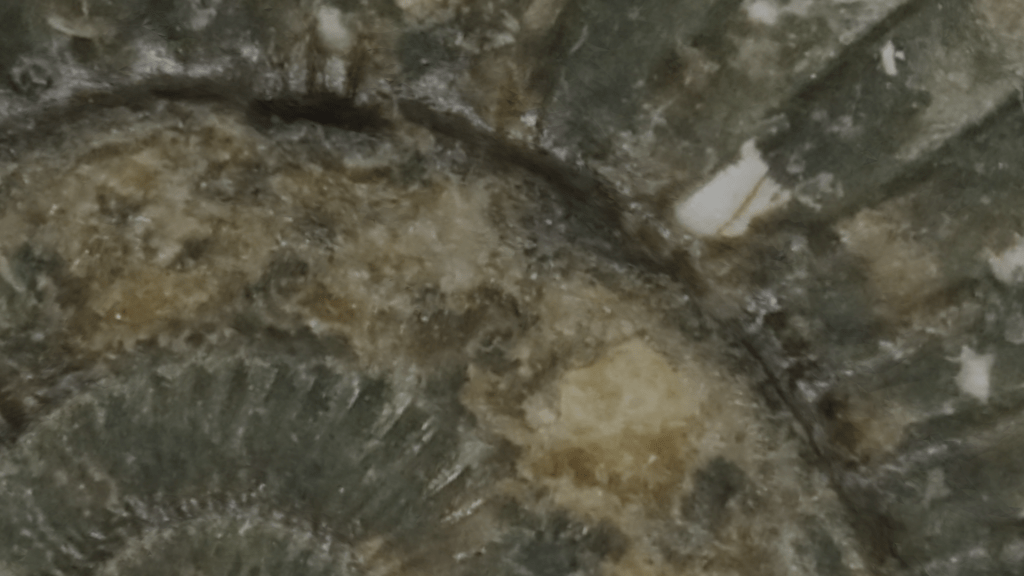
Both are very well detailed textures as can be seen in these closeups (of the middle of the bone, as show in the image above):
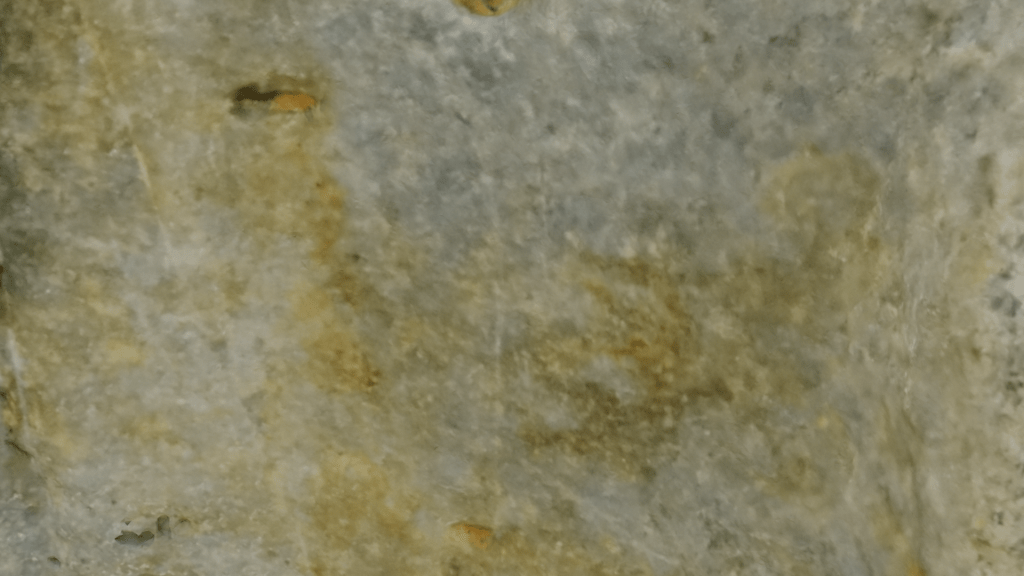
JPG Texture 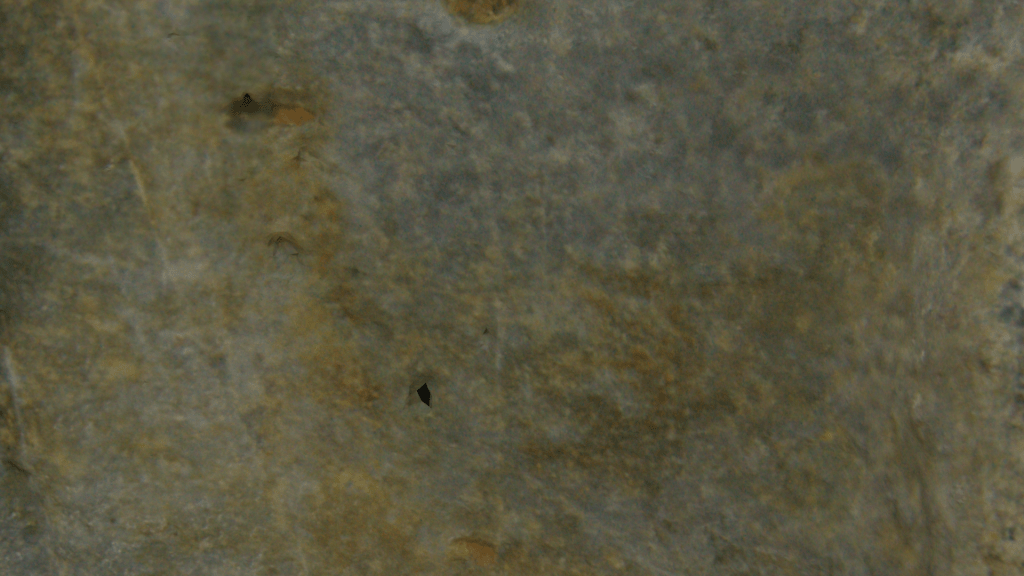
RAW Texture
Below are the texture files. Unfortunately, the texture map was calculated differently for RAW and JPG, so they are hard to compare.
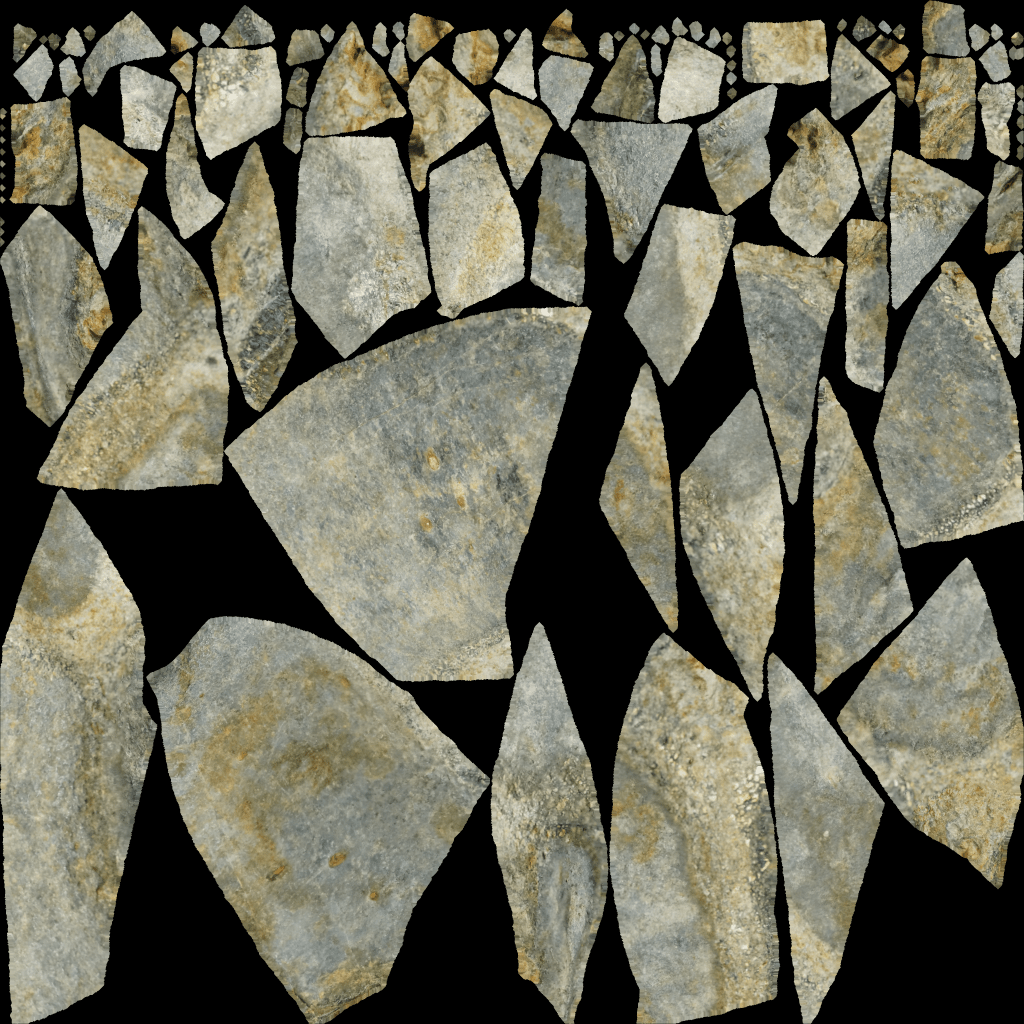
JPG Texture 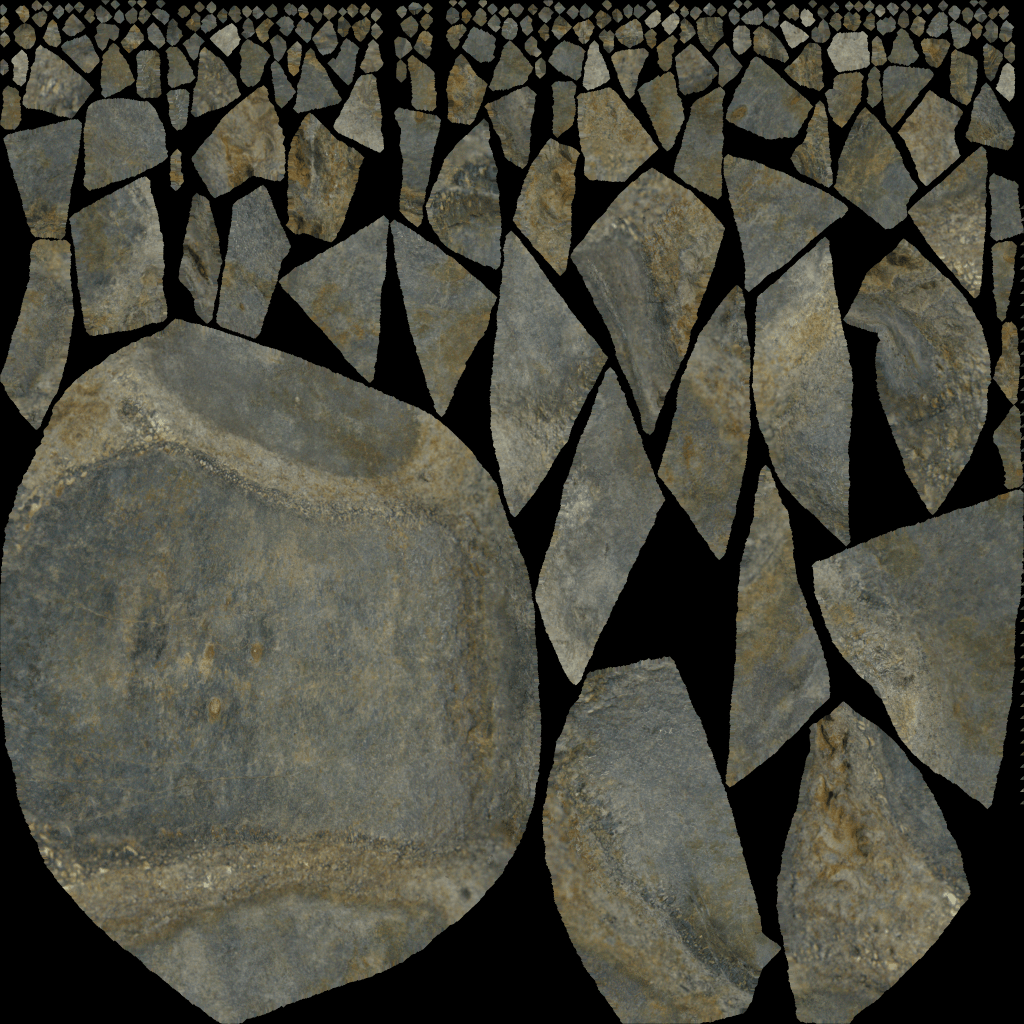
Raw texture
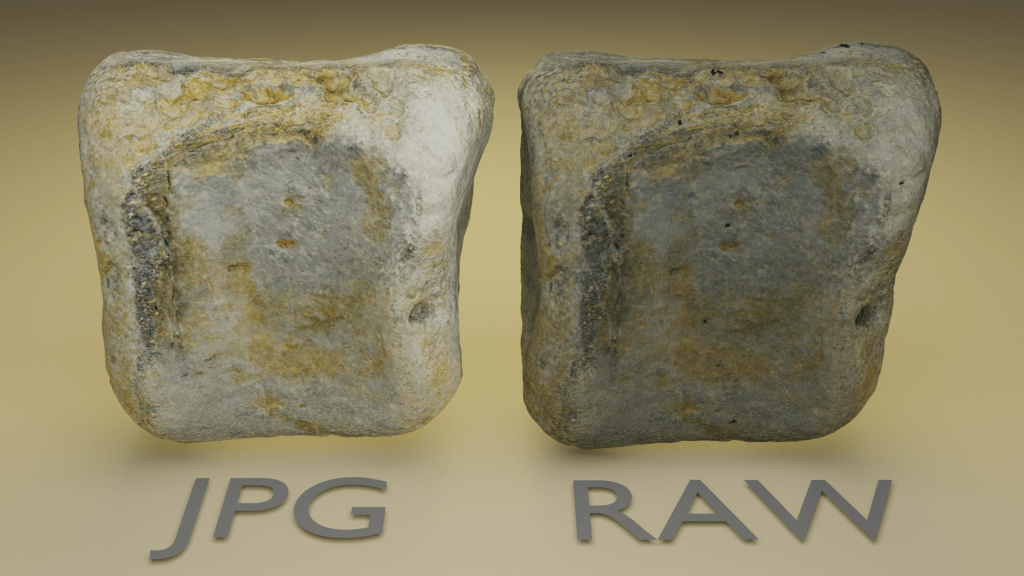
And here’s the Ammonite:
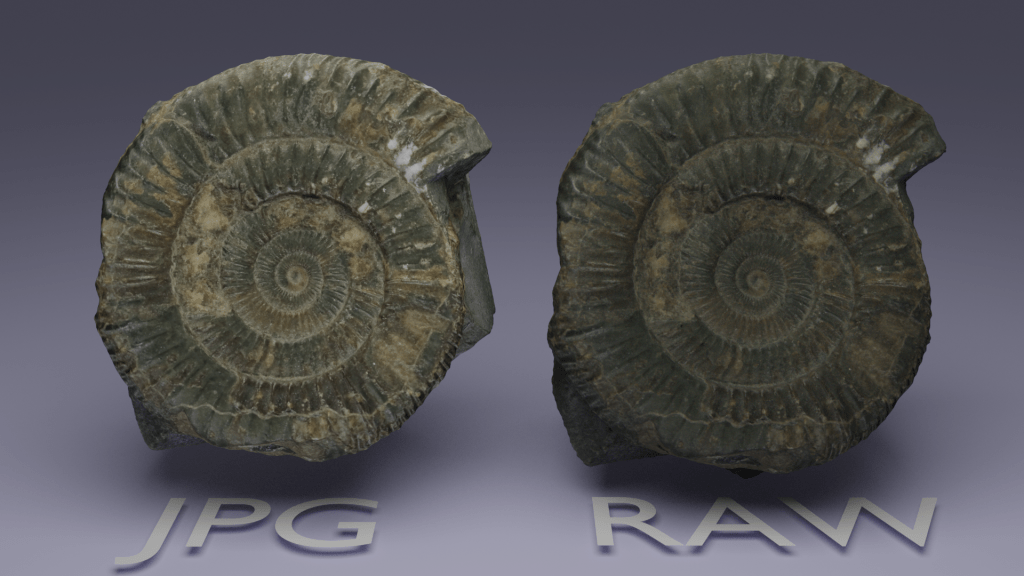
Just as for the vertebra, the RAW images produced a darker texture, possibly a bit muddier in this example, but ultimately just about as detailed:
JPG Texture 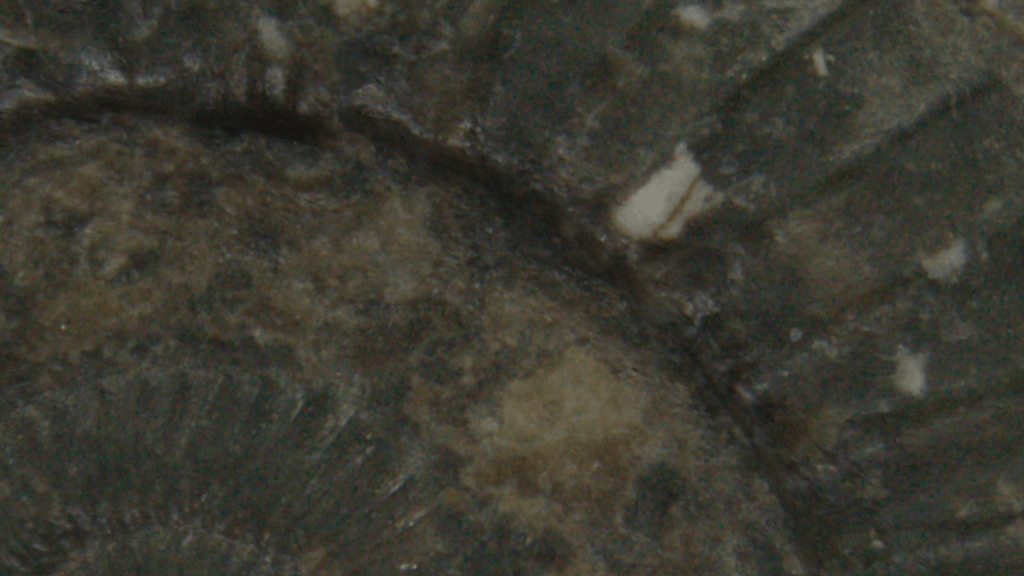
RAW Texture
I think I’d say the RAW texture is noisier.
Again, here’s the texture files directly:

RAW Texture 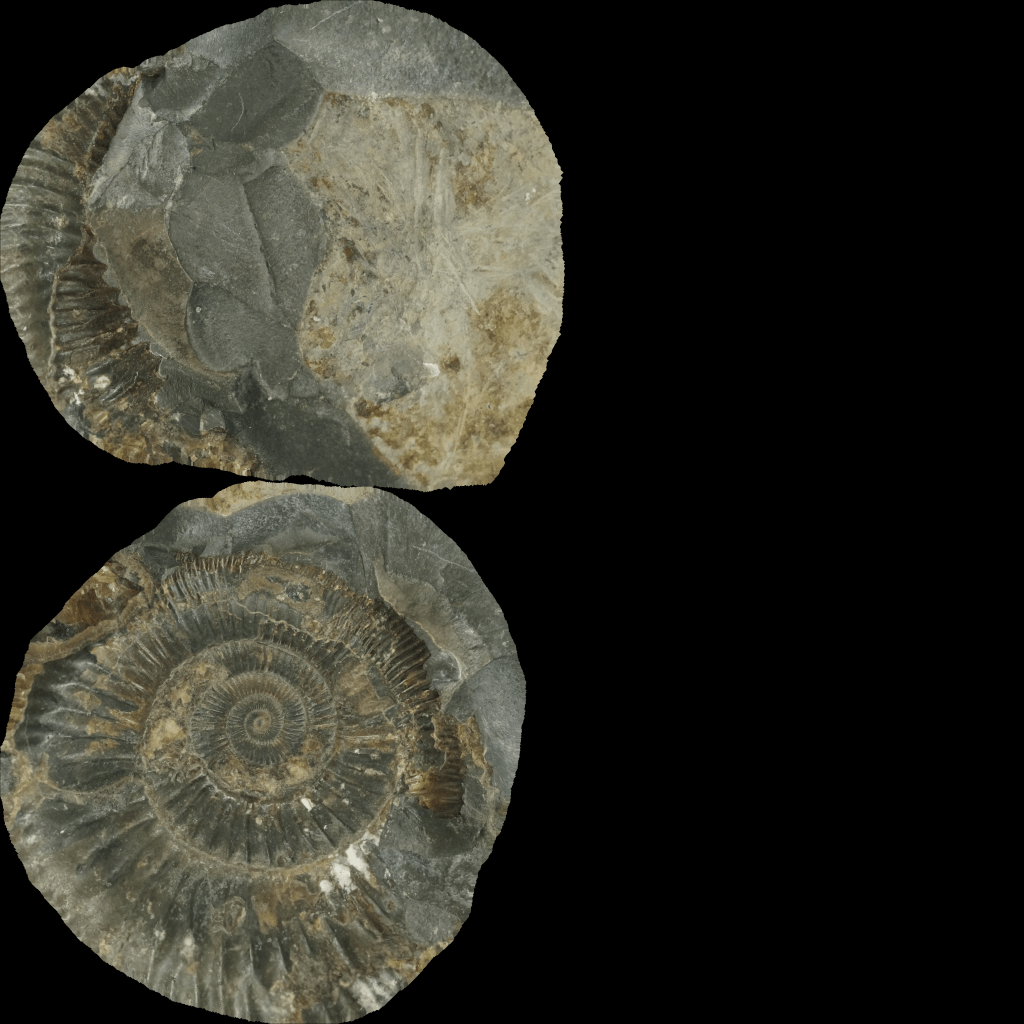
JPG Capture
Caveats:
Before I summarise, I want to cover my back and address a couple of glaring issues. First, this test is just on close-range photogrammetry. I don’t imagine it would be that different, but Drone or large-scale photogrammetry might behave differently. Secondly, The set-up was reasonably good, and I took half decent photos to start with; both specimens were in a light box, and had good contrast against the background. Dark objects against dark backgrounds (or light against light), or poor lighting set-ups with low contrast might benefit from shooting RAW more. Thirdly, this test might only be applicable to Sony cameras – different vendors treat JPG conversion differently, and may lose or retain more detail. Finally, my textures are high res, but not extreme. If you’re producing 8k or 16k textures, you might find the differences more pronounced.
As I mentioned at the beggining, I wasn’t able to load the RAW files directly into Metashape, so can’t confirm if what we’re seeing here is unique to Meshroom.
Summary, and the Pros/Cons of shooting RAW vs JPG
Ok, so this simple test shows RAW photos process a bit quicker, make meshes of about the same quality, and produce textures that maybe have a touch more noise than models made by JPGs, but perhaps a nicer colour.
Advantages of shooting RAW:
The main advantage of shooting RAW, as I see it, is that you can recover more details from photos that lack contrast, or were poorly lit. Ideally through batch processing, but individually if necessary (though you can do this, albeit to a lesser extent, with jpgs). Your original data is also potentially more robust – it’s lossless so you’re not losing something every time you open and save, though this isn’t a huge issue for JPGs if you’re not editing them.
Processing models from RAW images seemed to be noticeably quicker. Whether that 10-20% speed up is worth it to you in exchange for the downsides listed below is up for debate.
Disadvantages of shooting RAW:
File space. That’s about it, but it’s a big one. The JPG datasets for the Ammonite and Vertebra were 918 MB and 0.99GB respectively. The RAW datasets were 4.9GB and 4.98GB, so about 5x bigger. I have hundreds of gigs of photogrammetry datasets going back a decade, and if they were all RAW files, I just wouldn’t have the space to store them. I know that storage space is constantly increasing, but so is the speed of photogrammetry software, so I’m taking more photos. I’ve made the case twice in the literature (once in Davies et al 2017, and again in Falkingham et al 2018) that when publishing photogrammetric data, the model and the original photos need archiving. Many of my JPG datasets are already pushing the limits of Figshare, Zenodo, and other data repositories, and are already difficult to share with colleagues over home broadband connections.
It’s also not just the dataset – the cache folder Meshroom produces was also several gigs larger for the RAW datasets.
Handling, processing and archiving datasets 5x larger for a very minor increase in speed and the ability to recover details if photos are murky isn’t worth it to me. Far better, I think, to shoot JPG and just make sure you take decent photos to start with.
I say this in full knowledge that future Peter may well look back on this day, surrounded as he is by a bunch of irreplaceable photo sets beset by JPG compression artefacts, and curse past Peter for not saving everything in RAW.
You can compare the models here:
And finally, here’s a little render of the Ammonites, because why not?
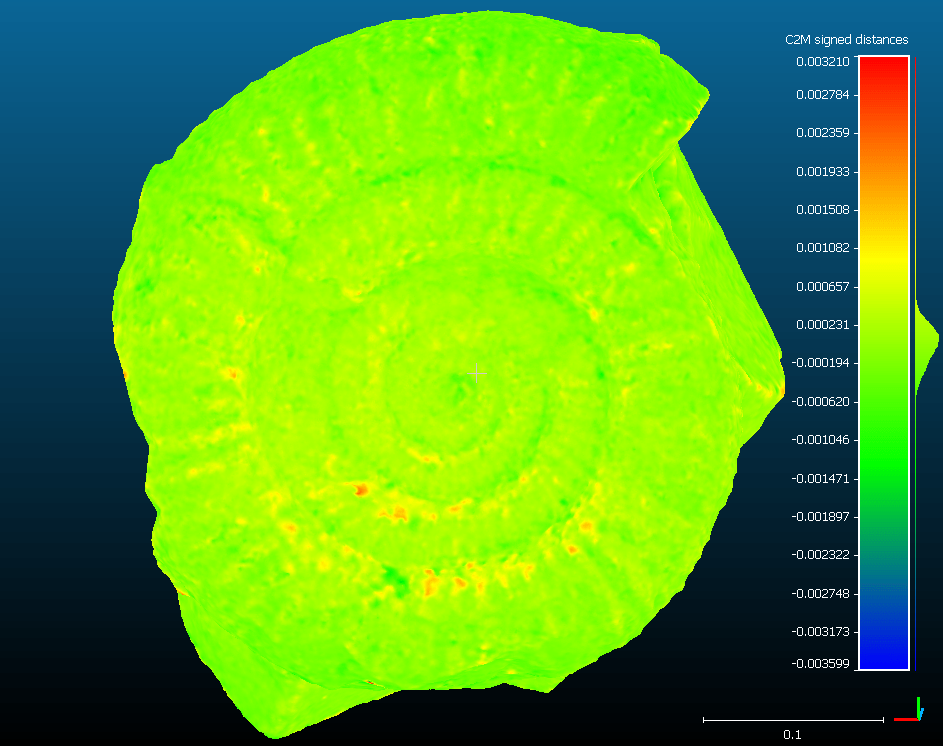
[Edit] Llion Evans commented below on what the difference between the meshes looks like. I put them both in cloud compare to see. I haven’t scaled the model, but you can see that differences between meshes are on the order of 0.0002, if the ammonite is 0.4 units across.
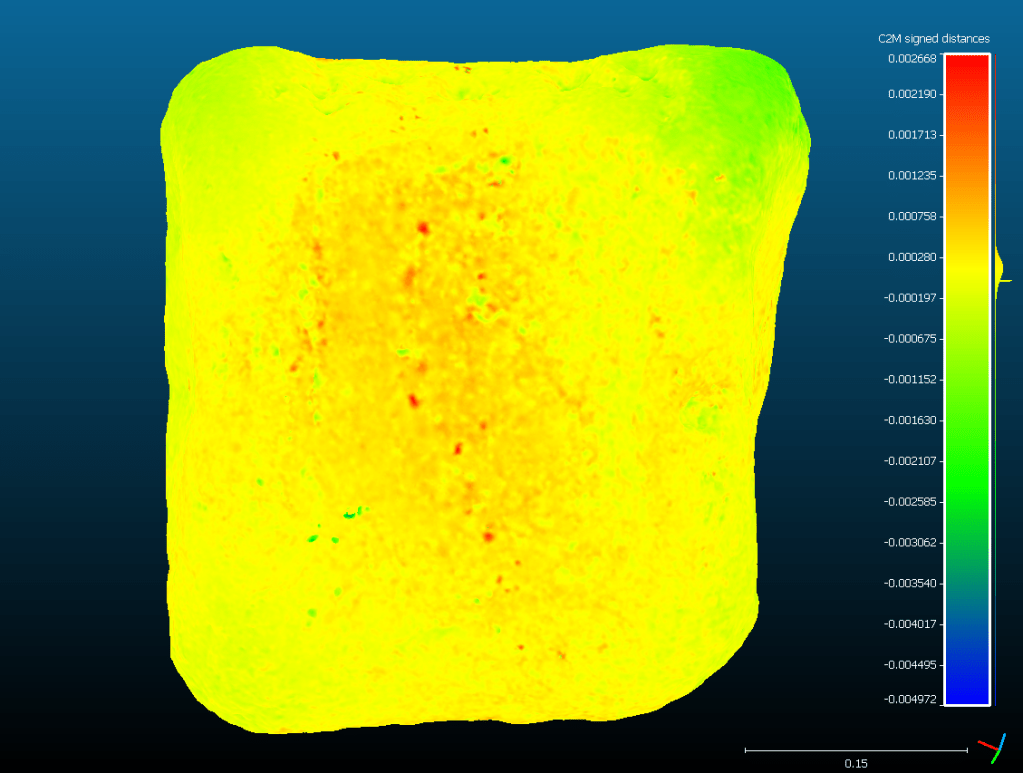
And here’s the Vert, same scale of difference between meshes:

Hi Peter,
another interesting post i see. I have 2 things to add here.
1) File size – nobody said that after a 6 months we can’t convert RAW’s into jpeg or even better HEIC (I use xnview for that batch conversion )
2) RAW’s are essential when you connect two part model – to create for example whole stone without missing one side. JPEG’s create visible seams – especially when you are not masking pictures from background – if you use white, then there will be white halo around it.
Absolutely correct on point 1 – but the problem for me is I’m low on space _now_, and need to keep both photos and cache folders under control.
Point 2 I’ve not experienced. My next poste will be on merging two halves of a model – I’ve never had the issue with visible seems. Why would that be different for RAW files? In your example, PNG can also hold transparancy,
If using Metashape, change it to use lowest intensity, rather than average, and it’ll ignore those white pixels and get rid of your seams.
I think because program during texturing pick most similar colors to average for that pixel and because its RAW, such file contain more information. I was processing around 15 models for museum (picture above shows one of them) and such raw vs jpg/png was confirmed for me in other few cases (3 if i remember correctly).
In my experience, some data won’t align when using jpg but will when using the raw files. Better signal to noise ratio making a difference is my take on those cases. There is also an argument to be made about accuracy, not just alignment accuracy but color acuracy. For many application the albedo color accuracy matters, and color correcting with jpg as source is not possible due to the lossy chroma compression. Another point: future developments in photogrammery software could make it possible to get more useful data out of raws. And lastly pre-processing the raws could help get more out of them, the jpgs out of camera has had sharpening and color and contrast adjustments applied in camera.
Do you not have noise in RAW files? I find the JPGs tend to smooth out the noise. Certainly in this dataset noise seemed greater in the RAW files. Whether that smoothing helps or not (it seemed to here) is another matter, and probably depends on camera algorithms.
I certainly agree on pre-processing the RAWs to get more data out, and cover that at the end, but for datasets with 100’s or 1000’s of photos, that’s not always feasible.
I’ve never experience data aligning with RAW but not JPG though. Do you have a sample dataset you can share where that happens? I’d be interested to see what causes it.
I try to always shoot at the lowest ISO my camera support, to keep noise at a minimum. But yes there is noise in RAW files regardless. If de-noising images is advantageous or not for alignment is a good question, on the one hand it could perhaps improve the signal/noise ratio but on the other hand it could introduce artifacts that confuses the SIFT algorithm. It would be interesting to shoot a data set at ISO 800 for instance and then compare denoised TIFFs to non-denoised TIFFs. Maybe an idea for another article? 🙂 Regardless of outcome I’d argue that there are better denoising-solutions out there in thirs party programs than what most cameras can produce, and that if you shoot in RAW you can control this aspect as you please, whereas with JPG you have less control. I should mention that I’ve also done some experimentation with mobile phone JPGs vs RAW and the difference in accuracy for me has been more pronounced with those tests. I initially thought it was due to the aggressive denoising done on the phone, but now I’m wondering if the phone perhaps also do other “tricks” that introduce artifacts which might also contribute to the difference.
I wrote my previous post on mobile so it was a bit rushed. I see the point regarding size and time, but I’m still firmly in the RAW camp. It’s a question of time and money when we’re talking photogrammetry for personal use or in a commercial setting. In an academic setting however there are other issues, and it’s an interesting debate to have. I agree with you 100% that data sets should be made available when publishing papers, and any data is better than no data. But I also think there are arguments to be made for striving to supplying lossless data sets.
Anyways regarding data sets where RAWs align but JPGs don’t I can send it to you. I’d be happy to release it as a public domain data set as well so anyone can use it. I’ll get in touch over e-mail later today to send you the links.
Hi
This post reminded me of this recent paper: Influence of Image TIFF Format and JPEG Compression Level in the Accuracy of the 3D Model
and Quality of the Orthophoto in UAV Photogrammetry
https://www.mdpi.com/2313-433X/6/5/30
These posts comparing various things are really helpful and informative (sometimes with surprising results). Please keep it up!
As someone who dabbles in photography (but not much photogrammetry), one big distinction between jpg and raw is that jpg are processed in camera (white balance) etc. whereas the expectation with raw is that you’re shooting in this because you want control and are absolutely planning to do this in post-processing. I would never share one of my raw photos without any processing as they look dull and somehow off, the untouched jpgs look better. But once I’ve tweaked setting on the raw there’s no comparison. Maybe you could look at this to improve on the ‘darkness’ you saw with the raw reconstructions?
Secondly, any plans to overlay the image data to see how they differ quantitatively?
Thanks Llion. Yeah, deffo the advantages to RAW lie in post processing. I’m happy with Sony’s JPG algorithm- it generally shoots JPG how I’d process the RAW files to look. Big advantages in low contrast shots though.
I considered comparing the models, but i dont have a ground truth to say which is more accurate, so could only say where they differ, which i didn’t think was that useful. Maybe it is… I could knock that up in cloudcompare this afternoon.
I’ve just added an edit to the blog post with an image of mesh-mesh distances.
Hi, nice post, reminded of this recent paper: Influence of Image TIFF Format and JPEG Compression Level in the Accuracy of the 3D Model
and Quality of the Orthophoto in UAV Photogrammetry
https://www.mdpi.com/2313-433X/6/5/30
Thanks – I haven’t seen that one. It’s really useful – and interesting to see they found JPG to be
I recently finished writing my dissertation on budget photogrammetry for creating game characters. I wish I could have read this when writing my literature review! Some really handy information in here :).
Hey Connor!
Is it possible to read your dissertation? I’m quite interested! I’m a game artist student and currently working on my graduation project. (Building small cardboard pieces and using photogrammetry to make a small interactive scene in Unity)
I try to keep it budget too. Using my mobile phone, a lightbox (build from cardboard and tracingpaper) and Meshroom.
I’m curious what you wrote!
Hi Marijke,
Here’s a drive link to download the pdf for my report. I’m new to photogrammetry so I used ReCap Photo to make it easier on myself. I also don’t know much about photography so it doesn’t go too in depth into camera settings and such, but I hope you find something useful to you in here.
https://drive.google.com/file/d/17LFUphFgEyCIG9MAhEF3nvawVrhdg3_n/view?usp=sharing
Nice article! The reason why raw is darker is because raw is linear cokor space while jpg is gamma 2.2 to render jpg texture correctly you have to make it linear too. From my experience, raw is way better, because I can fix exposure and rebuild the model. This helps sometime sfor better model calculation.
Next thing is that you took a super easy models for test. I mean they are full of features, so there is no big difference. Jpg not worked for me when I was shooting while shiny marble in museum. Raw can handle it way better. I was on Nikon 810 50mm. I would say it is a good option to onow, that on easy objects you can grab jpg and this will work. Thank you!
Very interesting article, I was always told to use HQ photo like raw or tiff, and to avoid compressed formats like JPG. I never tried myself, but this change a lot of things.
Is it somehow possible to have the JPG set of photo of the ammonite? I would like to make some test as well, just for practice.
Hi Alex. I think it varies a lot from Camera to camera. I find the JPGs out of my Sony are pretty good, and make great models. You’re welcome to the dataset – this like will work until 30th.
JPGs: https://1drv.ms/u/s!Am5GkbZS_98XtI0zURb2EPHGgcQvUg?e=rbhgge
I don’t have the RAW images however, as I just don’t have the disk space to store them (so they got deleted shortly after this little test).
Thanks Peter, the jpgs dataset is more than enough!
As mentioned in other comment, the main difference is the gamma. Raw looks darker as it it is likely display línear, whereas jpeg is always gamma 2.2.
When bringing the textures generated from the raw files in blender, the texture should be interpreted as linear, not as sRGB.
IMO, if you use JPEG at 100% quality, it should be almost as good as RAW … im most cases, where light are good enough.
For mushroom, I do not know if it handle RAWs in the full way (in 16 bits mode), else it would be just as good as the JPG.
If you need to recover highlights and shadows in a preprocess RAW would be better (preprocess is like a standard photo editing).
In the DTU Robo benchmark there are data sets for different lighting, It could be interesting to either fuse the different lighting to do an HDR TIFF (16 bits), to see if it’s better or not.
Thank you for all your testings !
Thanks. Yes, having the ground truth would be good (but also challenging to obtain). However, I think this straightforward comparison is still helpful to see the variance between them (even without knowing which is correct).