
**update 21/2/19: Not only has Dremel moved to a waaay better slicing software (based on Cura), but the latest firmware (v1.5, 20180611) has enabled standard *.gcode support for the 3D20 model. Finally…**
Last year I got hold of a Dremel Idea Builder 3D printer. It’s been great, and I’ve been able to print a range of animal bones for use in practicals – students can all get exact copies of the same bone and it doesn’t matter if they break them. I’ve been really impressed with the quality of the prints so far, but one area that the machine does disappoint is in the software.
The Dremel Idea Builder itself is a re-branded Flashforge Dreamer. However, annoyingly the dremel does not accept standard gcode files, instead it only reads it’s own proprietary *.3gdrem files.
This wouldn’t be too much of a problem, except that the software the printer ships with, Dremel 3D, is incapable of adding supports and rafts, features which are pretty much essential for most prints. Dremel support suggest using Autodesk MeshMixer, or PrintStudio to create supports, but these pieces of software create branching, tree-like supports:

Now I’m told that these supports use considerably less plastic that the traditional scaffold. Unfortunately, I’ve generally had terrible results using them, and the result is usually a model that fails, particularly for complex, organic objects like bones that have no good flat end for attaching to the build plate. For a while I got around this by slicing the model in half, creating a flat surface, and then printing both halves separately before gluing them together. This is less than ideal – firstly, it’s an extra step that needn’t be there. Secondly, I found that trying to print both halves at the same time resulted in significant curling at the build front on one while the print head was working on the other, with the curling usually ending up catching on the print head and the model being knocked over. It’s worth noting that aside from forcing this style of support, MeshMixer is a pretty decent piece of software.
I searched for some time to find a piece of software that could create scaffold support and output a *.3gdrem file, but it was not to be. Actually 3D Builder, which comes with Windows 10, is great, and can produce excellent supports and rafts, but for some unknown, infuriating reason, it sends the files to the Dremel and sets the print temperature to 215, which is too cold and the builds generally fail (The Dremel normally prints at 220).
So, after much tinkering (a favourite pastime of mine), I came up with the following solution.
!!!WARNING – ITS ENTIRELY POSSIBLE YOU CAN EXPLODE YOUR DREMEL IDEA BUILDER – DO THE FOLLOWING AT YOUR OWN RISK!!!
- Download Craftware
Here’s the link: https://www.craftunique.com/craftware
This is a pretty comprehensive free slicer for 3D printing.
- Import your model (drag and drop works for me)
Not a lot else to say here….

Make sure your options (1) are set as below (this makes sure the build platform is the same dimensions as the Dremel Idea Builder) – make sure 0,0 position is set to centre, not front left, and then head to supports (2).

- Create supports
By hitting ‘’Auto-Generate Support”. You can tweak this to enable the raft, or change the angle that requires supports, but I think to start with the defaults were fine (maybe I tweaked angle to 45 degrees). This is what that looks like:

- Slice it!
Hit the slice button and slice that model. You’ll now see a lovely model with scaffold-style supports. You can view each layer with the slider at the bottom of the screen, and follow the path of the print. Take note of the top right, where you can get info on length of filament and estimated time – it’s important to note this as you won’t see it again (as we’ll see below).

- Get the G-code
Hit the save button and save the Gcode somewhere.
- Now mangle that Gcode into 3gDrem.
In my simple little world, I tried just opening the g3drem file in a text editor, hoping to see what was different from standard g-code. Unfortunately, the first part of the file is in binary, and you can’t just copy and paste it into the G-code file we just produced.
What you can do is copy and paste the other way. But to do this you need two things:
- A text editor that will let you open a file with Binary in – Notepad++
- A previousle made dremel 3D *.g3drem file. I think any will do.
Then you open the g3drem file in notepad++, and you open the *.gcode file in another pane:
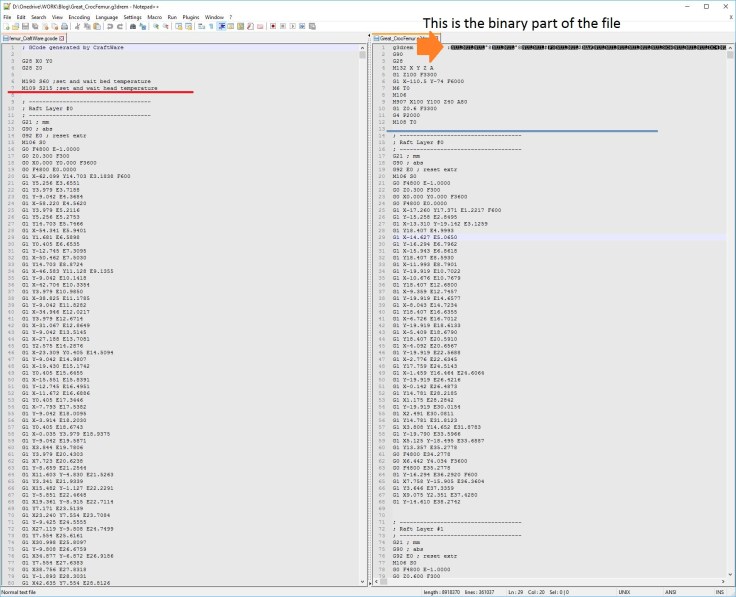
Delete everything below the blue line in the *.3gDrem file, and copy everything below the red line from the *.gcode file into the *.3gdrem file.
- Check it looks reasonable and send over to your dremel.
Open the file in Dremel 3D and check it exists in the correct world space, on the build platform. The plastic length and time to print will be calculated based on whatever model you used to make the dummy 3gdrem file, so just ignore them. You can now send it over to your Dremel Idea Builder.
Congratulations, you’re now able to build complex objects with scaffold-like supports:
In retrospect, this will probably work for Gcode files produced by 3D builder… I’ll have to try that soon, as 3D Builder is a really easy to use piece of software.
**Update 8/9/17**
I found this forum post, which contains a script for automatically wrapping the gcode with the binary headers needed for compatibility with 3gdrem

Hi! I finally got around to trying your trick and my dremel seems to dislike the result. Has the process changed since this was made? My goal with it was to get NinjaFlex to work with my printer. Let me know what you have found!
Thank you!
Hmm… process is still working fine for me. If you have a sample file you’d be willing to share I can try and give it a go for you. What error do you get with the dremel?
By ninjaflex, do you mean the flexible filament? No idea if that will work or not, and I don’t see the type of slicer making a difference (presumably temp/speed is important to control?)
My dremel file looks nothing like your dremel file do you know how to fix this.
Hi,
You’ll need to give me a bit more info than that to help. How does it not look like mine? What does it look like? You are opening it with Notepad++ and not just notepad aren’t you? (Notepad cannot display binary files).
2017 and i got it to work thanks it helped a lot
Hopefully you can help me🤔. I got the code page all setup but I can’t figure out how to send it to the Dremel program. It keeps saving it as a text file and ‘save as’ options do not show any .3gdrem options
Just change the extension in windows explorer (make sure you’ve got extensions set to visible), or set the save-as drop-down to *.* and type it in as the saved file’s name.
Hi! I’ve been reading through your tutorial for doctoring the remodel G-codes but I keep going back to your disclaimer at the top. What potential for damage is there when using this technique to alter the G-codes? Is it possible instead to generate the supports and export the model back out like meshmixer does?
Currently, my problem is two-fold. My G-codes produced with dremels program using the tree-like supports from meshmixer seem to be triggering some conflict that’s causing the file to start by dropping plastic particles on the build platform at the start of the build, and as the extruder goes through the motions and gets higher up it stops extruding entirely and seems to be acting like it’s clogged. When I load a simple 4-sided dice model into it that takes roughly 15 minutes to print, it works just fine. Also, as you’ve stated in your tutorial above, the trees tend to fail under certain conditions which makes them just suck.
Seriously, I think I’ve wasted more plastic with the trees failing and messing up the model overall than I would with the scaffold supports. my hangup is your disclaimer at the beginning in red because I really don’t want to damage my printer.
That’s a slightly over-the-top disclaimer – I can’t actually envisage how it could mess things up, but it’s there just so people don’t try it, break their dremel, then blame me!
You’re right – I was in the same boat, I felt the meshmixer tree-supports were failing more than they were working and any savings in material just weren’t worth it.
So to answer your questions: I don’t _think_ there’s any major damage can occur [but the warning’s there!]. Not sure what you mean by exporting the model back out from the G-code – once you have your scaffold/model G-code, you can’t get just the model out again (I think).
I tried to apply supports to a model through the craftware program and then went back one screen (which shows the ghosts of the supports) and tried to export the model with those ghosted supports. it didn’t work. I loaded the model I exported out back into the dremel gcode generating program, but the craftware supports were not there.
Now that I think about it, you probably already tried that, which is why you have to open the gcode in other programs and do some editing…
I will certainly give your tutorial a try now that I understand your warning there. Thank you for the quick reply!
I’ve been using this amazing guide for a couple of months. A great work around, if a little labor intensive. However, I just discovered that the Dremel 3D40 does in fact read standard gcode. I just tested my first print using the new-ish Dremel DigiLab 3D Slicer software (digilab.dremel.com/software), which only exports gcode, not g3drem, and it turned out great!
Digilab looks great, but I’m gutted it doesn’t work on the 3D20!
Hi –
I wrote a plugin that allows Cura to export .g3drem files specifically for the 3D20 and you get all the support options (lines, grid, triangles, zigzag, tree, etc…) that Cura has embedded in it:
https://github.com/timmehtimmeh/Cura-Dremel-3D20-Plugin/
Indeed you did, and thank you so much! I was extolling the virtues of this on Twitter a couple of weeks ago: https://twitter.com/peterfalkingham/status/973950531298263040?s=20
Will be referring to it in a post coming up. Again, thanks so much; being able to use Cura instead of that nonsense from Dremel is a god send.
Dremel has provided a more advanced slicer which includes supports and rafts called Autodesk Print Studio, and it saves into the *.3gdrem file format. It can import from .stl and a few other formats.
The website says it doesn’t work with windows 10 creators’ update, but i haven’t had any problems with it so far.
https://dremel3d.at/pages/software
Last time I installed it (a couple of months ago) Print Studio still couldn’t do scaffold-style supports, only the rubbish tree-based ones. I haven’t had a lot of luck printing complex objects with that style of support.
I’m also using a 3D20. I have the new firmware and the Digilab slicer … but can’t get the slicer to print directly (apparently that’s only for the 3D40 and 3D45), nor to export .3drem files that Idea Builder can print. In the end, I installed Cura – which has a totally unofficial plugin for the .3drem 3D20 file format.
Yeah, the new firmware makes the 3D20 accept normal *.gcode files, which can be produced in anything.
I was using the plugin and Cura for a while, which was great, but I ran into issues when updating Cura and having to wait for the plugin to update. The new Dremel version of Cura is pretty good, and has a ton of options not necessarily available via the plugin.
Any ideas why I can’t see build timed on my Dremel 3d20 when I make my own g-code files? I can see a build time on the files that come preloaded on the SD card but none of the ones I make.
Yeah, for some reason that doesnt translate over. But if you use the new dremel software based on Cura i think time is properly included.
Im using the current software and i do see the time of the print and the filament usage in that program, i was just wondering why it did not show up on the touch screen of the unit like the preload files. But now i know where to look.
I have tried this but every time I load into Dremel 3D the item is floating in mid air is there anything I can do to rectify this.
Are you using the new software from dremel based on cura? https://digilab.dremel.com/3d-software
Yes but everything is floating in mid air and I’m unable to get it down to the bed
Interesting – in my version, I can’t keep things off the build plate. Have you tried going to rotation and clicking ‘lay flat’:

I can’t only get the 3gdrem file to open in idea builder and not the 3d slicer program
Ah. Once it’s a 3gdrem, I don’t think it can be altered – that’s the sliced file. You’ll need to go back to your original 3d CAD/scan and re-slice.
In which program
You can use the Dremel 3D slicer I linked to, but you need to bring in the original file (*.stl/*.ply/*.obj), not the 3gdrem.
Argh please help, I have just bought an as new Dremel 3d20 but can’t find drivers to connect it to my windows 10 machine, it is running the original firmware and I would love to update it but can’t , even tried taking the micro sd card out and seeing if I could flash from there but no joy,any ideas out there please
I can’t help I’m afraid – I never run it from the Windows machine, I just slice on the computer, then copy to an SD card and move it to the printer that way. The printer and computer aren’t hooked up to each other.