I covered Meshroom back when it was version 2018. Shortly after, I wrote about trying out all the settings.
It’s been over a year and half since then, and in that time Meshroom has become my default photogrammetry software. I’ve got into a habit with changing the default graph, so wanted to share the settings I use/changes I make. Remember, Meshroom is super easy to use – drag and drop your photos into the left pane, change any settings you want on each node, then press start. When it’s done, right click the last node and click ‘open folder’, and you’ll find your mesh and any material/texture files in there.
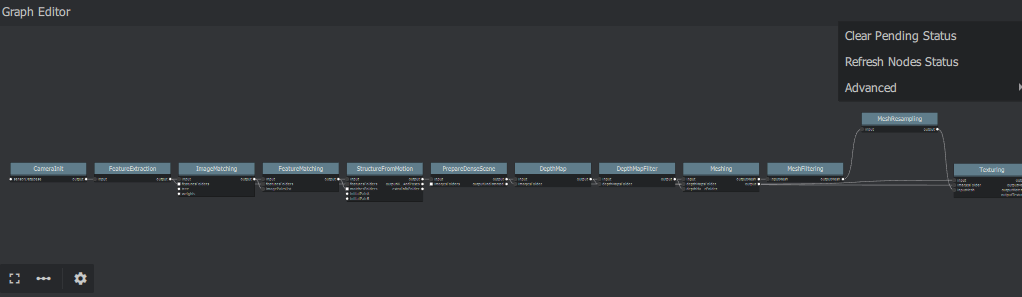
Here’s what my graph looks like:

I’ll run through the graph from left to right, highlighting what values I tend to change. Some of these are settings are found if you enable advanced attributes by clicking the 3 dots at the upper right of the attributes box:
CameraInit: No changes (though I have in the past manually edited the sensor database if my camera wasn’t found).
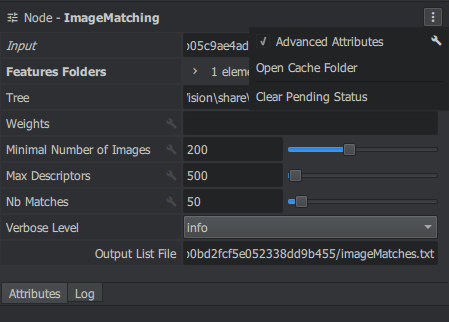
Feature Extraction: If I’ve got a dataset with less than 200 photos, I untick ‘Force CPU Extraction‘, so it uses the GPU. The reason GPU isn’t used by default is that if the dataset has more than 200 images (or whatever value is set for ‘minimal number of images‘ in ImageMatching), then it’ll use a matching tree, rather than matching all photos. As that tree hasn’t been trained with features extracted by the GPU, it’s not guaranteed to work. Using the GPU for Feature Extraction doesn’t really speed it up much, and I don’t always remember to uncheck it on small datasets (which are quick anyway).
ImageMatching: No changes.
Feature Matching: Sometimes I enable Guided matching, which takes longer but does often result in more complete reconstructions. I tend to only enable if a first pass wasn’t great.
Structure From Motion: No changes
PrepareDenseScene: No changes
DepthMap: No changes.
DepthMapFilter: No changes.
Meshing: No changes.
MeshFiltering: I enable ‘Keep Only the Largest Mesh‘ – this gets rid of all the floating extraneous crap. Almost always keeps the mesh you’re interested in.
MeshResampling: This node doesn’t appear by default, you need to rick click in the graph area and add it. You can see in the image below that you need to hook up meshfiltering to the input, and put the output into the inputmesh of the texturing node.
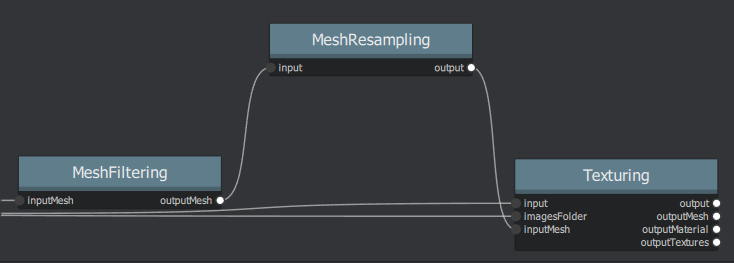
What this node does is it retopologises the mesh so that all the triangles are approximately equal in size. Don’t use this is if your mesh has areas with very large polygons outside the area you’re interested in, because you’ll lose a lot of detail in the bit you are interested in. I normally set the simplification factor a bit higher than the default 0.5 – around 0.8 (meaning triangle count will be 80% of what came out of MeshFiltering). You may also find you need to flip normals, as it can produce meshes with normals reversed. This issue means it can be difficult to stick MeshResampling into an automated workflow, and I only use this node about 50% of the time.
Texturing: I change Texture Side to 4096 (usually. Sometimes I’ll go for 8 or 16k textures if I really need the resolution), and Unwrap Method from Basic to LSCM. Basic texturing will produce multiple texture maps on a large mesh, which is a pain for asset management. I prefer a single texture, so use LSCM, but note this does use more memory and takes longer, particularly on large meshes (the tool tip recommends only using for meshes <=600k faces, though I’ve used it on much larger).
That set-up works most of the time for my datasets, and produces good meshes with a single texture file.
Some other tips:
Start Button greyed out:
If Meshroom crashes during a reconstruction, you might find that when you open the scene, the start button is greyed out and you can’t get it processing again, forcing you to restart the entire workflow. When that happens, go to the three dots at the upper right of the graph editor, and click ‘Clear Pending Status’
Using more feature descriptors:
FeatureExtraction, FeatureMatching, and StructureFromMotion have options for more describer types:
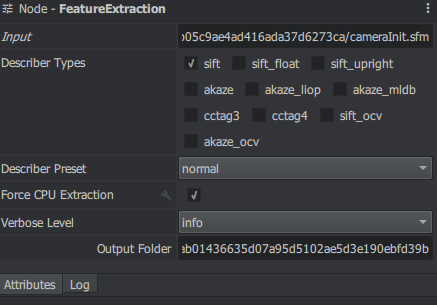
If you’re struggling to get a good reconstruction, you can try enabling akaze as well as sift (check both, and make sure they are both checked for all three nodes). StructureFromMotion will then utilize features found and matched using both algorithms, potentially aiding reconstruction.
You can also use the cctag describers if you have cctags around the object. You can download markers to print from the AliceVision github: https://github.com/alicevision/CCTag/tree/develop/markersToPrint. All those markers would use cctag3. I haven’t used these myself, so can’t comment on how useful it is.

I want to ask you a question: why do the same datasets get different results when using meshroom
Can I ask you a question, why do the same dataset have different reconstruction results in meshroom, even though the same initial image pair is selected
I’m not sure. I think it’s because the feature detection and/or matching are not deterministic. You’ll get a much better answer from the AliceVision google group.
No one in that group answered me