
Here’s a list of all the software I’ve tested with the same dataset and computer:
All my testing has now been summarised in my up to date 2020 post:
https://peterfalkingham.com/2020/07/10/free-and-commercial-photogrammetry-software-review-2020/
Current Recommendation: AliceVision Meshroom
The following article was written in 2017ish, and since then, as you can see from the linked post above, I’ve reviewed a lot more software.
I had a beautiful dream. I would compile/install/run all the free and open source software I could find, test it on consistent data sets, and let you know how long things take and what works best in what circumstances.
One problem: It was too big a task.
For a couple of weeks I’ve been running datasets in my sparse free time (there was a little conference to deal with, and now teaching is getting into gear, as well as trying to carry on my own research). I even got all clever, and wrote scripts in bash and windows, to automatically run the processes for several workflows and collect time taken for each stage. My computer was occupied for days at a time.
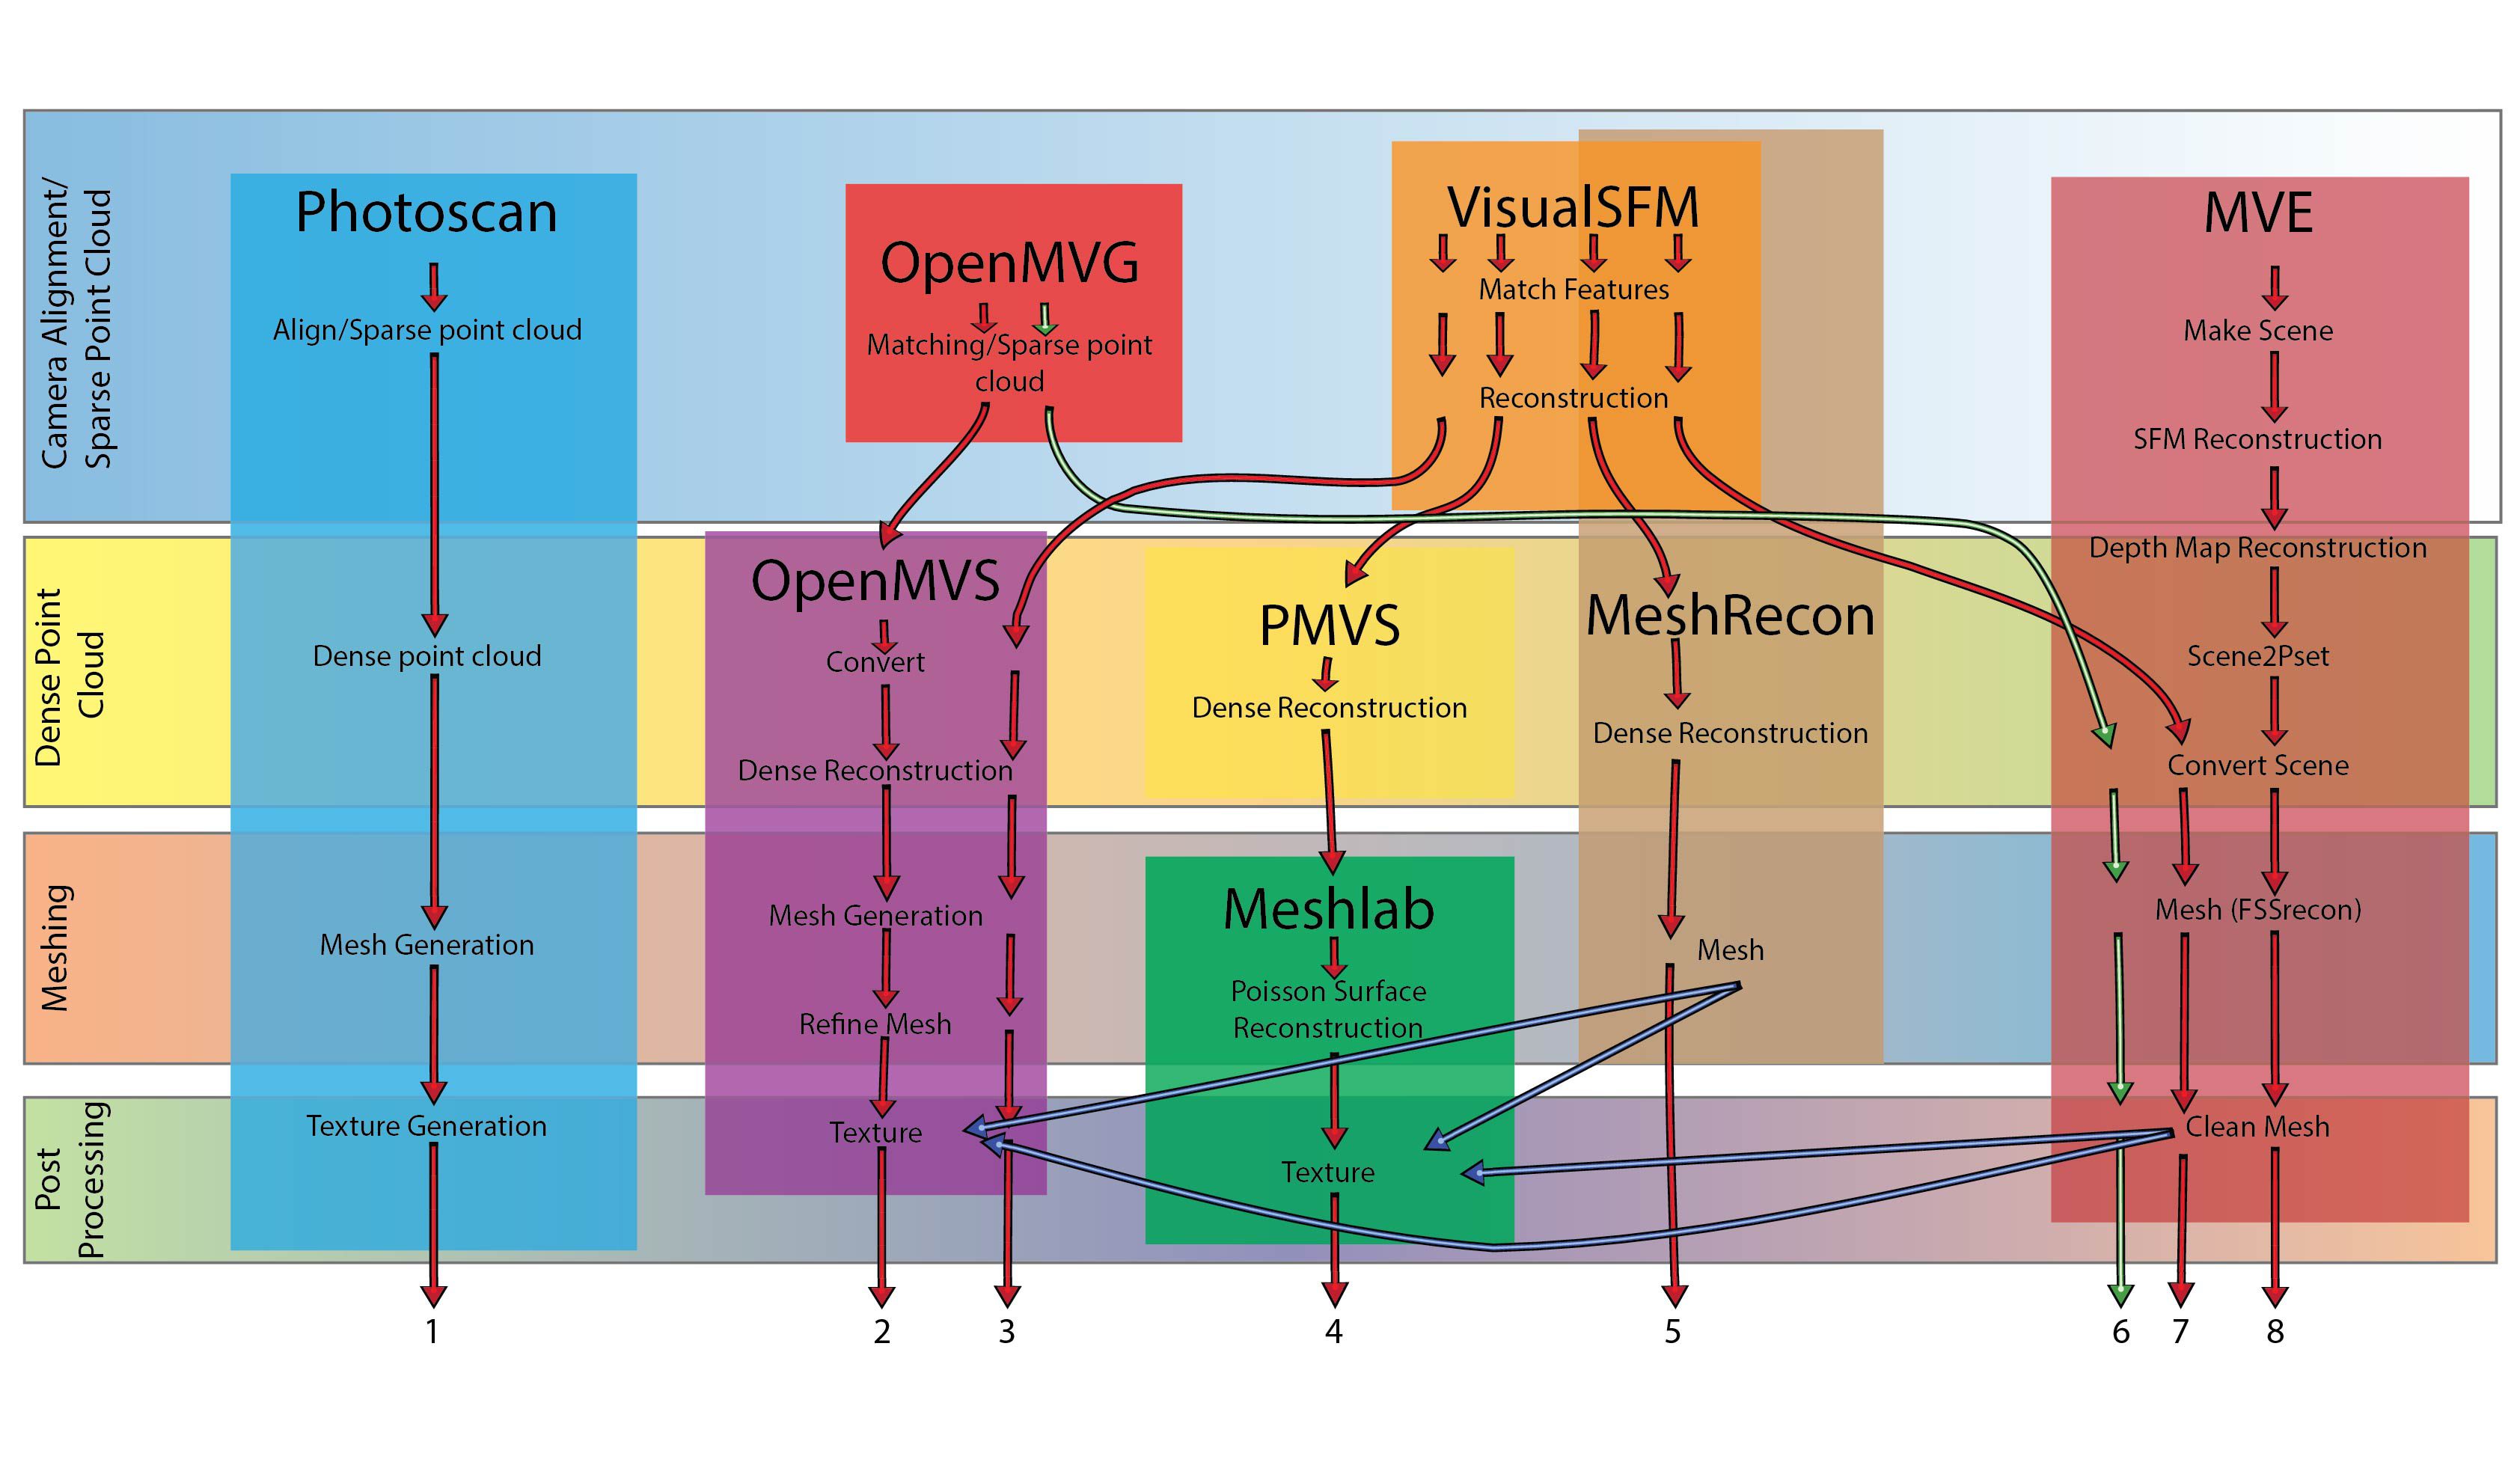
You see, some software will do the whole process from photos to textured model, while other programs will just do structure from motion (SfM), or just do mesh reconstruction from dense point clouds, etc…. In fact, the workflows I tested looked a little like this (I even created a lovely figure):
The Datasets
One of the problems I had was that neither dataset was particularly good for photogrammetry (to be honest, I rushed them), and so it was hard to find particularly good models at the end to make decent comparisons with.
All photos were taken with a Sony Nex-6 with 18-50mm lens. I used two datasets in all 8 software paths:
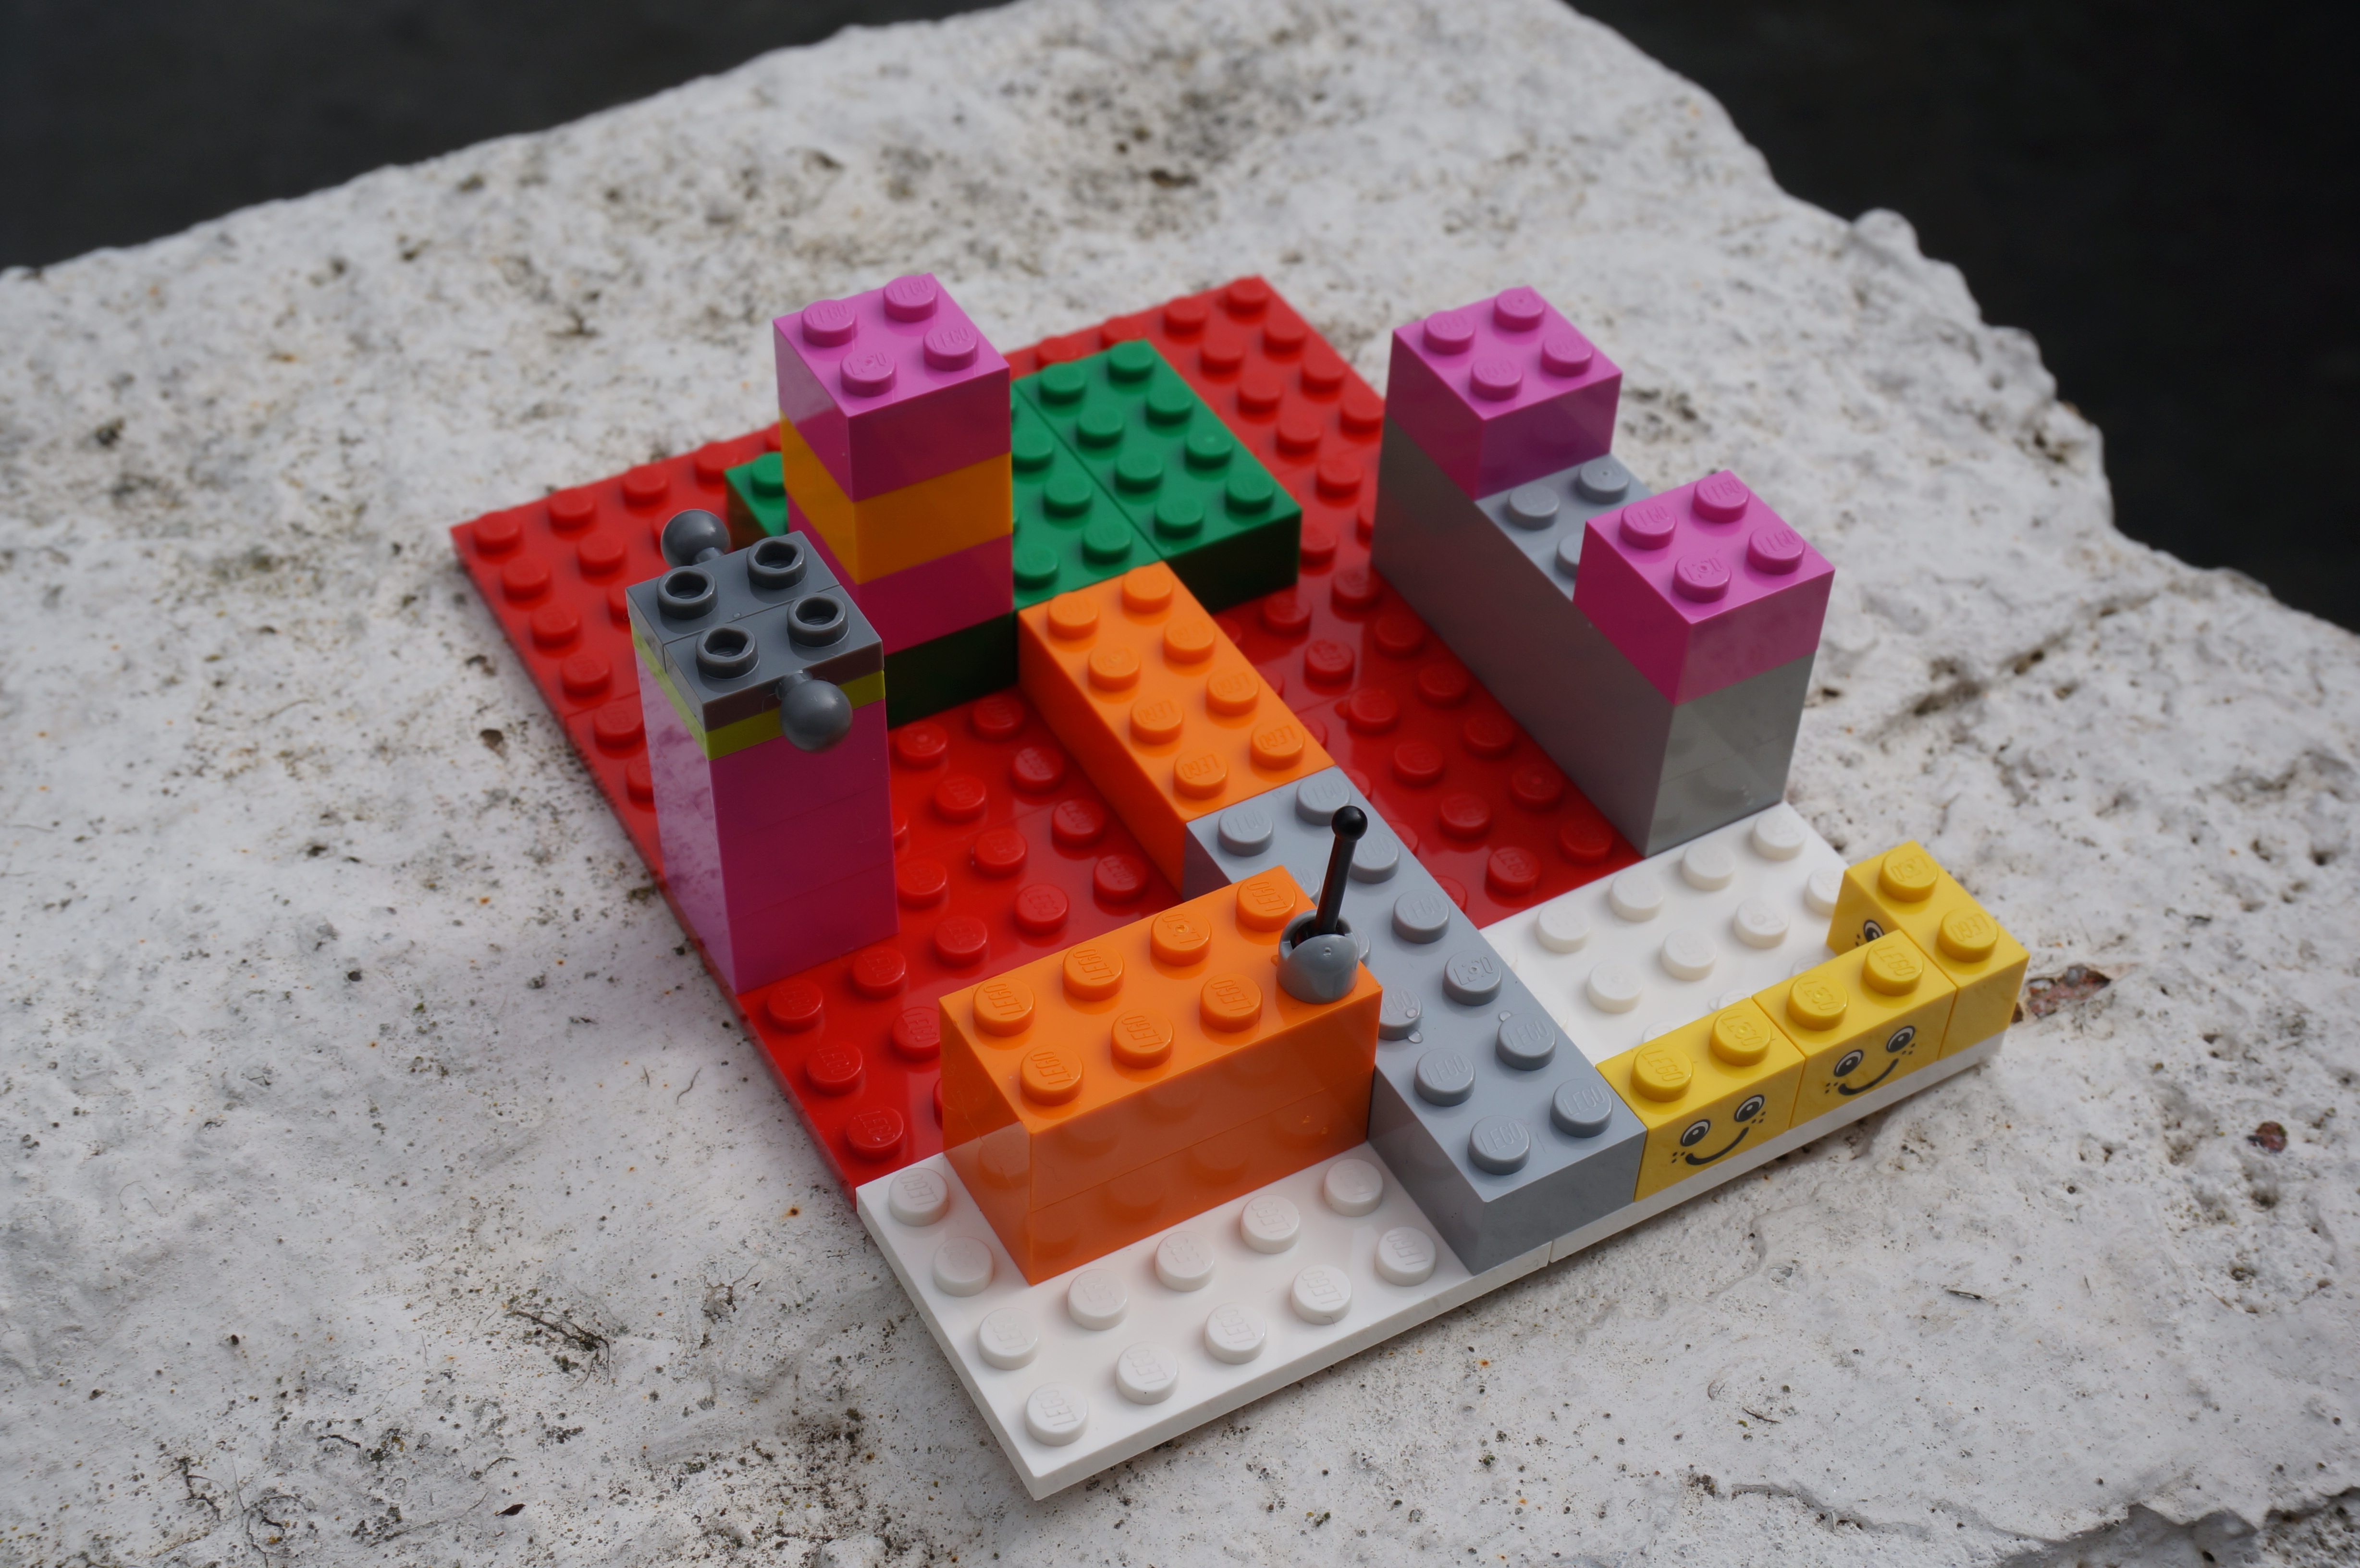
Lego: The reason Lego is so expensive compared to its competitors is that it’s precision made. That makes it excellent for use as a calibration object. However, a downside is that bricks tend to have solid colours which is bad for photogrammetry, and they are also a little reflective, which is again terrible for photogrammetry (the software tries to match features in reflections). Good, I want an object with very specific dimensions, but that is challenging for all of the software combinations.
Stone Gargoyle: An object from my garden (my wife’s doing, I fear). The heavily textured surface is perfect for photogrammetry, and the natural curves are perhaps something more like what a palaeontologist will encounter when digitizing specimens of any size. This is the ‘easy’ test case.

The software
This is where it gets really tricky, because as I noted above, a lot of these are interchangeable.
This program has become something of a standard among colleagues who use photogrammetry, and for good reason. At $59 for the educational standard version, it’s a bargain, and it’s easy to use interface means anyone can use it. I have a Quick’N’Dirty guide here, but there’s lot’s out there, including this paper by Mallison and Wings.
This was one of the first free photogrammetry programs to really utilize the power of the GPU (Graphics Processing Unit). In fact, I wrote about this in the PE blog post [seemingly vanished now] following my 2012 photogrammetry paper – the field was moving so fast at that time that between me submitting my paper and it coming out, processing times were improved at least 10 fold! VisualSFM handles the feature matching and camera poses, it does not itself do any dense reconstruction.
PMVS/CMVS (Patch-based Multi-View Stereo Software and Clustering views for Multi-View Stereo)
This is the software that, by default, handles the dense reconstruction after VisualSFM has matched the images. In fact, PMVS and CMVS were the follow up to bundler as used in Falkingham 2012. As far as I’m aware, the dense reconstruction part hasn’t seen the advances that camera matching has in the last half decade or so. Windows Binaries are available from Pierre Moulon’s page here.
OpenMVG (Open Multiple View Geometry)
This is a fairly recent, and actively developed library covering structure from motion, providing camera matching capabilities. I generally have trouble getting this to compile on Windows, so use the new Bash terminal in Windows 10 (and here’s a guide I wrote on getting that installed).
MVE (Multi-View Environment)
A full pipeline from matching cameras to cleaning the mesh. Available as a download containing windows binaries (from here, under downloads)
The freely downloadable binaries haven’t been uploaded in some years – the code forms the basis of commercial code now (I think). This software generates beautiful textured meshes, complete with animations and all sorts if certain options are not turned off. Requires images and camera parameters for input – here we’ll generate them with VisualSFM or OpenMVG. I didn’t even include this in my diagram above 😦
The Hardware
All the tests were run on my home computer, with the following specs:
- Windows 10 64 bit
- 16gb RAM
- 128 gb SSD for the OS, 1TB HDD for main (programs and data were run from the HDD).
- nVidia GTX 970 GPU.
- Intel Core i7-4790K CPU (4 cores/8 threads, up to 4.4Ghz).
So this is a reasonably good ~1.5-year-old gaming computer. Nothing special and available now for well under £1000.
While running the tests I tried to refrain from running anything in the background, but watching and timing some of these was a little boring, so sometimes times may include a few CPU cycles being devoted to youtube or music!
The Results
Well… My attempts to do everything at once meant that my datasets weren’t great, and so nothing really shined. I created lovely tables of times taken for each stage in each process, but the different pathways were simply overwhelming. Here’s a couple of the lego structure, showing how the solid colour areas really cause problems for most of the software.
Here’s a few of the Gargoyle… note that VSFM+MVS was really good:
Conclusions
In conclusion then, this was too big a study for me to attempt in one go. What I can tell you is that until today, my general feeling from these datasets (and another of a human footprint), VSFM+MVS was about the most robust and complete pipeline, even compared to Photoscan.
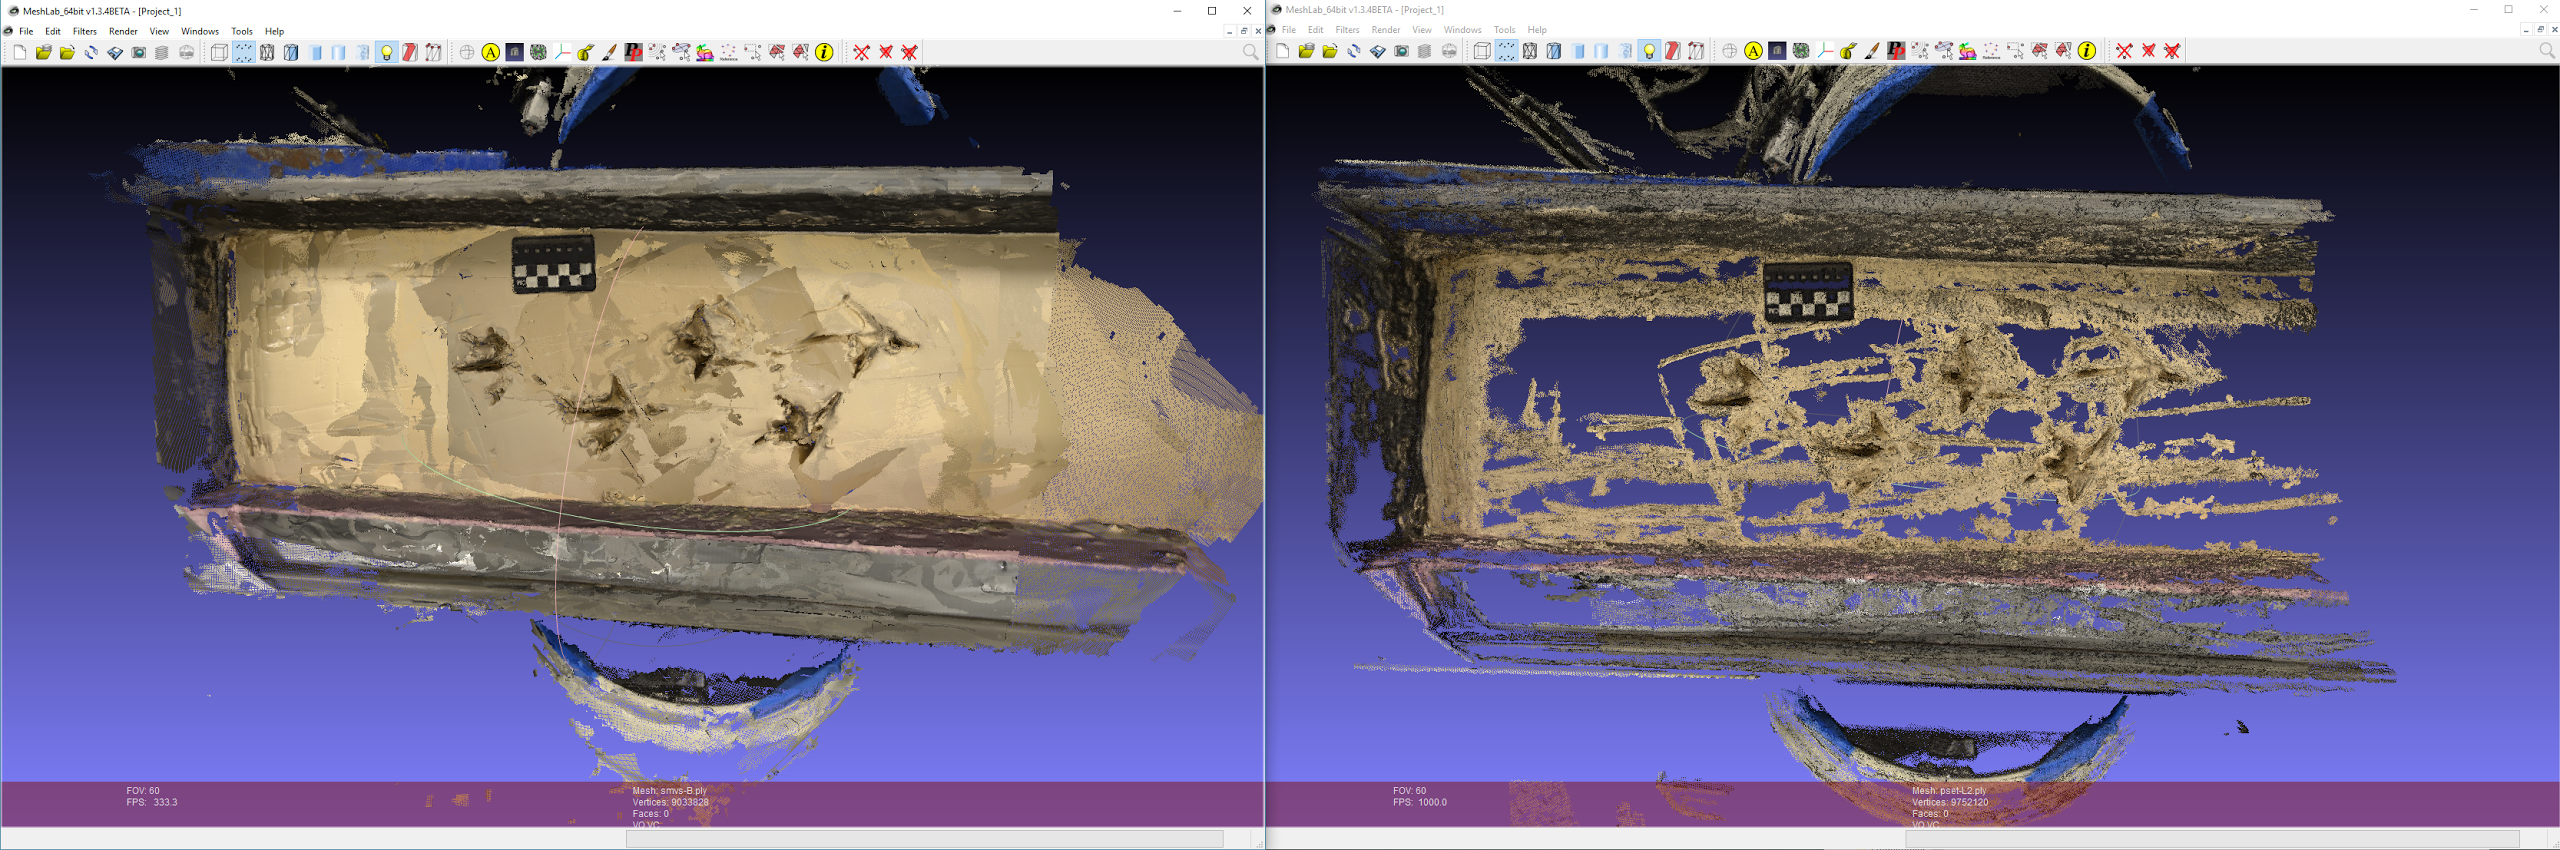
However, today I discovered SMVS, and it’s even better than MVS – reconstructing solid colour areas really well… take a look at this:
Frankly, the only way I’m going to tackle this in a meaningful way is through…
Future Work
Here’s my plan. I’m going to collect some great photos at work, on a perfectly lit turntable, and I’m going to collect some not so great photos that represent a less good dataset. Then each week, I’m going to post the results from a new pipeline, including times taken. When I run out of steam, or think I’ve just about covered all the packages I want to cover, I’ll make a full summary post. That way, I can be more thorough, and more methodical than trying to run every combination at once.
An aside
There’s an awful lot of papers getting submitted at the moment comparing photogrammetric techniques (usually one piece of software against Photoscan). I know this because I keep getting them to review. If this post shows anything, it’s that the field is moving so quickly that I’m not sure such comparisons are suitable for the peer-reviewed literature – blog posts and the like may be a far more apt venue. But that’s just my thoughts on the matter, and perhaps make me a little hypocritical given my own publication record. I’d be interested in reader’s thoughts on the matter.

Thank you for posting! Very good as allways.
I only missing APERO MICMAC which is also a free complete photogrammetry package and nowadays has a GUI.
Ah, last time I tried Micmac was some years ago, and I found it very difficult to use. Thanks for letting me know it’s been developed still – I will check it out at!
Regarding your comment: “I now think this is due to openMVG being on unix, and MVE being on windows, and filepaths changing accordingly”. MVE is a Linux-first tool. Just to clarify. And it happens to also work on Windows 🙂
Oh absolutely, but I think my issues was from mixing operating systems between my Linux (bash on windows) binaries of openMVG, and my MVE windows executables. If I run the whole pipeline as just linxu binaries or just windows binaries, everything is fine. My statement would have been a bit clearer had I written “due to my openMVG being on unix, and my MVE binaries being compiled for windows…”
Note that this minor issues was caused through pure laziness on my part in not bothering to make sure everything was running consistently!
Hi, thanks for the article.
I am new to photogrammetry. I was wondering whether or not it would be possible to make a range finder using real time close range photogrammetry.
Do you have any experience in this are?
No – I don’t have any experience with that I’m afraid. My guess is that because photogrammetry is a scale-less method, it could be quite complicated. It’s not impossible to get scale using camera parameters, but I’m not sure how accurate that would be.
Can you link to the papers you keep receiving. I would love to read some of them.
Can’t think of any papers specifically that I haven’t linked to. Usually I just find the software through searching on google/bing and reading documentation at the software’s site.
Please have a look at the comparison at Wikipedia: https://en.wikipedia.org/wiki/Comparison_of_photogrammetry_software
Hello,
Thank you for your good job. I am oftenly referring to it.
As comment of the last image, you start your sentence with “Left: SMVS, Right: MVS”…
But which MVS it is ? Did you mean CMVS ?
There are so many xMVS..it is confusing.
Al
Good question…. it’s been a while. I think I was referring to openMVS. However, if you see this page: https://pfalkingham.wordpress.com/2017/05/26/photogrammetry-testing-11-visualsfm-openmvs/ you’ll see that openMVS gets much better results when using COLMAP to match cameras instead of VisualSFM.
I’m conducting a Photogrammetry project for my final year project and daunted by the vast amount of software available. I would like to thank you for your blog posts and kindly ask you keep it up. For now, I’m using photoscan to compare my attempt at coding a photogrammetry algorithm. Wish me good luck!
Awesome review / comparison!
I wonder, do you still have the photosets so we can have a look at how they look in new versions of the various software?
Ah, forgot how I’d structured this. No, I don’t have the datasets for the Lego or Gargoyle, but for all the subsequent testing (links at the top of the article) I used a dinosaur model, and the dataset for that is here: https://1drv.ms/u/s!Am5GkbZS_98XqJcY7pZBjtpooG3AGQ (also linked at the top of each article).
Thank you!
Wow this is an amazing article!
Do you know which combination or program would work best with small variance in color such as in fruit?
thank you in advance!
I stand by COLMAP and openMVS, but if the colour has very little variation or texture, you may need to sprinkle a little powder on there to give some texture.
For more realistic (commercial) applications, consider the impact of flight line geometry on the end product quality. I have used AgiSoft, Pix4D, OneButton, and Zephyr to process multiple sets of images (for areas and long narrow corridors) and experienced the systematic SfM doming (elevation) error consistently with each of the softwares tested when the imagery was collected using traditional (linear/parallel) flight lines.
Based on the following research, I formulated curved, convergent, non-traditional (non-linear/non-parallel) flight lines to help mitigate the doming error; and it worked.
Minimising systematic error surfaces in digital elevation models using oblique convergent imagery
Rene Wackrow
Jim H. Chandler
First published: 16 March 2011
https://doi.org/10.1111/j.1477-9730.2011.00623.x
Results of the simulation process, the laboratory test and the practical test are reported in this paper and demonstrate that an oblique convergent image configuration eradicates the systematic error surfaces which result from inaccurate lens distortion parameters. This approach is significant because by removing the need for an accurate lens model it effectively improves the accuracies of digital surface representations derived using consumer‐grade digital cameras. Carefully selected image configurations could therefore provide new opportunities for improving the quality of photogrammetrically acquired data.
Google “Gently Curved, Convergent, Non-traditional Drone Flight Paths” to find the description of the curved flight lines used to mitigate the doming error.