
AliceVision’s Meshroom was made available as a windows binary not long ago – I wrote about it shortly after it was released and produced a model using my standard test set using default settings.
Since then, it’s become my go-to software for producing photogrammetric models. It’s generally not as fast as COLMAP, but I like the end-to-end workflow, and I like being able to produce a single, half-decently optimized texture, rather than either multiple files through TexRecon, or a single, mostly empty, texture with openmvs.
Anyway, I thought it would be useful to test some of the parameters and what effect they have on reconstruction quality and processing time.
One of the awesome things about MeshRoom is the network based workflow, which in this case let me create a whole bunch of networks and run them in one go overnight. When I wanted to change some parameters, I’d duplicate the node and subsequent pipeline, and change parameters accordingly. The result looked like this:
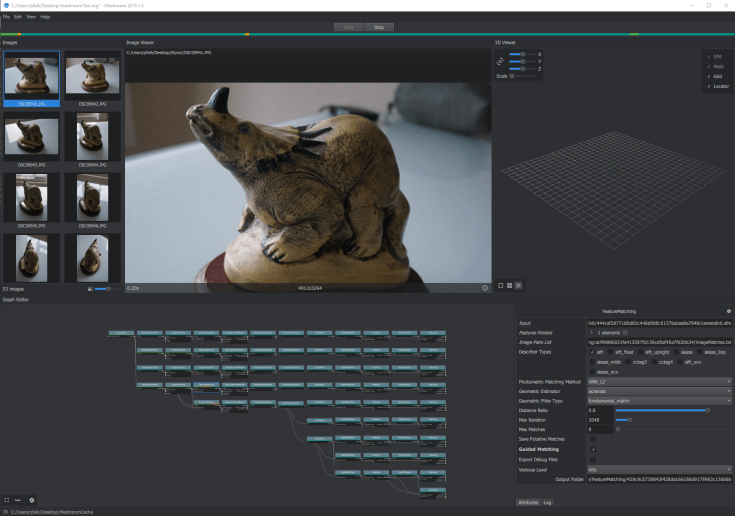
And a closer look at the networks:
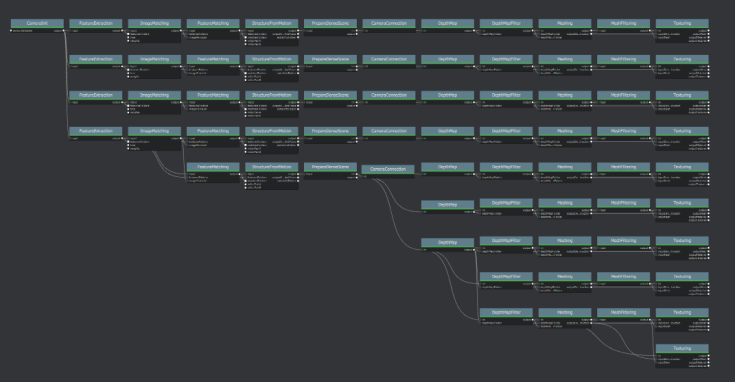
There are 10 here, and from now on I’ll refer to these as 1-10, top to bottom. Here’s what was changed at each duplication:
| Test | Feature Extraction (Describer preset) | Feature Matching | Depth Map | Depth Map Filter | Texturing |
| 1 | low | default | Default | Default | default |
| 2 | normal (default) | default | Default | Default | default |
| 3 | high | default | Default | Default | default |
| 4 | normal (default) | Guided Matching on | Default | Default | default |
| 5 | normal (default) | Guided Matching on | Default | Default | default |
| 6 | normal (default) | Guided Matching on | Downscale 16 | Default | default |
| 7 | normal (default) | Guided Matching on | default | Filtering size in pixels 6 | default |
| 8 | normal (default) | Guided Matching on | default | No. nearest cameras: 20 | default |
| 9 | normal (default) | Guided Matching on | default | default | unwrap method LSCM |
| 10 | normal (default) | Guided Matching on | default | default | Unwrap method ABF |
italics indicate that the node doesn’t actually exist for that test and the pipeline is using whatever was above. You may notice that tests 4 and 5 are the same. That’s because I’m an idiot and forgot to change something, but don’t have the time to re-run it right now, so I’ll leave it in for good measure.
Ok, so here’s the times that each test took. I ran this on the same home computer I’ve been running all my photogrammetry tests on (specs here) I’ve left this as an image because it’s a big table and hard to format on wordpress. Click to enlarge.

It’s all very well looking at times, but what do the models look like? Well, here’s some close-ups of the mesh before the mesh filtering step:


And here’s a similar scenario of them after mesh filtering:


Finally, let’s take a look at the different texture unwrapping methods (I’ve downsampled these by 50% to save space):
Default:
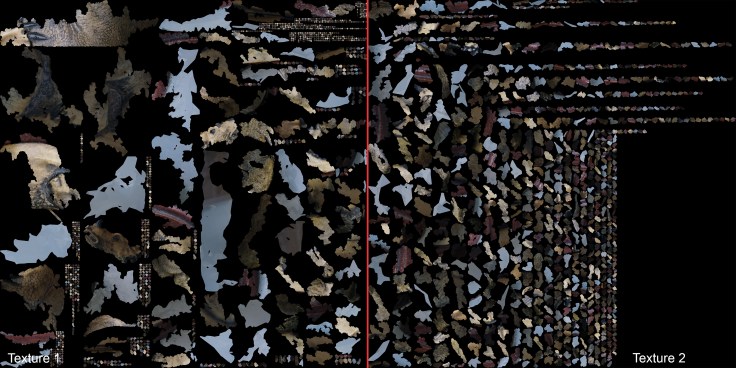
LCSB:

ABF:

Here’s some fun facts and figures about the results at various stages in the different tests:
| Test | No. Cameras matched (out of 53) | Landmarks | Initial Mesh, No. triangles | Filtered No. Triangles |
| 1 | 41 | 3778 | 1626924 | 1624474 |
| 2 | 45 | 26644 | 1580090 | 1579012 |
| 3 | 53 | 52752 | 1700300 | 1695960 |
| 4 | 53 | 33564 | 1680974 | 1677921 |
| 5 | 53 | 33564 | 1680974 | 1677921 |
| 6 | 53 | 33564 | 33205 | 33204 |
| 7 | 53 | 33564 | 1833467 | 1827933 |
| 8 | 53 | 33564 | 1728026 | 1725238 |
| 9 | 53 | 33564 | 1680974 | 1677921 |
| 10 | 53 | 33564 | 1680974 | 1677921 |
Clearly we can see that using guided matching (tests 4 onwards), or high feature extraction (test 3), results in the most cameras matched, which is of course a good thing. The mesh produced in test 6 (Depthmap downscaled to 16) has far fewer triangles than the other meshes, as is obvious in the images above.
Summary:
| Test | Total time (seconds) |
| 1 | 1827.37 |
| 2 | 2037.71 |
| 3 | 2303.108 |
| 4 | 2746.53 |
| 5 | 2747.53 |
| 6 | 1683.982 |
| 7 | 3275.832 |
| 8 | 3031.97 |
| 9 | 4163.55 |
| 10 | 24098.27 |
As you can see, test 6 was significantly quicker, but produced an absolutely garbage model. The next quickest was Test 1 – all default settings except feature extraction preset, which was set to low, however this only matched 41 of the 53 cameras. Changing the texturing unwrap method (tests 9 and 10) greatly increased processing time, especially for test 10 (unwrap method ABF). Personally, I’m willing to take the hit, at least with LCSB, to get one good texture, rather than multiple.
Long story short, it looks like default settings, but with LCSB for texture unwrap leads to the best results for me. Total time was about 69 minutes. I didn’t learn any real insights into the parameters, but still, that was kind of fun.
The models are too big to upload to sketchfab as a single scene as I’d originally planned. I may do something with them in the future, but for the time being if you’d like them, you can contact me and I’ll send them over. Or you can just download the photoset from here and run the tests yourself.

Hey man, thanks for these tests. I’ve also been playing around with some of the settings (my smallest model size contained 180 photos. Perhaps a tad overkill) and the one thing I would do is to add a MeshDecimate node in before the default MeshFiltering node. It really crushes the faces count in the final mesh without a noticeable hit on the final model. Put it to 0.7 or so and it’ll help a lot when importing to Blender.
Also, I too prefer the single texture map so I also use either of the non-basic methods.
I’ve been trying out the mesh decimation mode, but I find instant meshes to be better + quicker at down sampling the mesh. Downside is that means re-UV mapping and texturing later: I still have nailed that workflow.
Maybe just sticking decimate mesh in there as you suggest is cleaner, thanks.
Well, I have read in the manual that you can bring the OBJ into another piece of software for down sampling and then bring it back into Meshroom to apply the textures. It’ll even redo the UV map. But you can’t change the scale or rotation of the model in the other piece of software. It has to line up exactly with the mesh created in Meshroom. You can even bring in your own UV map.
So, in theory, you could create the object in Meshroom, bring it into Instant Mesh to retopo it, then bring it over to Blender to unwrap it, then drop it back into Meshroom to add the material and then bring it back into Blender for final lighting and render.
Yeah, that does work. Wonder if a custom node could be added…
You think 180 photos is overkill? Well that’s interesting, I tend to scan in all my models with 300+ photos and thought that was underkill. I could save more time that way if Meshroom works alright with smaller numbers.
Thank you for posting this, looking at all the nodes in Meshroom is really Daunting.
I was/am trying this to make normal maps; photograph an interesting wall, meshroom->blender->bake normals. It needs further investigations thats for sure
Ha, compositor, put the normal output of render layer into normal vector node, then an image file node, set it to exr format, you get a normal map
BTW tick the normal box in the View layer tab
Rinse and repeat for the deefuseed cetra