
This is a re-post of a document I placed on Academia.edu a few years ago. In fact, that academia paper has sat in Academia.edu’s top 0.5% of papers in terms of views for some time. However, I’m reposting for two reasons: 1. Academia.edu have added so many ‘premium’ (i.e. costly) features that I’d like it elsewhere, and 2. So that it’s here for completeness sake when I post my upcoming Photogrammetry comparison. You can find the original PDF HERE.
If you are unfamiliar with photogrammetry, hopefully this guide will provide a little assistance in how to take photos to maximise the quality of the final model. If you have taken photos for producing a photogrammetric model before, you probably don’t need this guide.
Before beginning/Notes:
Scale: The first thing to note of importance is that photogrammetry is a scale-less method. Unlike laser scanning, the resultant pointcloud has no absolute scale. As such, it is imperative that an object of known dimensions (e.g. a scale bar) is present next to the subject being photographed, and that photographs incorporate this known scale are taken as part of the process, so that the scale ends up in the final 3D model.
-
Taking photographs:
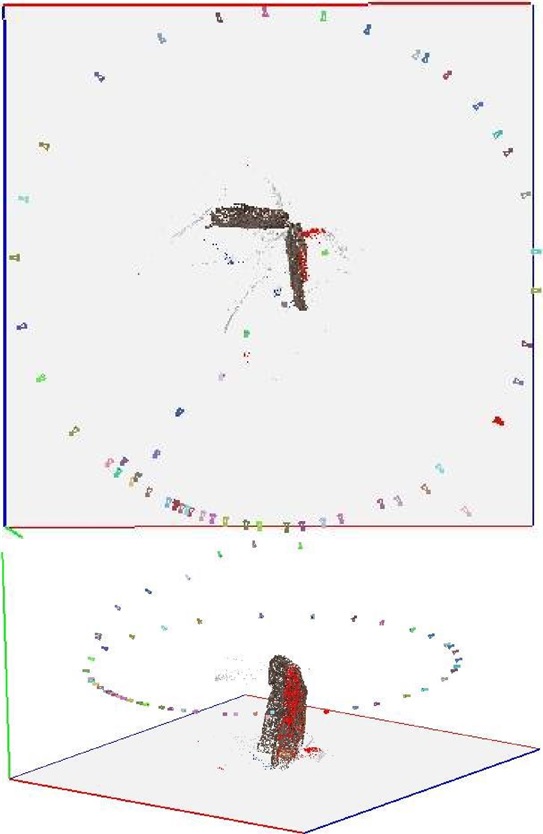
In order for any given point to be represented in the final 3D model, it must be present in at least 3 photographs, preferably many more. As such, when taking photos, ensure considerable overlap between images. Include overview shots of the entire subject [if possible] and closer shots that can be located in the overview. Taking shots as you move closer to the subject allows the software to make the links easier. The figure below shows the camera positions for a small object. Obviously in the case of mounted skeletons, it may not be feasible to go over the subject as in the figure, but photos from varying angles are very useful.
Camera: Any camera should do. The software we use takes the camera/lens parameters from the EXIF tags in the jpegs. However, just to be safe, please note the make and model of your camera in case for some reason it is not recorded in the EXIF tags. Resolution is important, but it isn’t everything. Very high res photos (>10mp) can end up being less useful than just taking lower res photos closer. Having said that, we can always down-sample high-res photos, but we cannot up-sample low-res photos, so higher is better than lower. I’ve found 8-10 megapixels to give the best results.
Number of photos: It can be difficult to say how many photos are required for making a good model, as it varies according to the complexity of the subject. It is better to take as many photos as possible, covering the entire subject repeatedly, rather than aiming for a specific number, but 100-200 photos can be most useful.
-
Running VisualSFM:
(adapted from http://ccwu.me/vsfm/doc.html#usage)
VisualSFM available here: http://ccwu.me/vsfm/
PC and Linux tested. Details on trying to install on Mac OSX can be found here (it’s not trivial!).

- Add the images into your SfM Workspace
“File->Open Multi Images”. You can do this multiple times. (or button 1 above)
2a. Run feature detection & full pairwise image matching
Click “SfM->Pairwise Matching->Compute Missing Match” (or button 2 above)
The time taken at this stage increases exponentially as more photos are used – 10 photos will take seconds, 100 photos minutes, and 1000 can take days
2b. If your photographs were taken in sequence (or if you have extracted frames from video):
You can use “SfM->Pairwise Matching->Compute Sequence Match” This will then only match each image to the specified number in front and behind, rather than to all images as in 2a. However, beware of errors creeping in as images late in the sequence are not correlated with those early in the sequence.
- Run sparse reconstruction
“SfM->Reconstruct Sparse” or the corresponding toolbar button (button 3 above).
- Dense reconstruction by using Yasutaka Furukawa’s CMVS/PMVS (obtain CMVS package separately)
“Sfm->Reconstruct Dense”. Note that CMVS/PMVS related parameters are stored in nv.ini
You will be prompted to save [name].nvm file, and CMVS will run in the folder [name].nvm.cmvs
If you save the reconstruction to [name].nvm, [name].i.ply is the result of the i-th model.
This dense reconstruction can take a long time.
-
Producing a photo-textured Mesh using Meshlab Meshlab available here
Having produced a dense mesh using CMVS through VisualSFM…

- Open the Bundle Project file in Meshlab
“File->Open Project” (or button 1) then navigate to the folder created during the dense reconstruction (i.e. [name.nvm.cmvs]). Within that folder, go to [name].nvm.cmvs/00 and open “bundle.rd.out”
Then a second file selection window appears, and you should open list.txt
These files will load the sparse point cloud and (undistorted) photos into Meshlab
- Hide the sparse point cloud and bring in the dense point cloud
Hide the visible sparse point cloud (button 3, then 4)
“File->Import Mesh” (or button 2) then select the ply file created by VisualSFM/CMVS (should be located in the folder with the photos).
- Create a surface from the dense point cloud.
Ensure that the dense model is selected in the layers pane (highlighted in yellow)
Use “Filters->Point Set->Surface Reconstruction Poisson” and set Octree Depth to 10. (If this fails, you may need to use “Filters->Point Set->Compute Normals” first)
Can take a little while on large/complex datasets
The Poisson surfacing algorithm tends to produce bubble-like objects. You can remove the extraneous faces with “Filters->Selection->Select faces with edges longer than”. The default value will usually remove most extraneous faces.
- Project the photos onto the mesh to produce a texture.
“Filters->Texture->Parameterization + Texture from registered Rasters”
Save file as an OBJ
I’ve been having issues with meshlab not properly finishing the material file using this workflow, so if no texture appears:
Close meshlab, navigate to the folder where you saved the new mesh, and open [surfacename].obj.mtl with a text editor and add ‘map_Kd texture.png’ to the end (change ‘texture.png’ if you called the texture something other than default).
Open the obj file in meshlab with import mesh (button 2)
- Scale the mesh
In order to take accurate measurements from your digital model, the model must be scaled. Use the measure tool to measure an object of known length.
Scaling factor = known length / measured length, so if a scale bar is 10 cm, but measures 4 cm in meshlab, the scaling factor will be 2.5.
“Filters->Normals, Curvatures, and Orientation->Transform: scale” and enter scaling factor into x, y, and z boxes and apply.
I published a paper on earlier software: Falkingham, P. L. (2012). “Acquisition of high resolution three-dimensional models using free, open-source, photogrammetric software.” Palaeontologia Electronica 15: 1T:15p. (web link: http://palaeo-electronica.org/content/issue-1-2012-technicalarticles/92-3d-photogrammetry). You can check it and its references out, and while I’d appreciate citations (particularly in palaeo), it’s a couple of years old now and there is more up to date and relevant info available. Wu’s own publications for one:
- Wu C (2007) SiftGPU: A GPU implementation of scale invariant feature transform, SIFT. http://csuncedu/~ccwu/siftgpu.
- Wu C (2013) Towards Linear-time Incremental Structure from Motion. 3DV 2013.
- Wu C, Agarwal S, Curless B, Seitz SM (2011) Multicore bundle adjustment. IEEE Computer Graphics and Applications. pp. 3057-3064.
I recommend the google group for more help: https://groups.google.com/forum/#!forum/vsfm
