This post follows on from automating photogrammetry with the Z8 turntable.
Having the Z8 turntable rig working means I now get a whole revolution of NEFs and JPEGs dumped straight onto the PC, which is wonderful, and immediately creates the next problem: what to process them with on Linux. RealityScan is far and away my favourite photogrammetry solution – it’s quick, it’s free, and the 2.2 release brought AMD GPU support alongside NVIDIA. But it’s also been one of my bugbears in moving to Linux.
The “native” Linux version
Epic do ship a Linux build of RealityScan. The documentation is honest about what it is if you read carefully: it’s experimental, it’s “built on a bundled Wine environment”, and “the supported workflow is CLI-only”. Which is one way of saying that while there is the Windows GUI, it’s full of problems: overlays blocking interaction, no JXL support, and no scaling support. It’s frankly a nightmare to use.
So I’ve built the GUI myself. With Claude doing the bulk of the actual coding (this is unashamedly vibe-coded).
The app
The application is my own GTK4 one; RealityScan’s interface is nowhere to be seen when it’s running. Under the hood Epic’s RealityScan is still doing every scrap of processing, but it runs headless, no window at all (though it does have an icon in the application tray): a plain background process under Wine whose only interface is the REST server built into its Remote Command plugin. My app starts it, sends it commands, and shows the results in a proper native Linux window. Everything below goes through RealityScan’s engine via that plugin, exactly as the official CLI would, but with a window you can actually use with nice animations, scaling, etc.
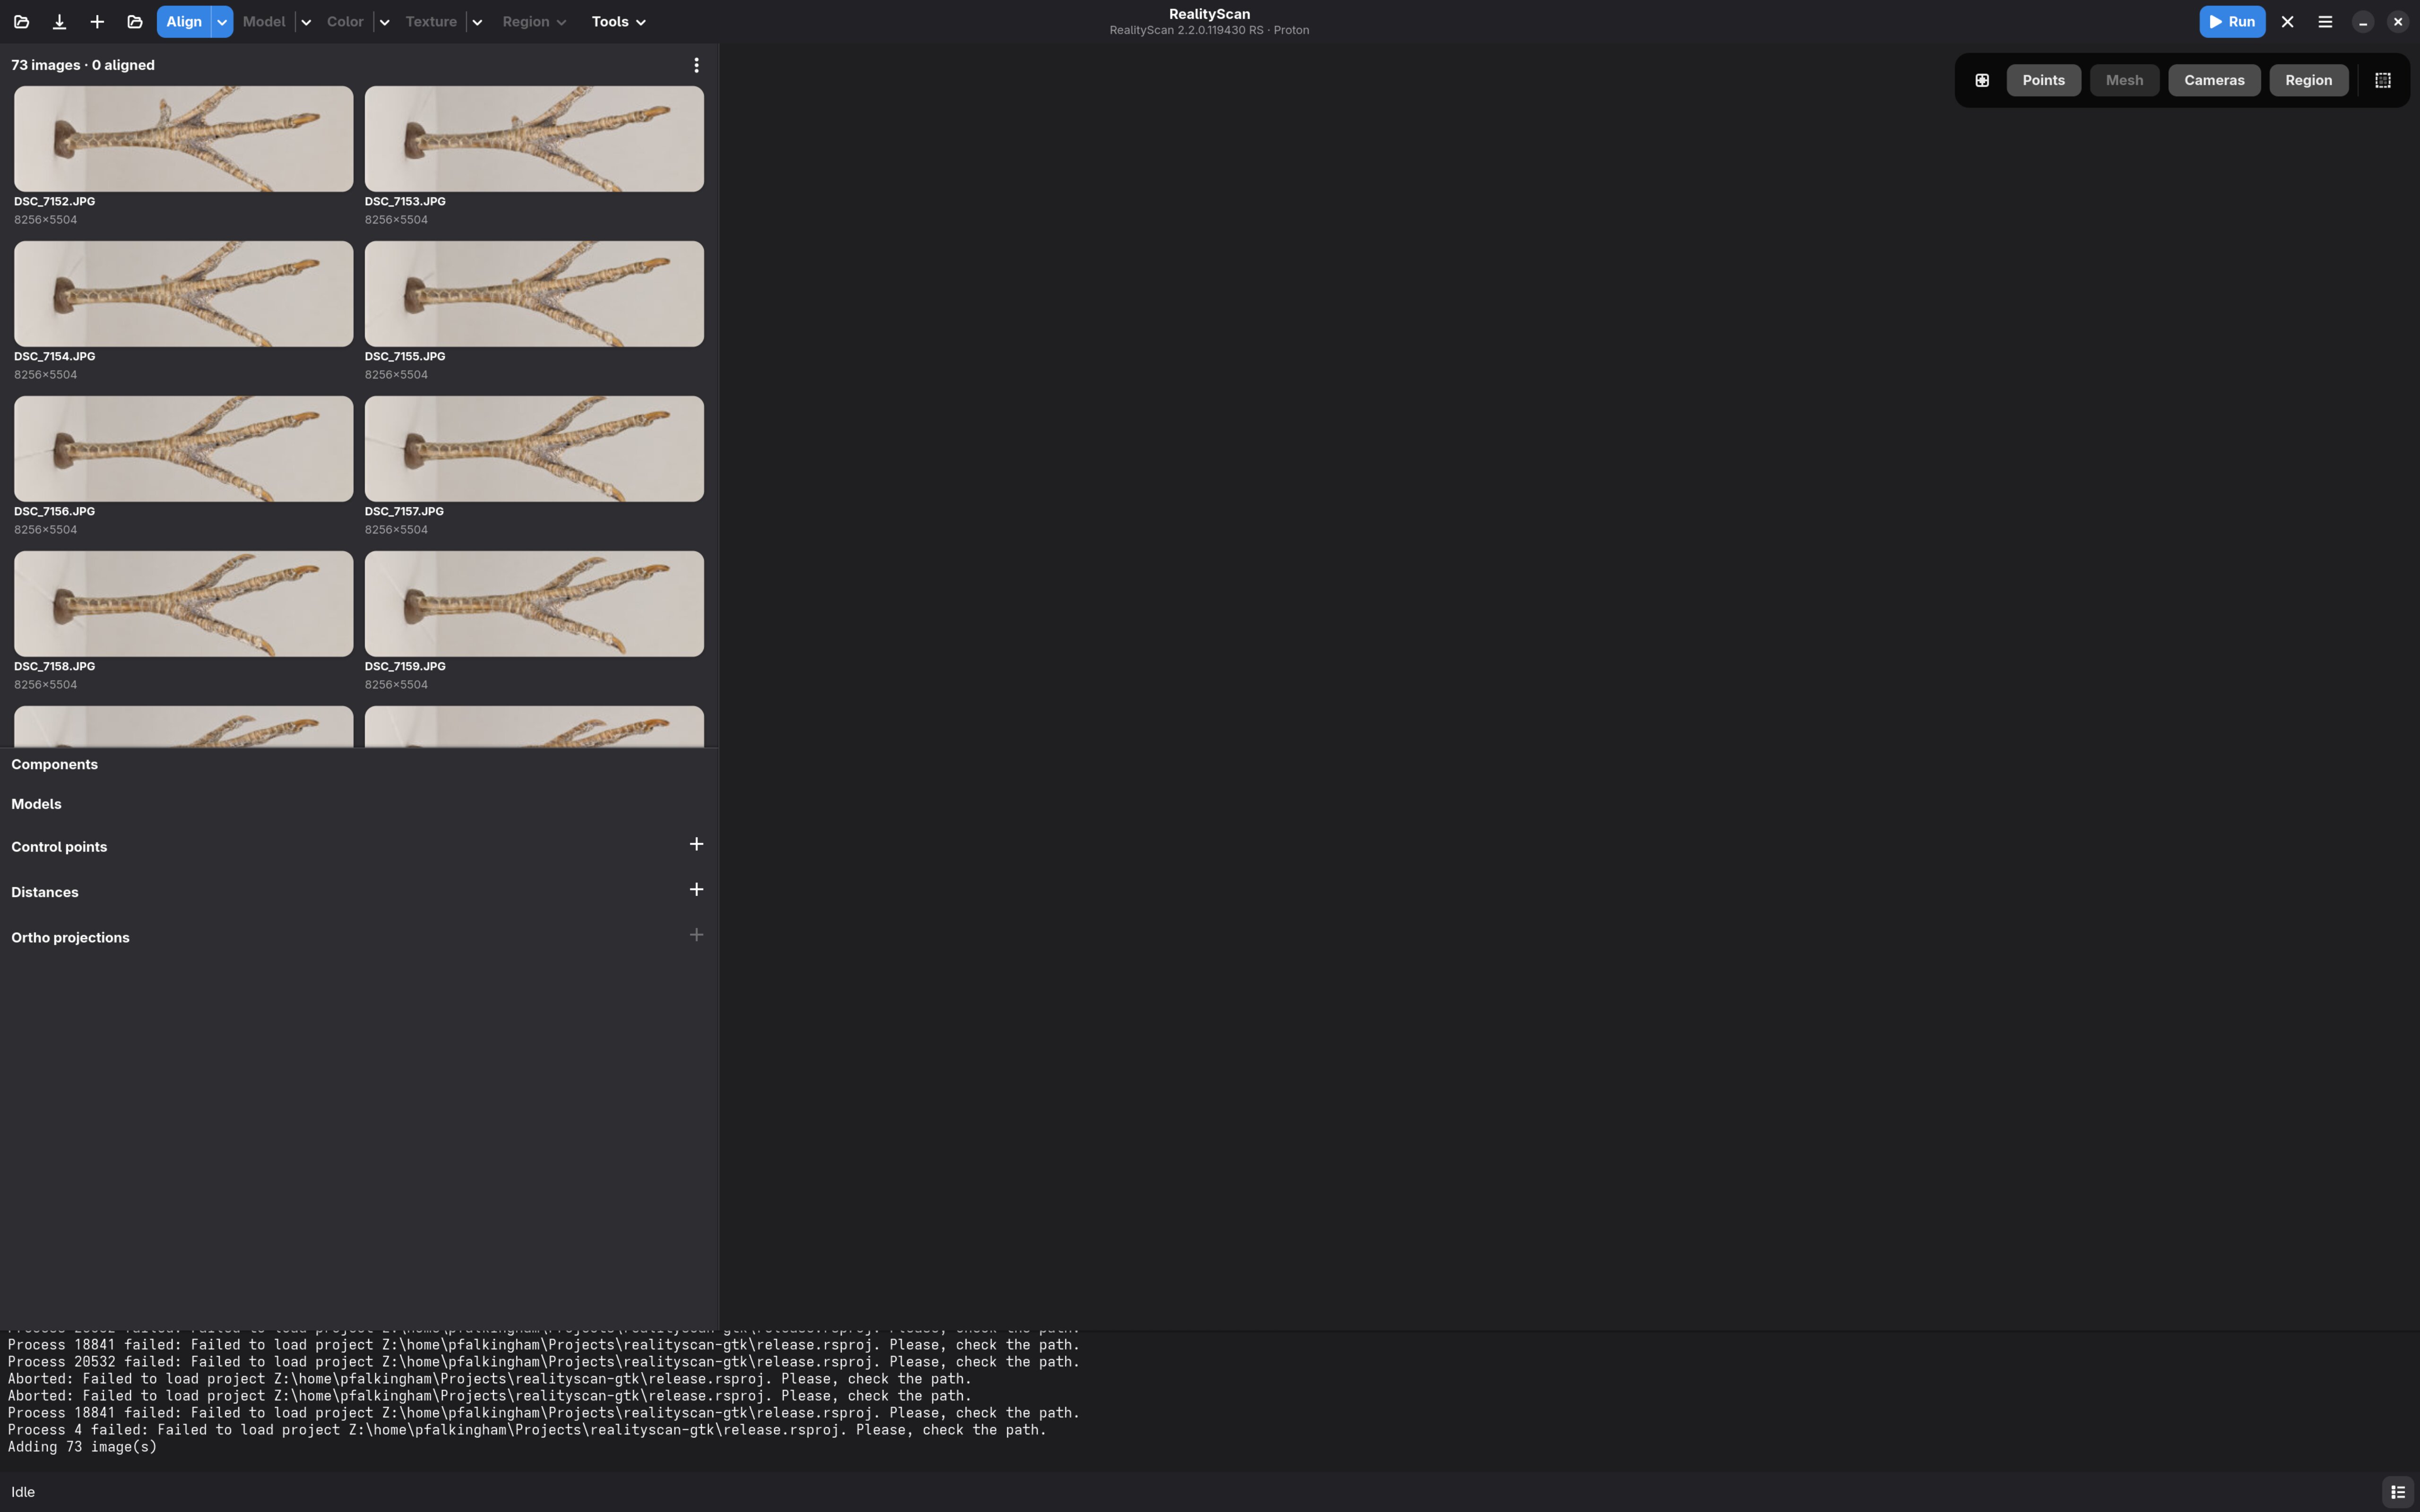
Scans arrive by drag and drop or the import button in the top left. The 72 images from a turntable revolution land on the window and appear as thumbnails down the left, each one with switches for whether it takes part in alignment, meshing and texturing (image rotation isn’t handled correctly yet). The workflow stages sit across the top, Align, Model, Color, Texture, Region and Tools, and the big blue Run button does the whole thing in one press: align, a normal-detail model, a texture, and a reconstruction region fitted automatically when the project doesn’t have one.
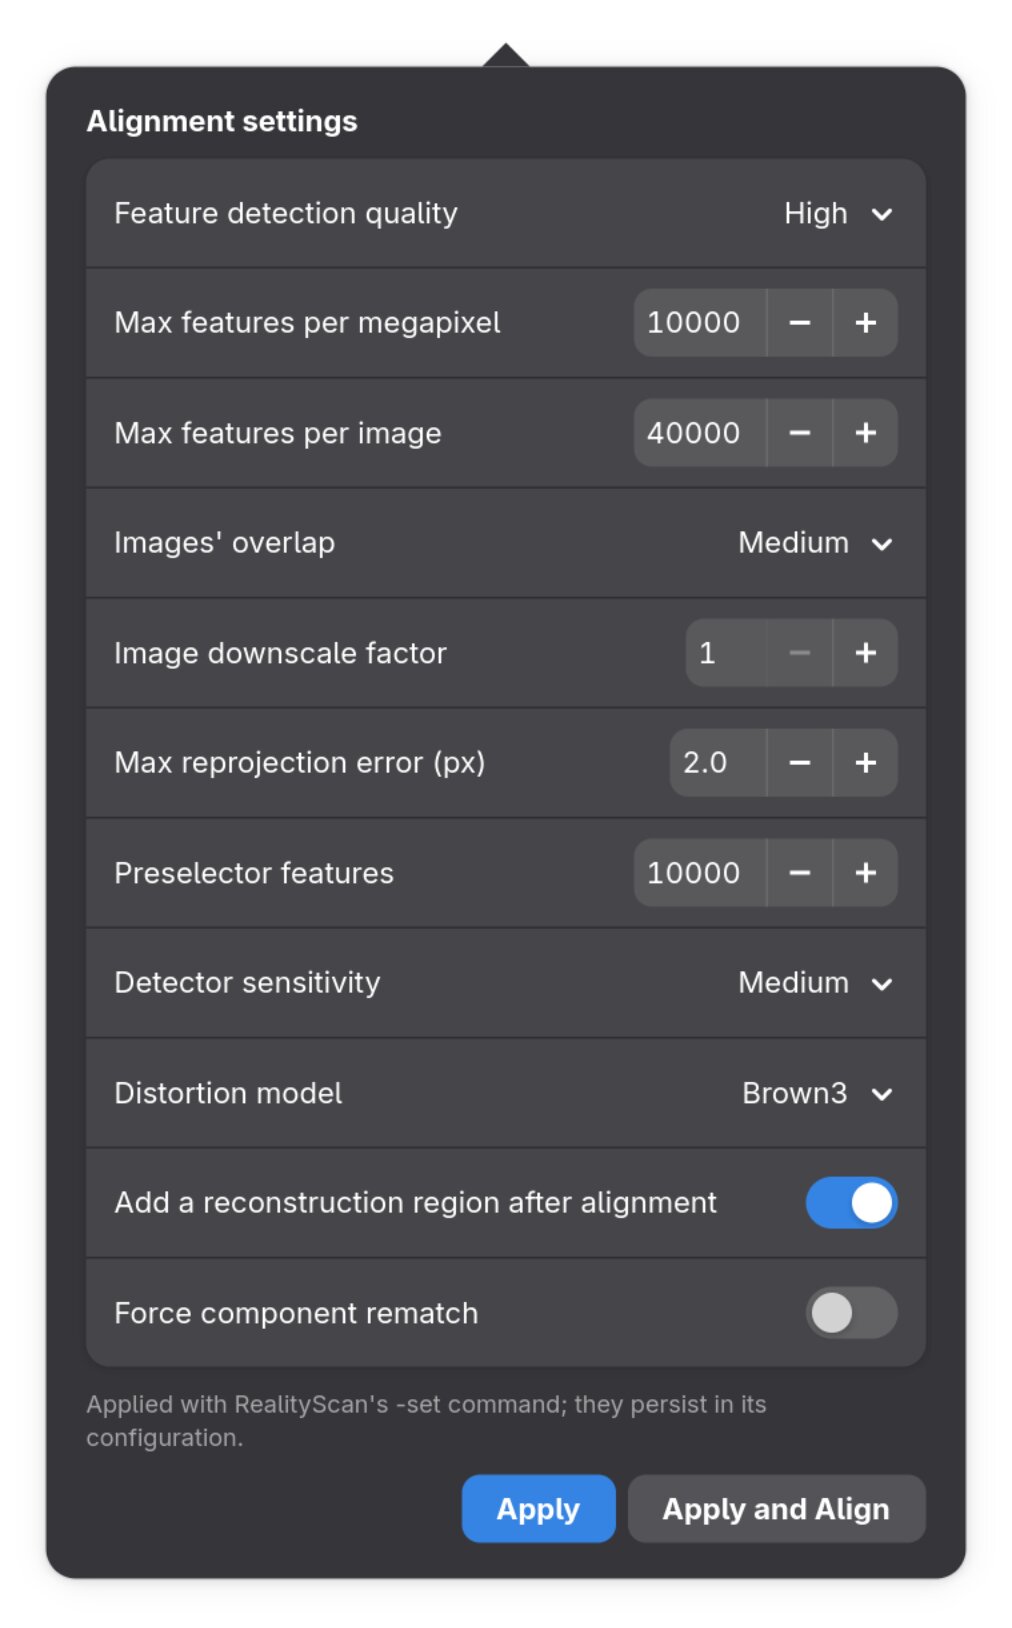
The arrow beside each stage button opens a menu containing all RealityScan’s own settings for that step. Model gets its preview, normal and high detail choice the same way, and Color and Texture have their own options behind theirs. Esc aborts a running process, and anything sent while RealityScan is busy queues until it is idle.
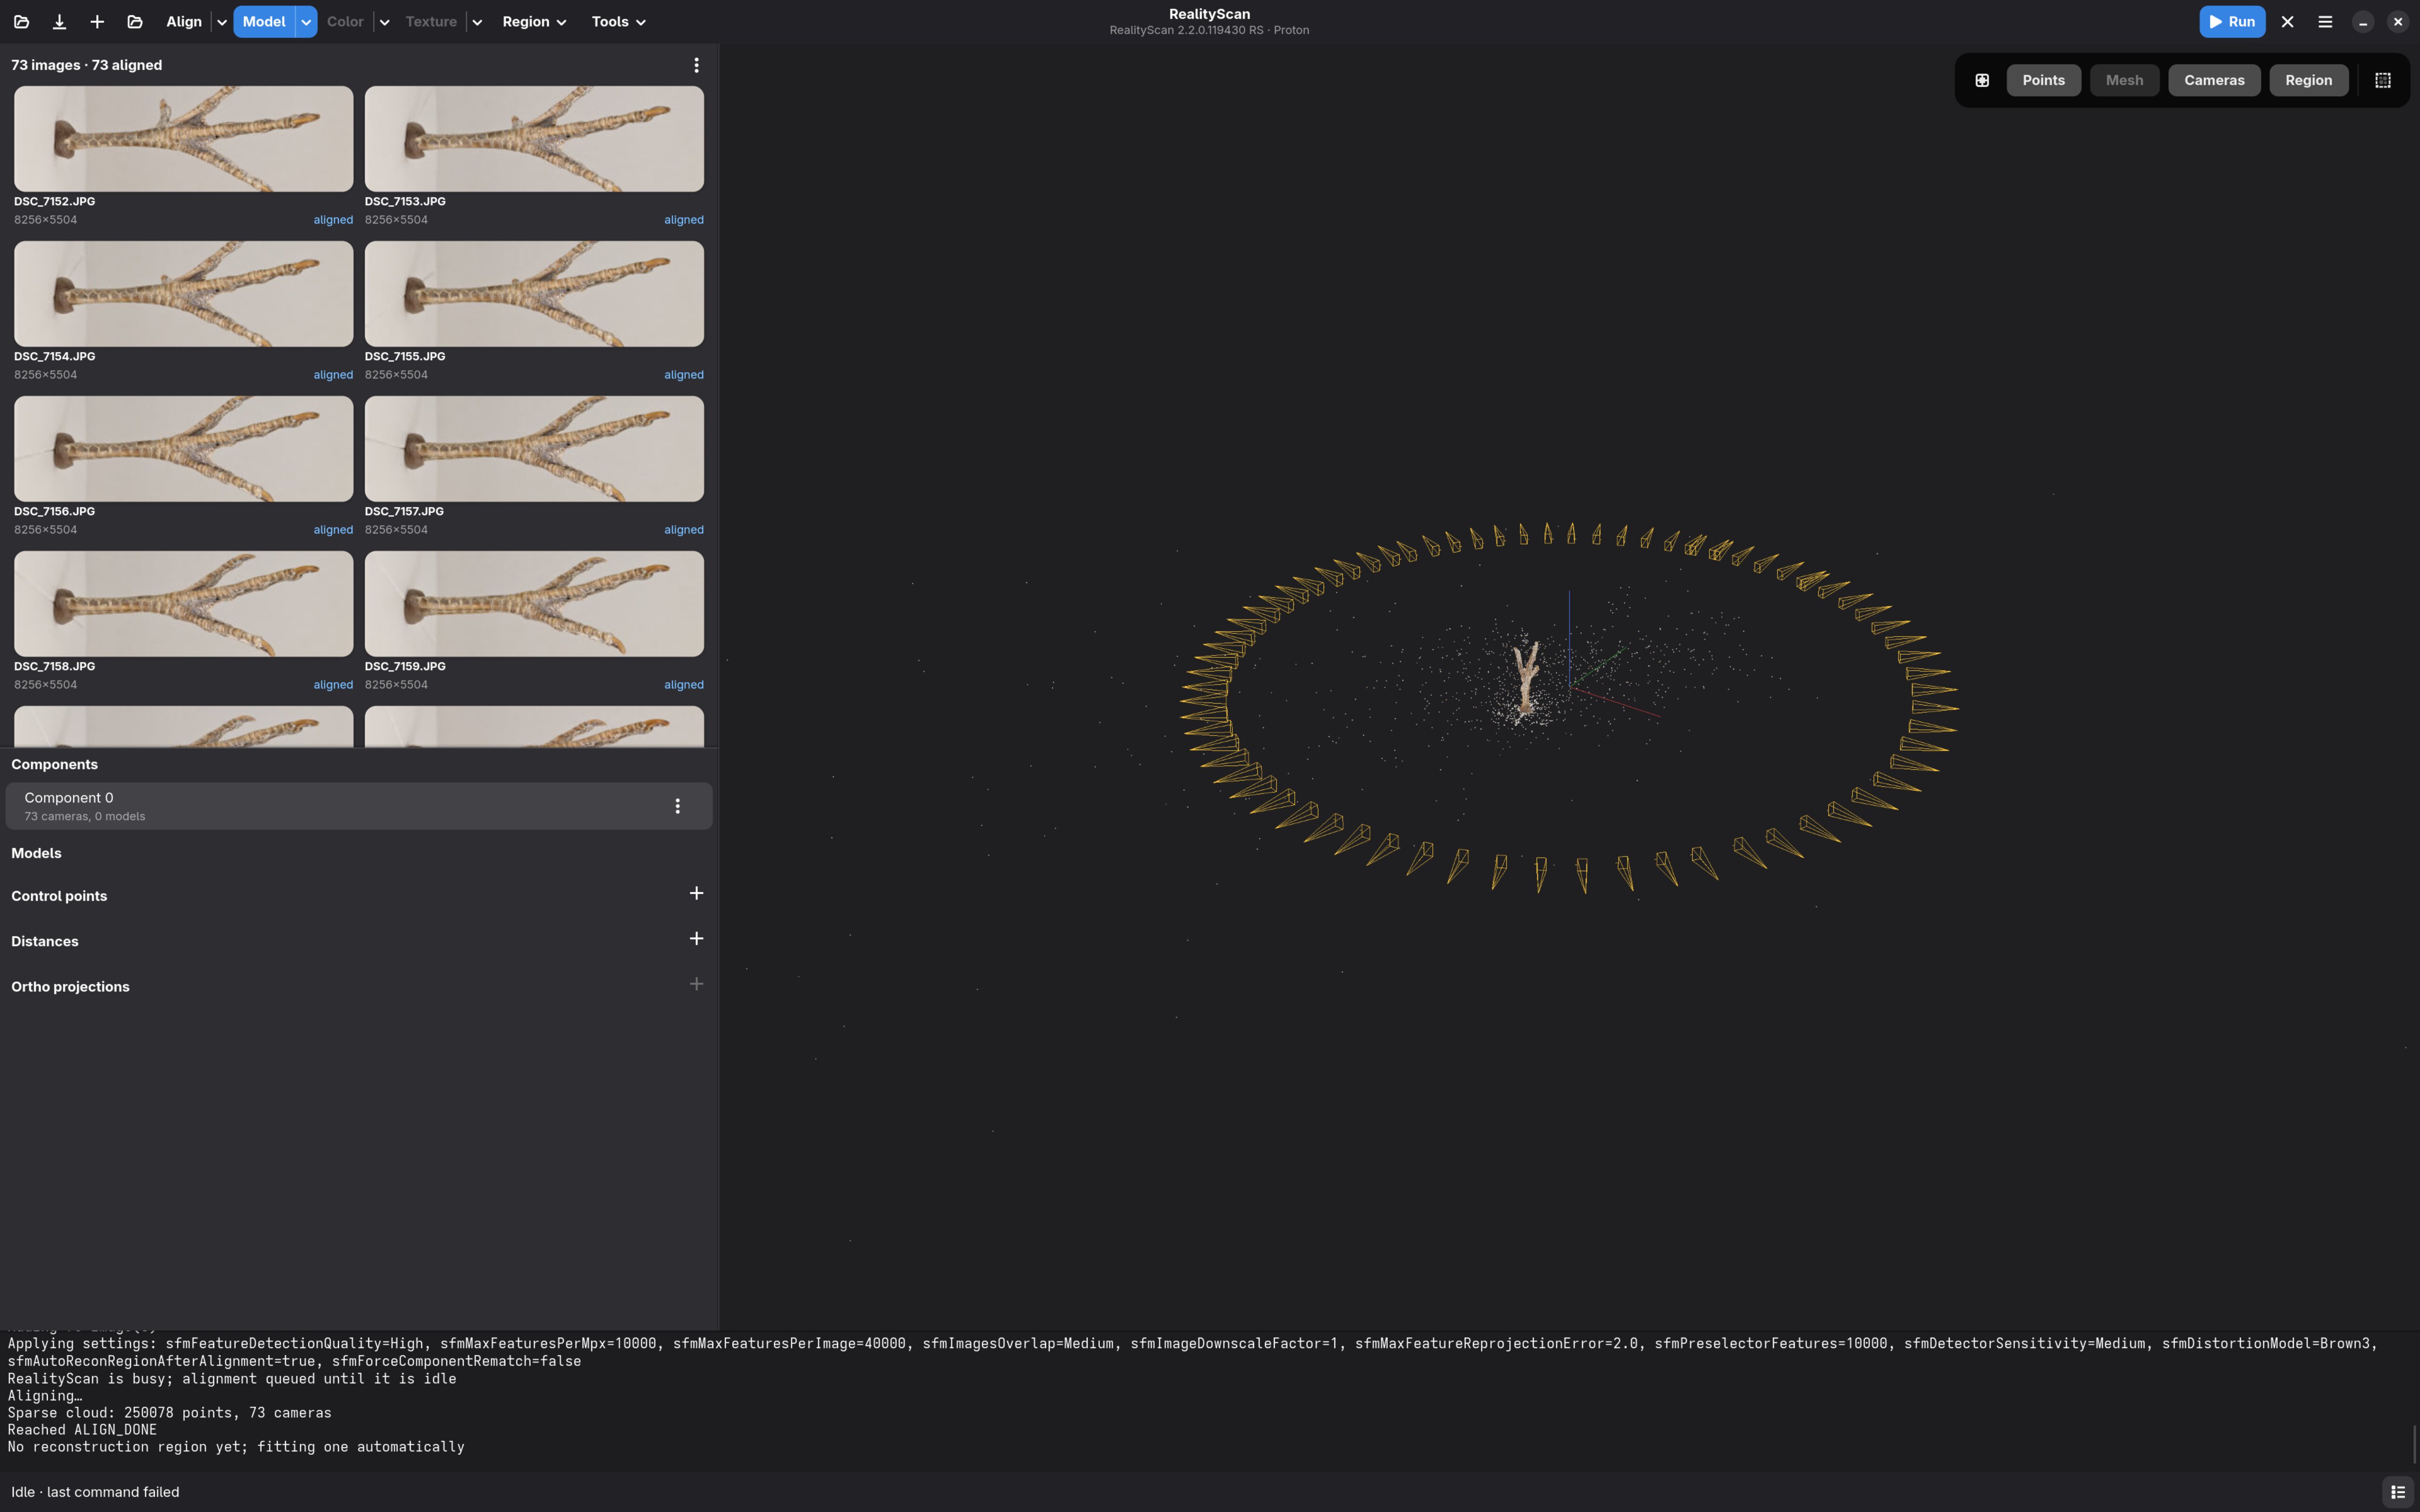
Alignment gives back the cameras, drawn as frustums around the specimen, and a sparse cloud of the matched points. Click a camera and its photo opens; select thumbnails and their cameras light up in the view. The toolbar toggles the point cloud, the cameras, the reconstruction region and the mesh, and left-drag orbits, right-drag pans, the wheel zooms.
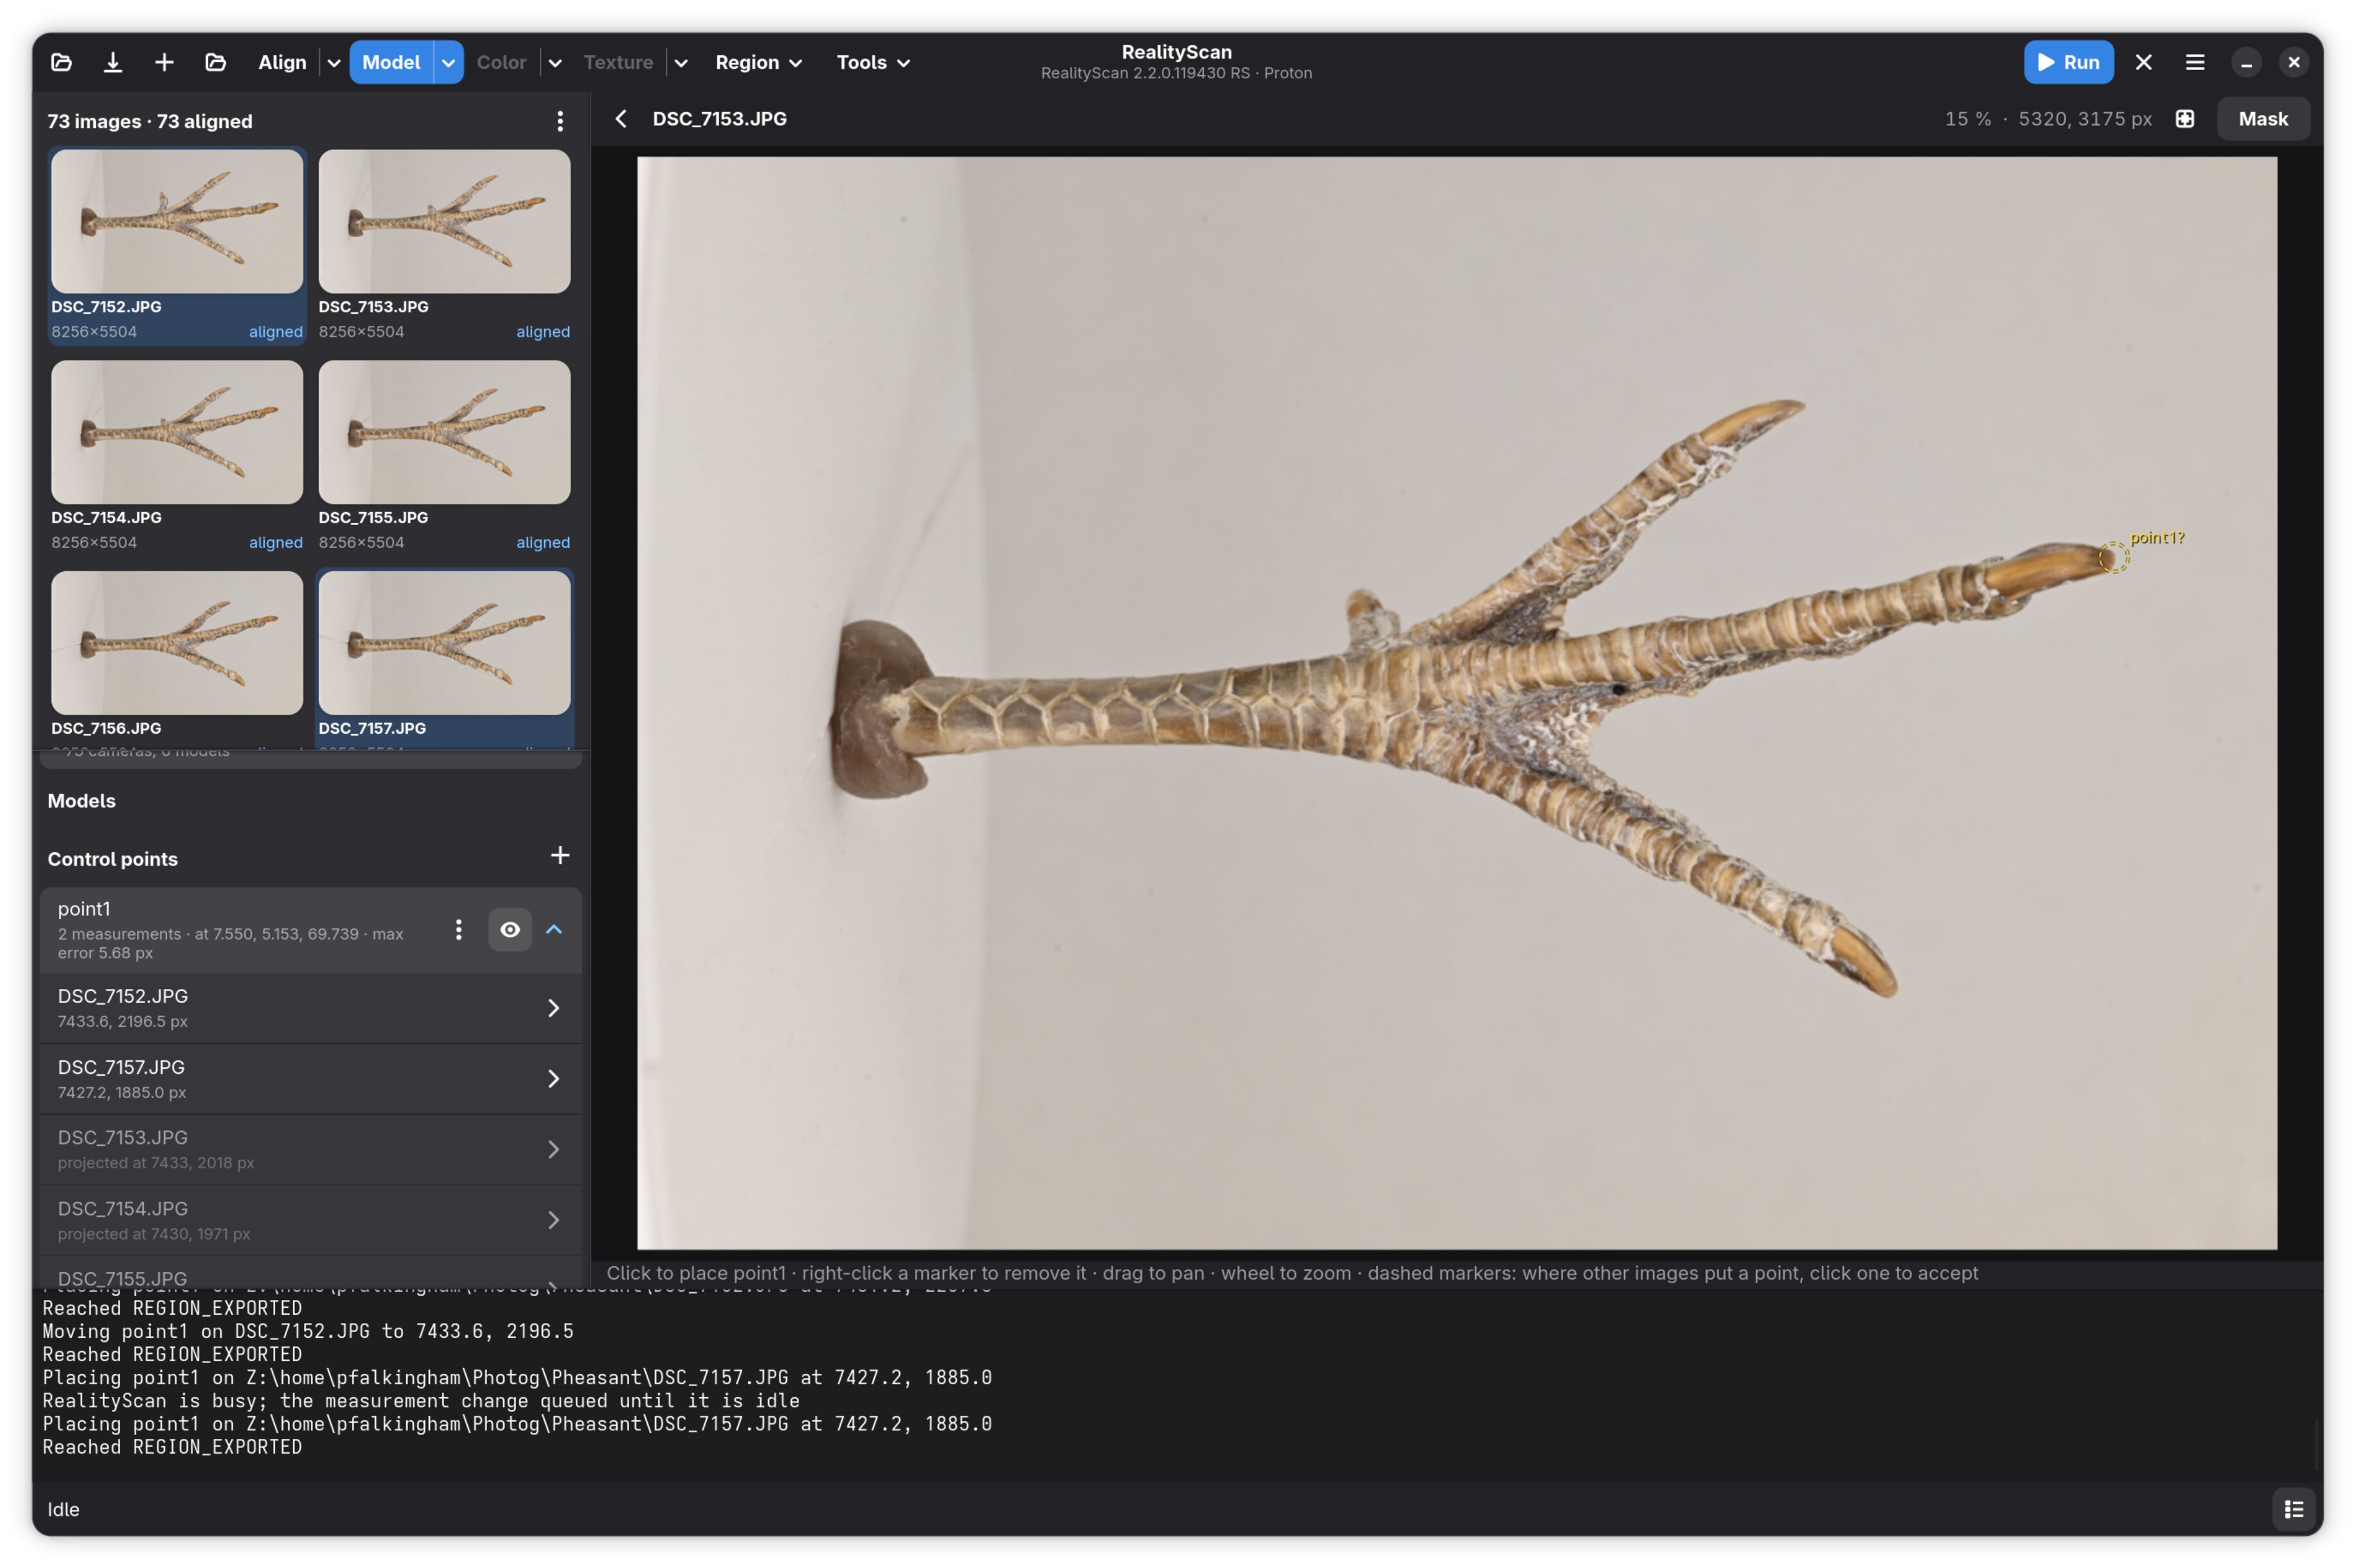
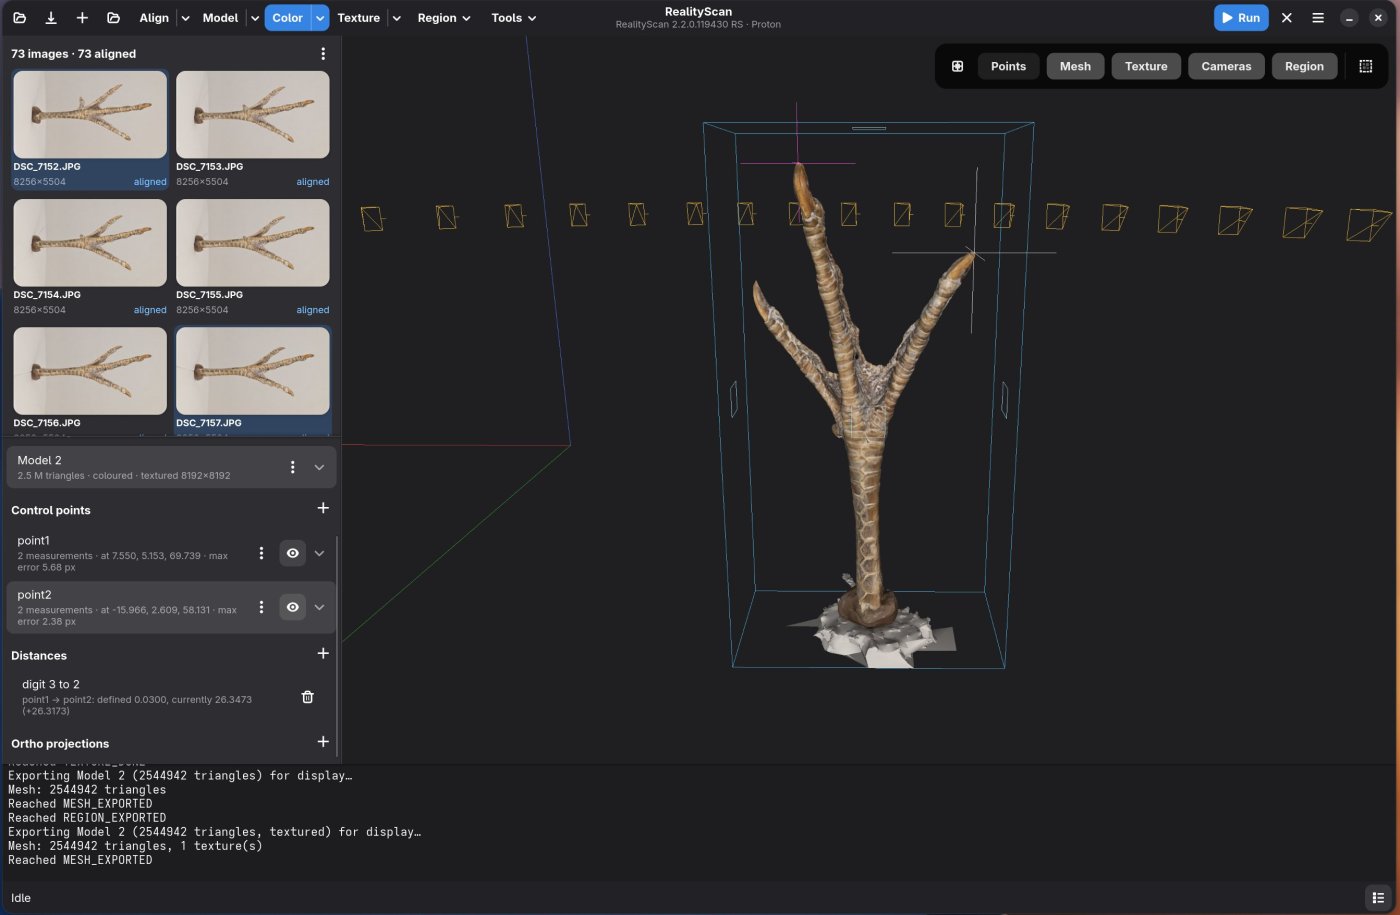
Control points are placed by clicking the same spot in two or more photos; drag a marker to move it, right-click to remove it. Once a point is triangulated, every other image shows a dashed marker where that camera should see it, projected through the registered calibration including lens distortion.
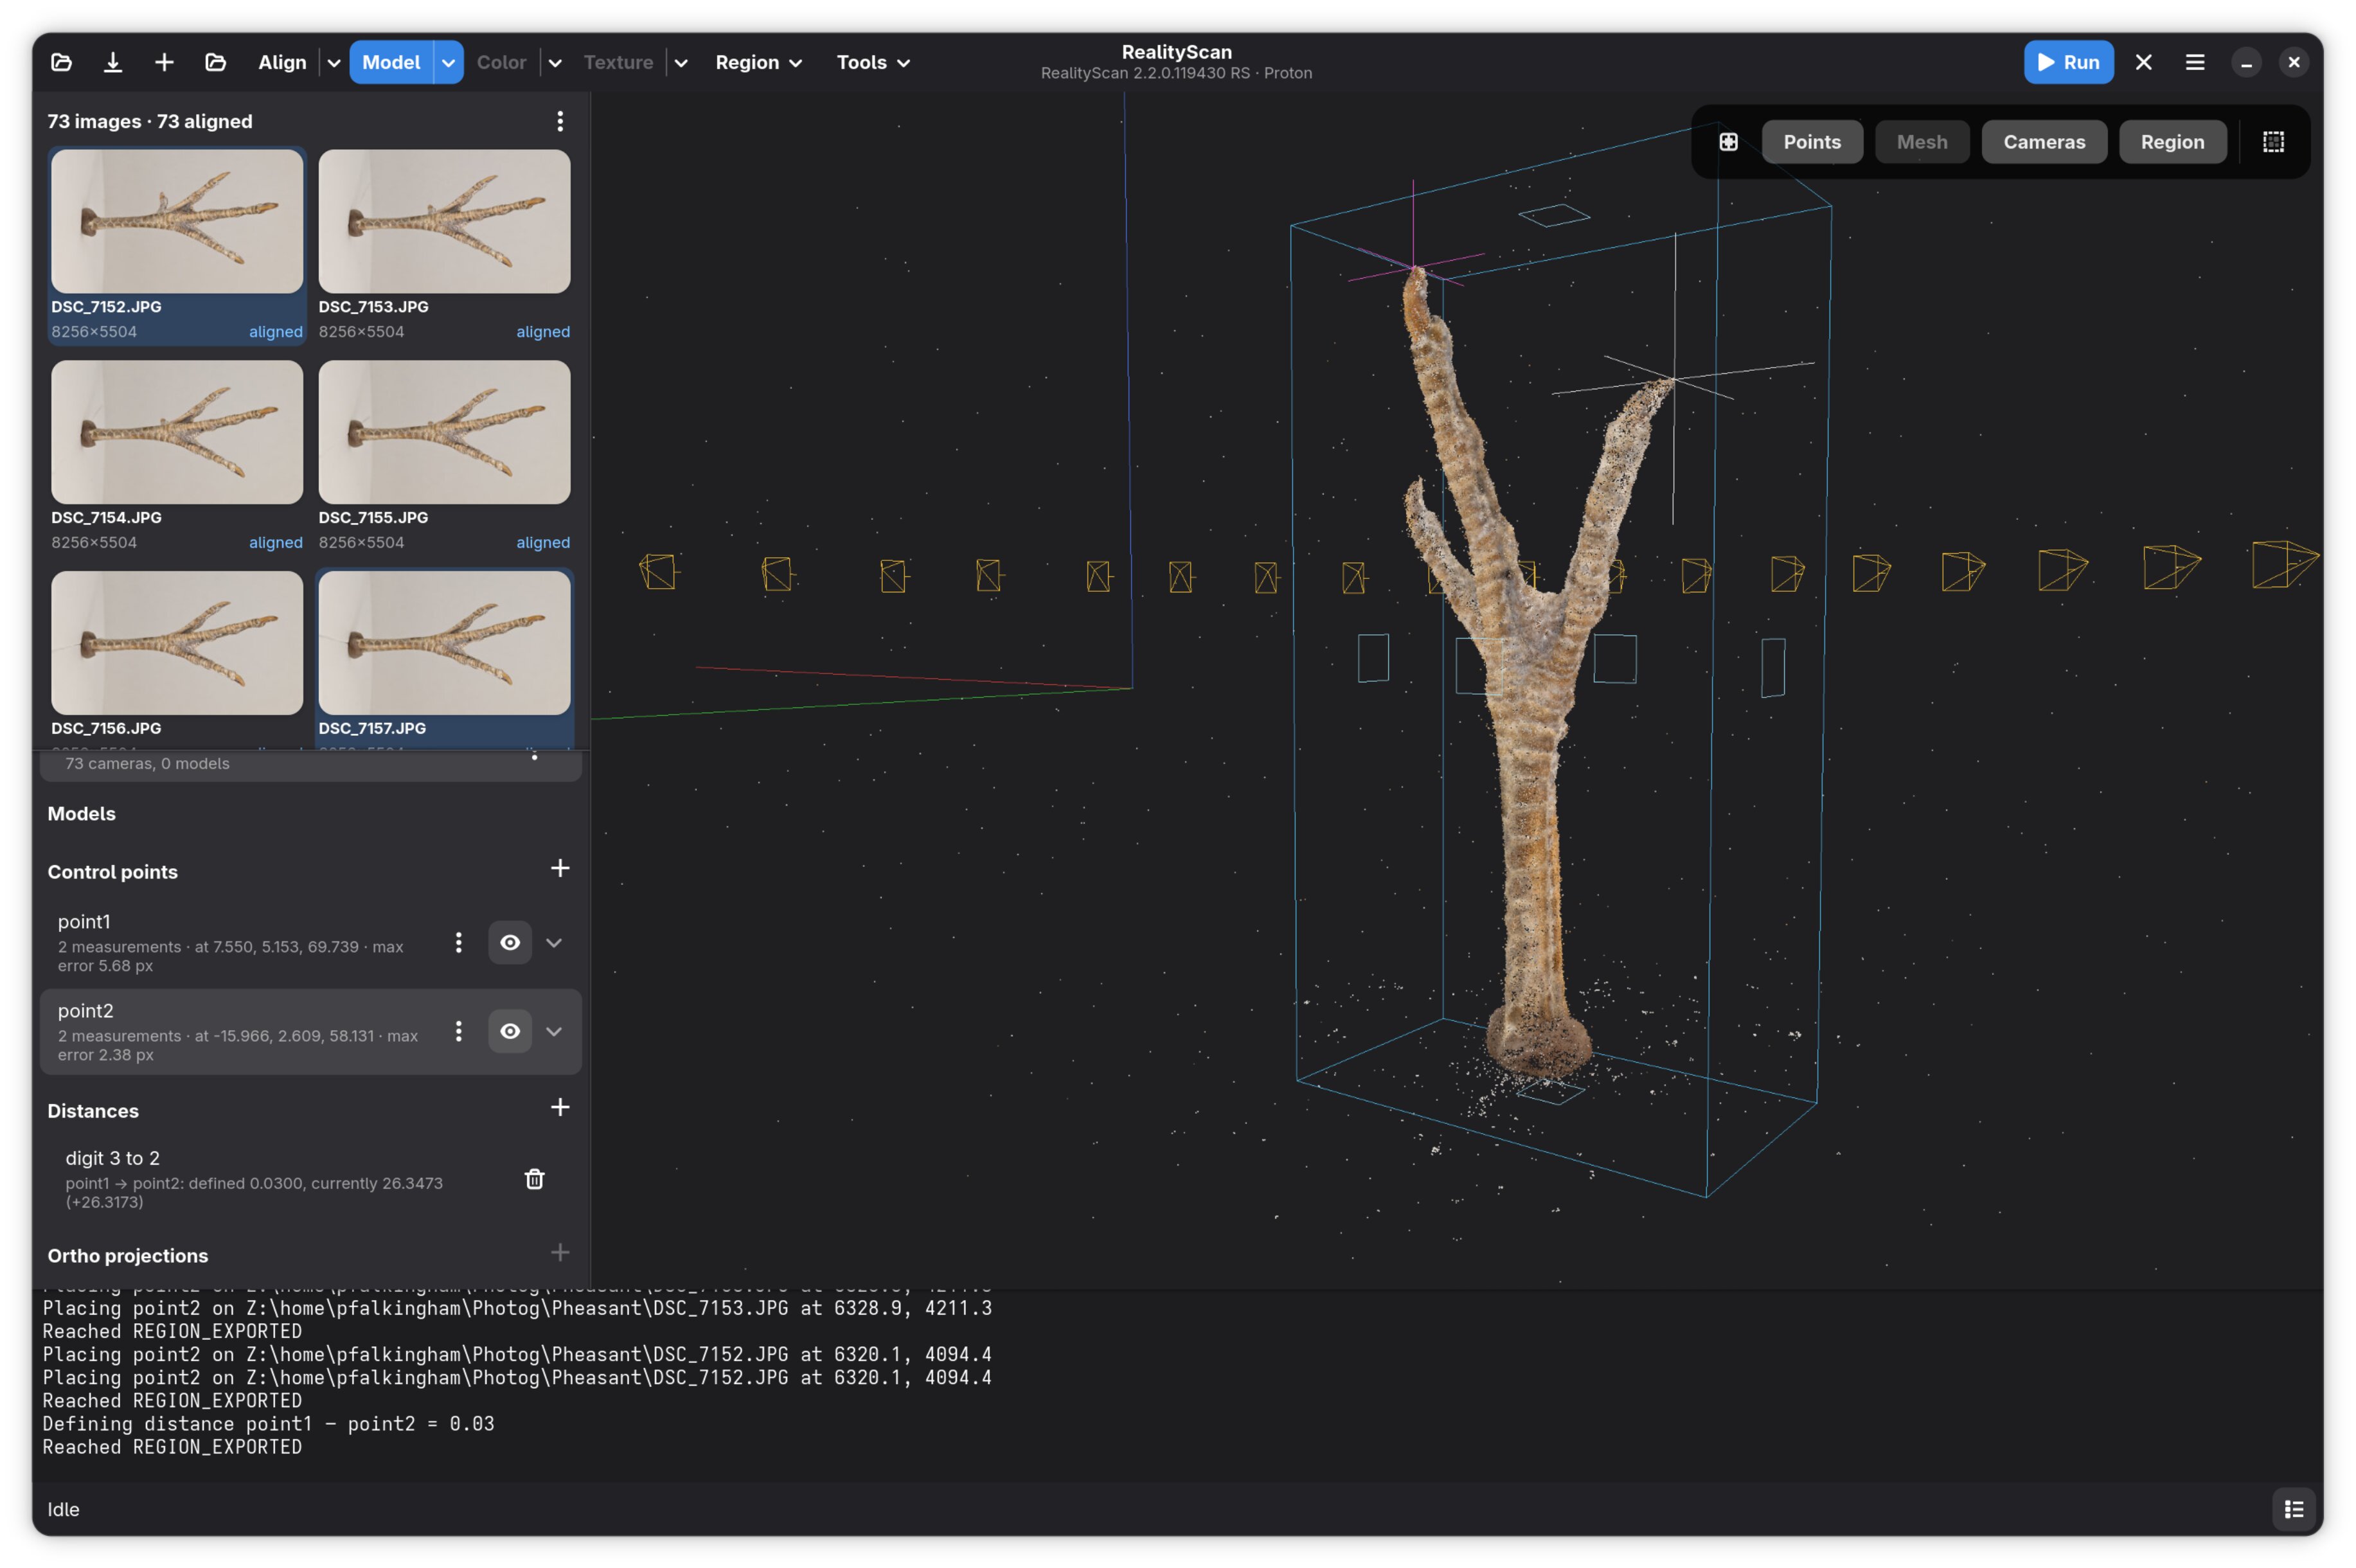
Ctrl+click on the model and a point is measured from the 3D view in three cameras that see that spot from well-separated directions. Two control points plus a known distance between them is all scaling takes: enter it under Distances, run Tools › Update Alignment to Constraints, and the whole project rescales to real size. Tools › Detect Markers finds coded targets if you use them, and ground control points import and export as CSV.
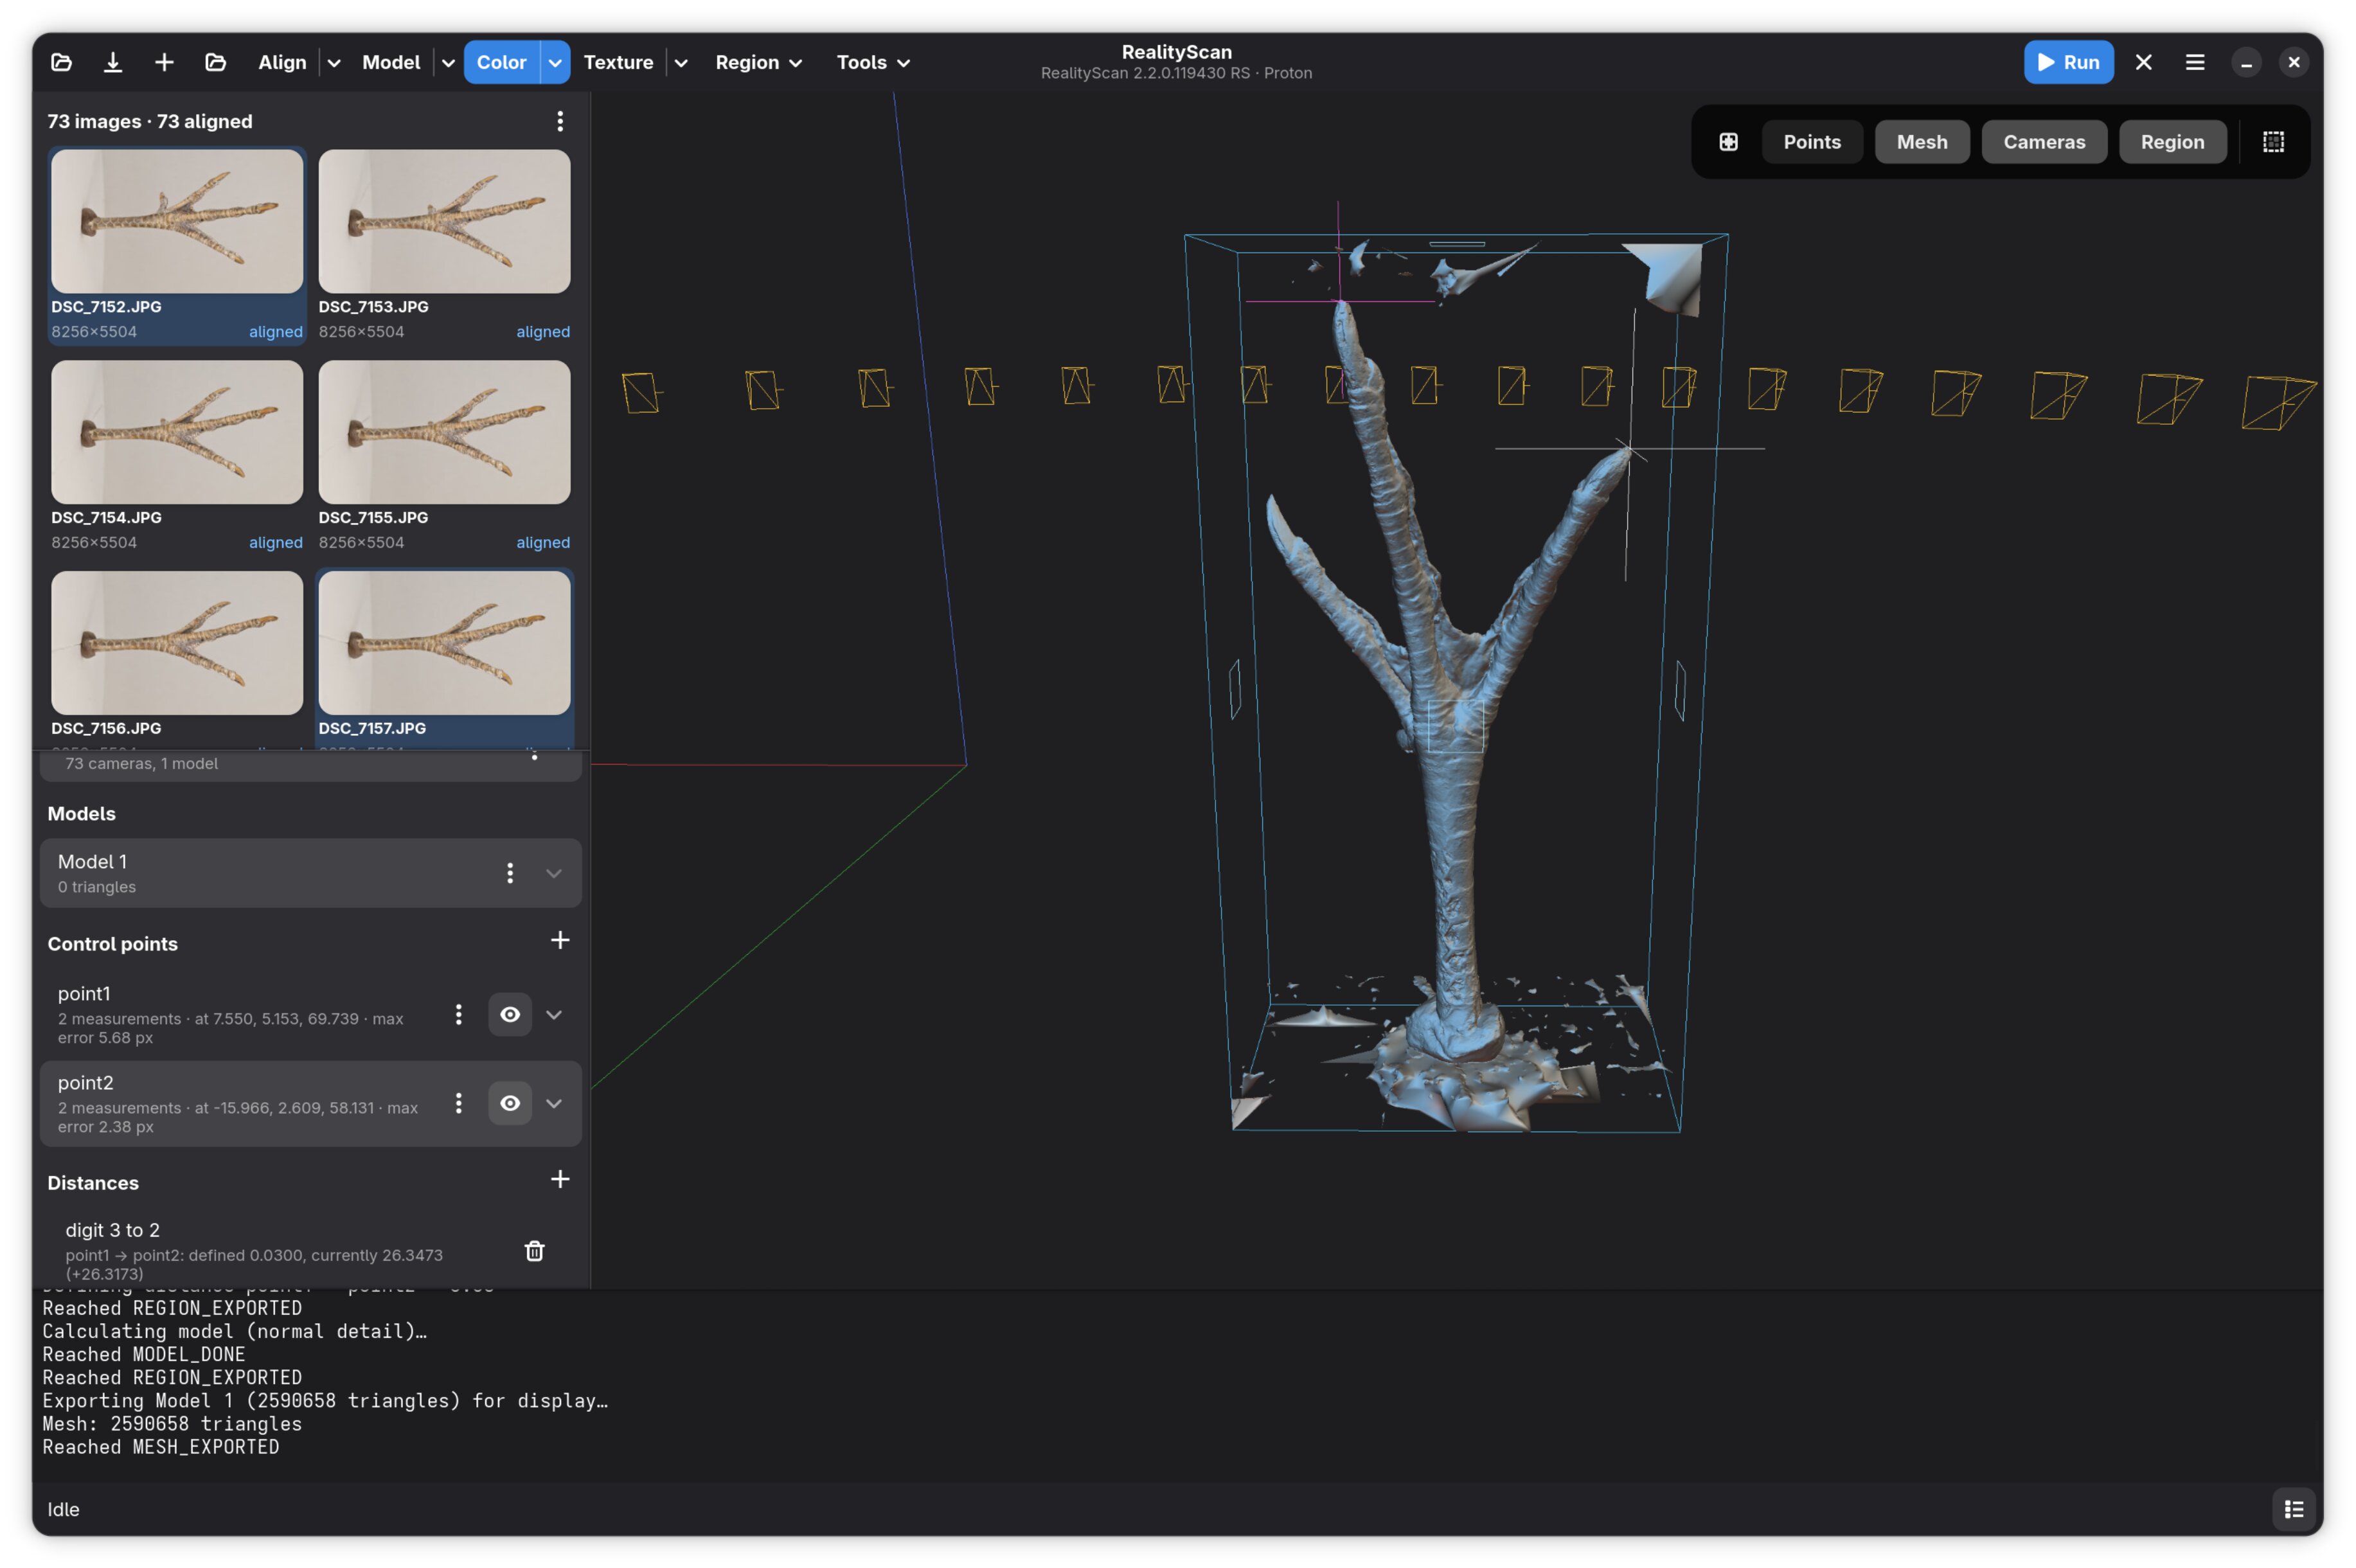
Model builds the mesh, here at normal detail, and the status bar carries the progress plus RealityScan’s own activity line. The reconstruction region, the box that decides what becomes geometry, can be fitted automatically, typed in, or dragged by its handles in the viewport.
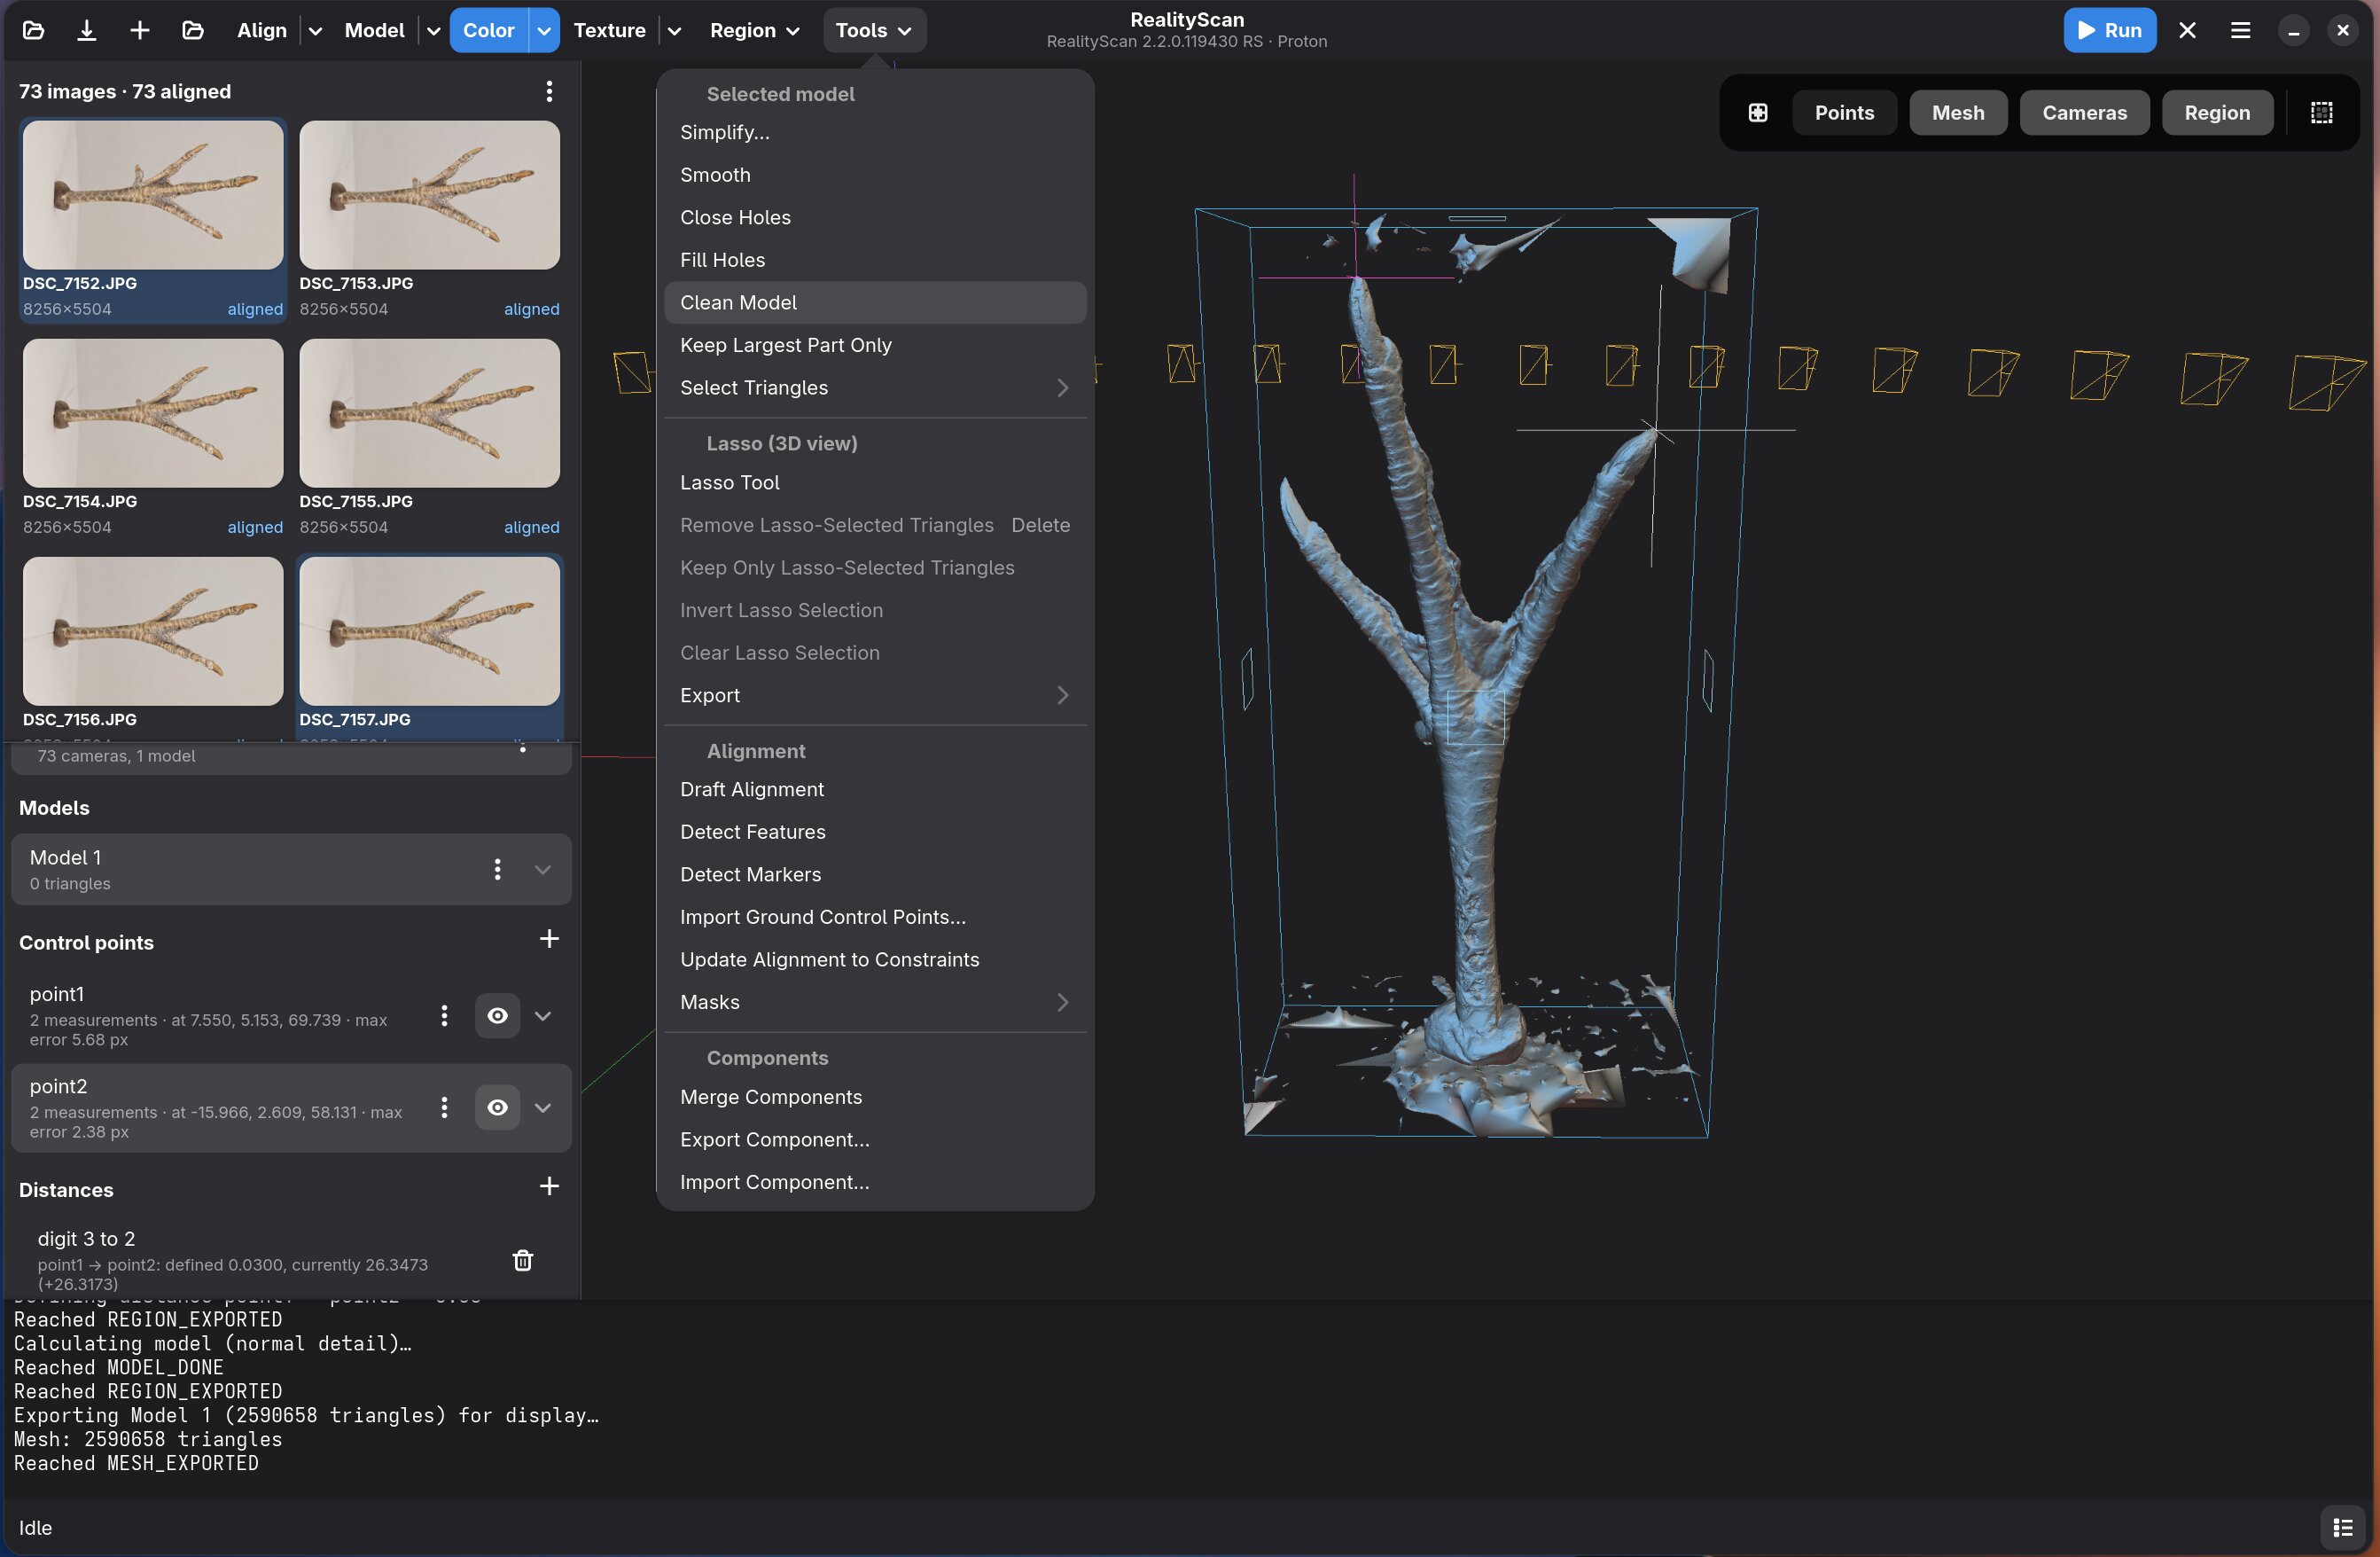
No scan comes out clean; a specimen on a turntable always drags in junk geometry from the support underneath. The Tools menu carries RealityScan’s triangle selectors, inside or outside the region, marginal triangles, large ones, largest part, followed by Remove Selected Triangles, and then Fill Holes, Smooth, Simplify and Clean. Each filter makes a new model, so the original is always still there if one of them takes something it shouldn’t.
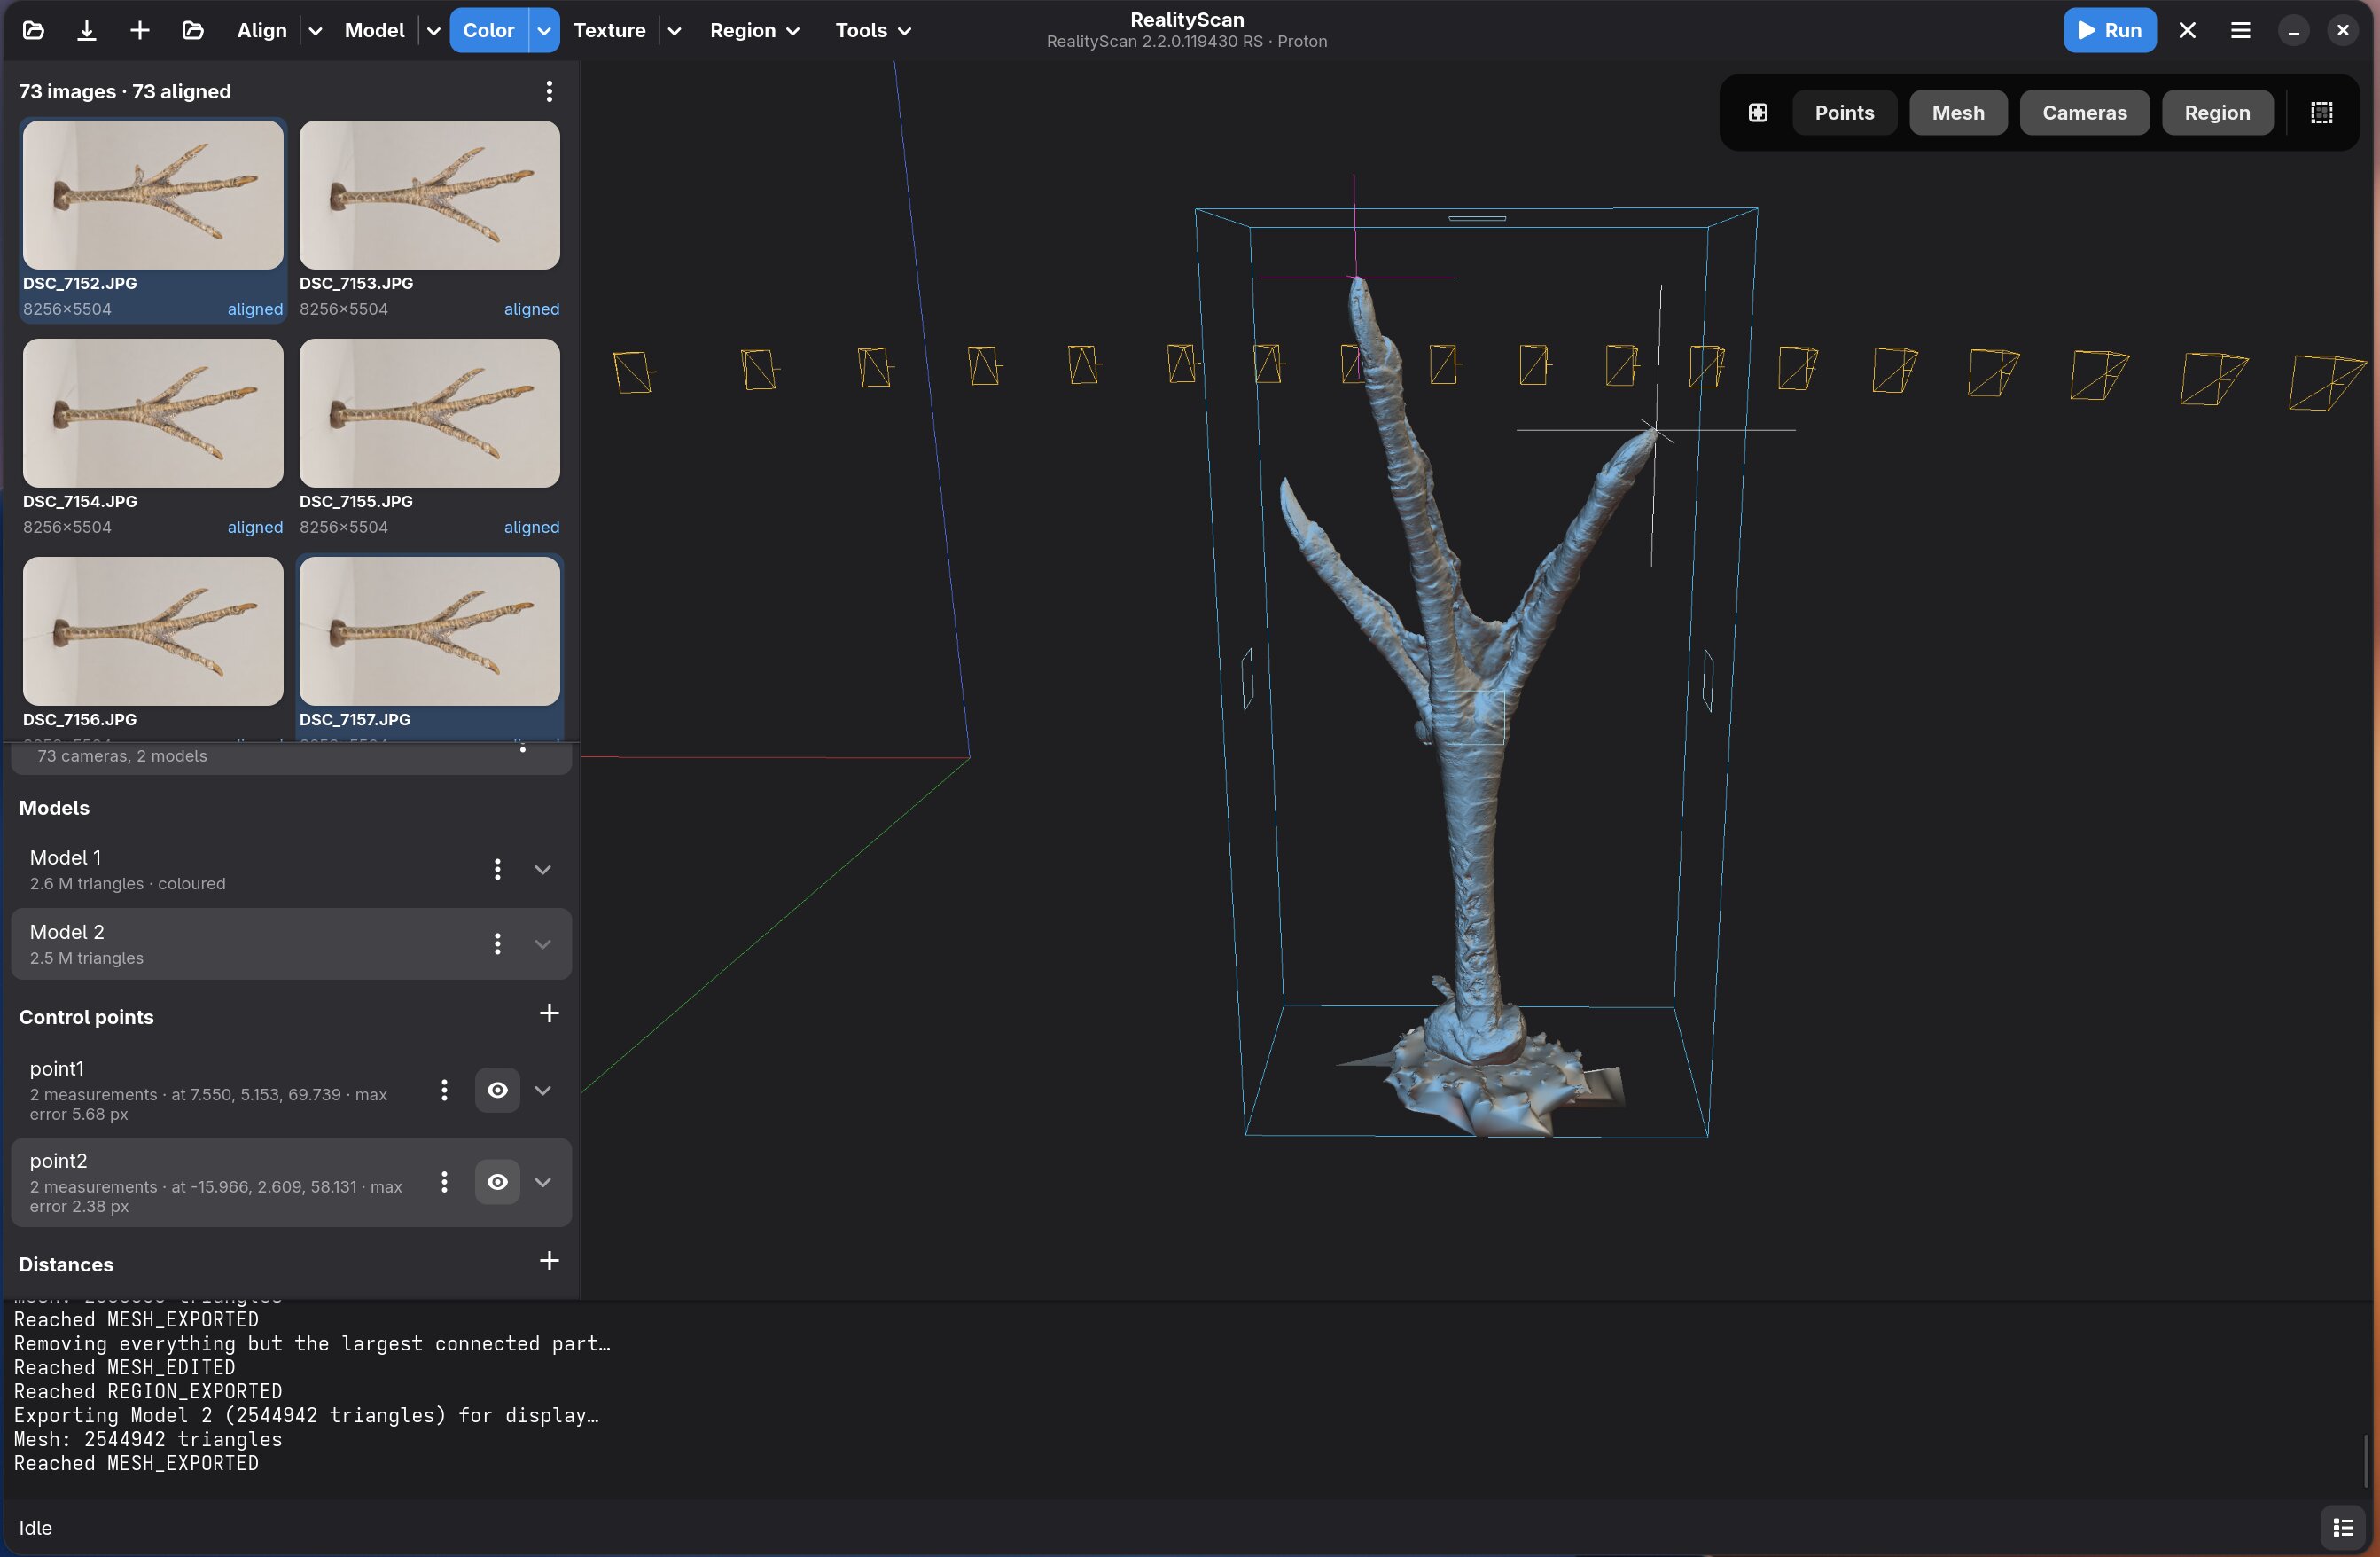
Where the selectors can’t express it there is the lasso: switch it on, drag an outline around the triangles you can see, then Remove, Keep only or Invert. On this scan that picked two and a half million junk triangles out of a five-million mesh, most of it the surface below the specimen.
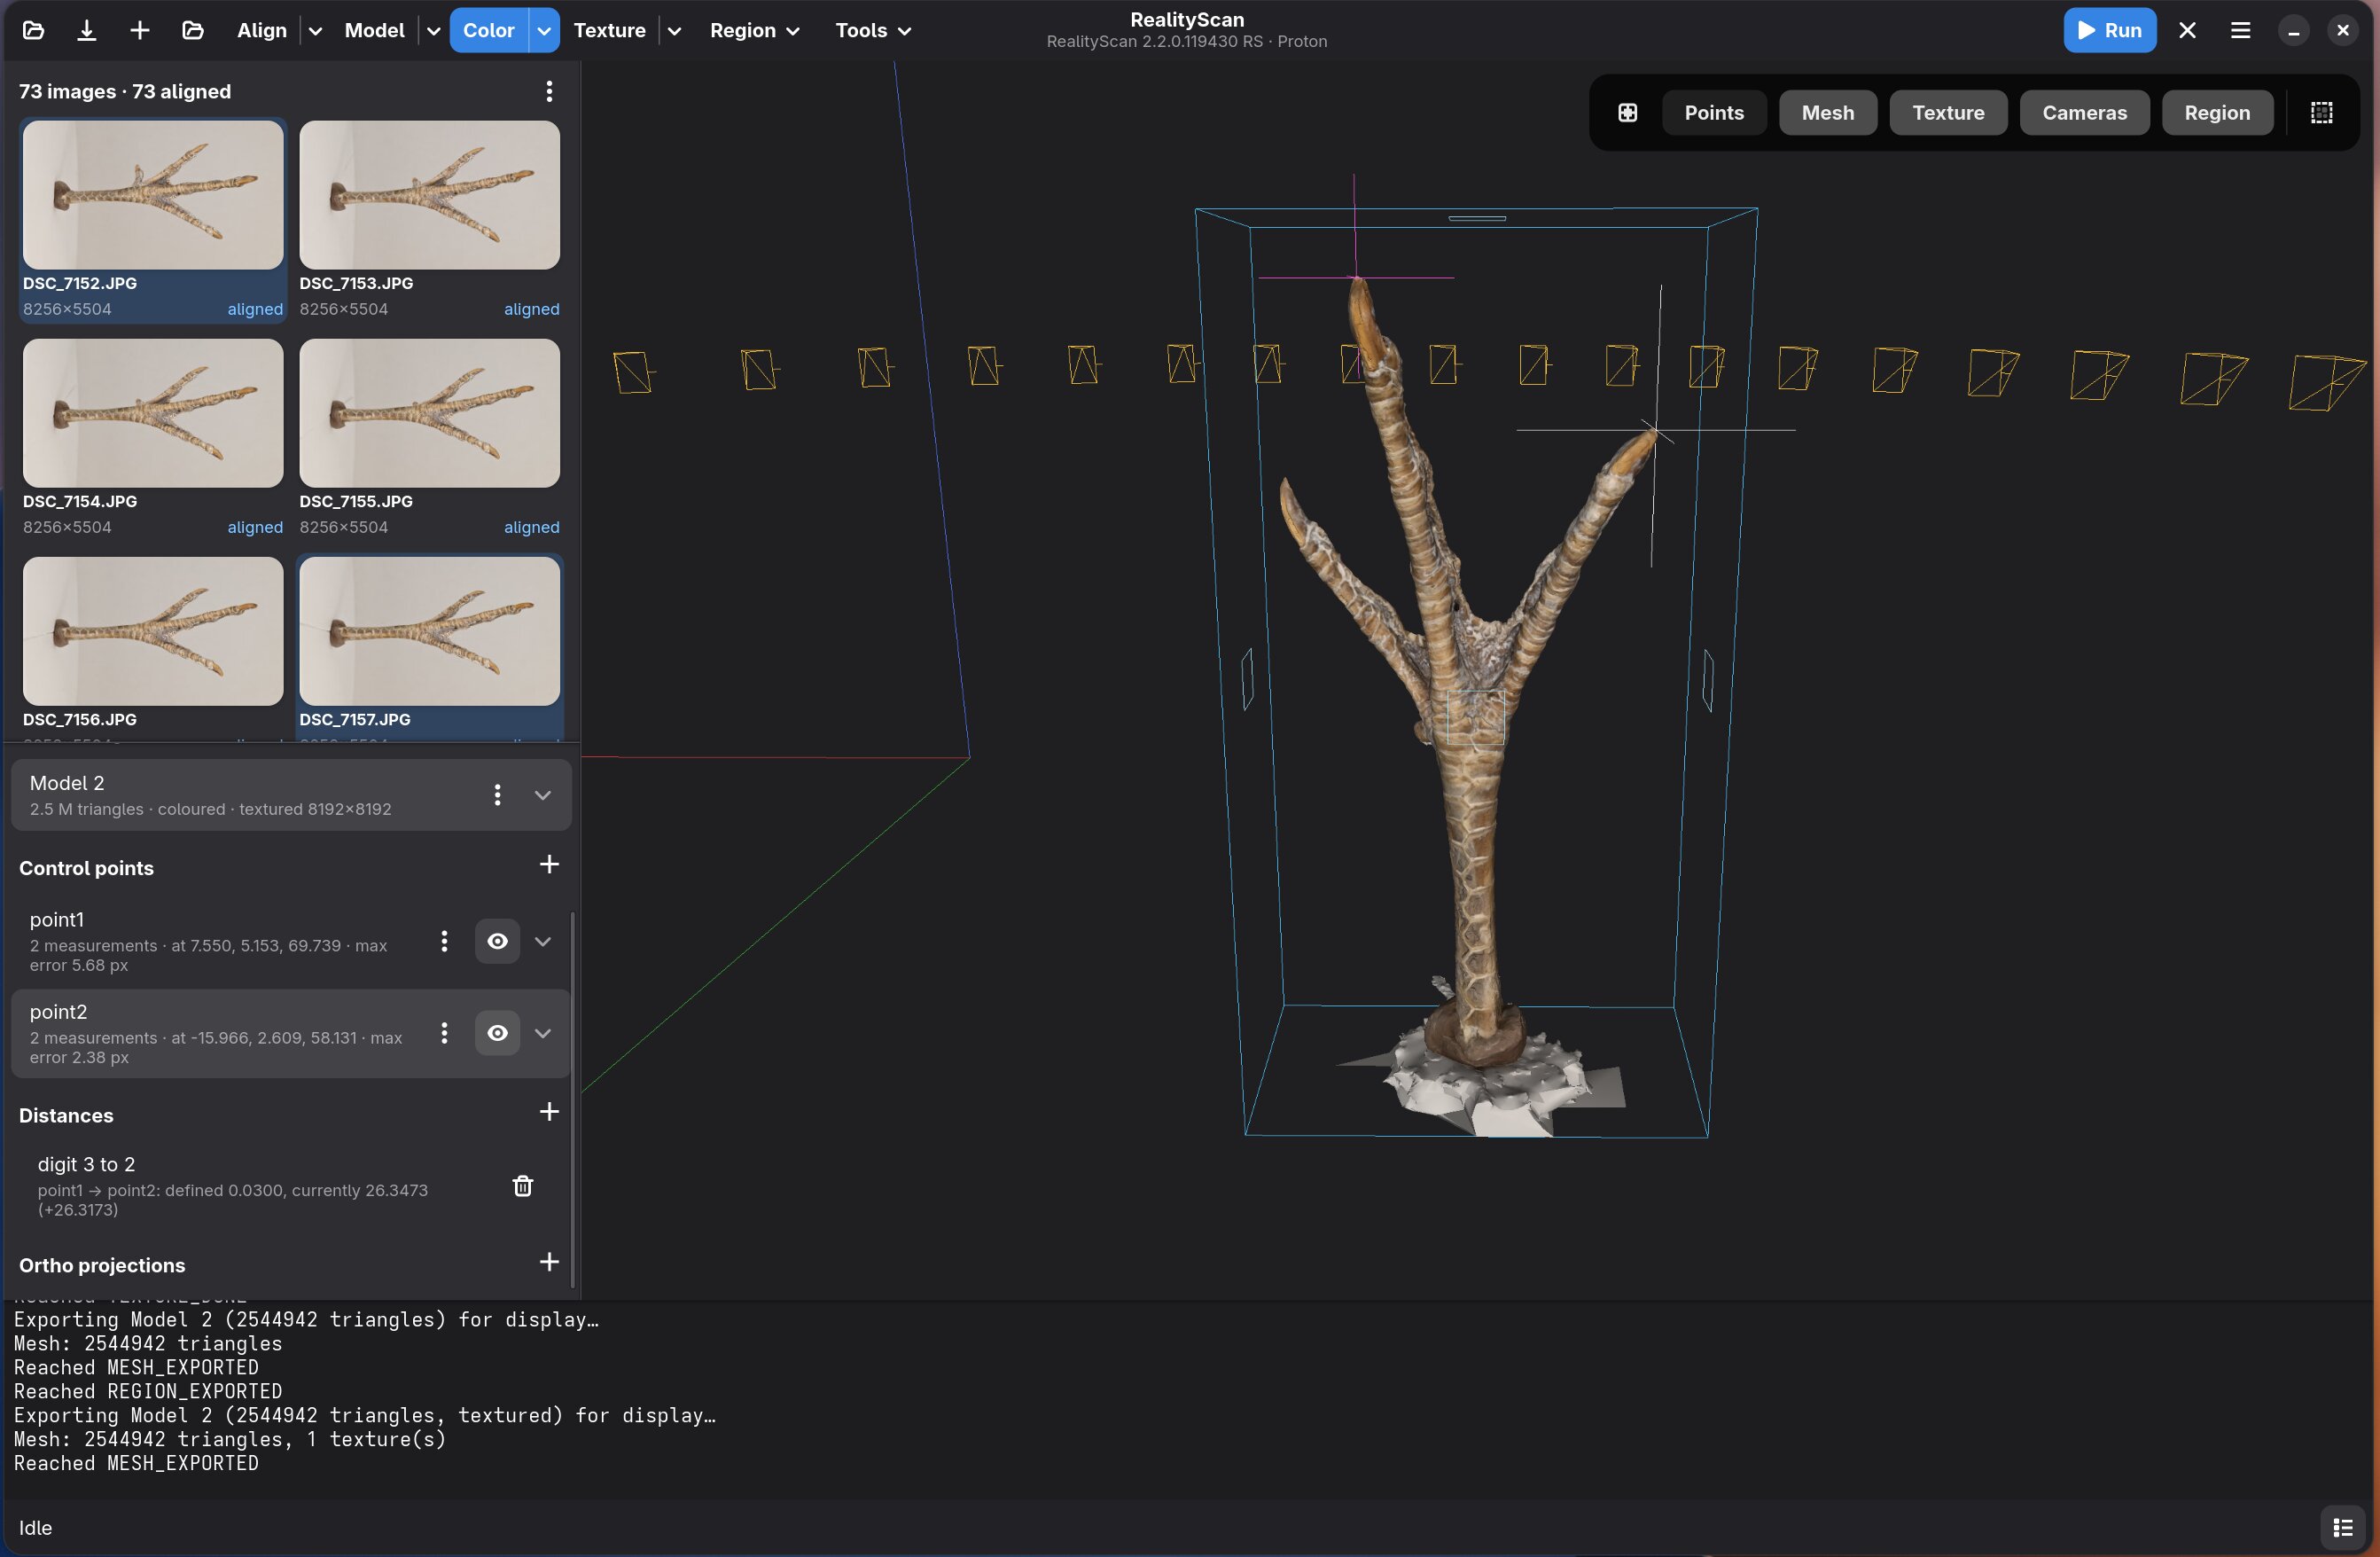
Color puts the photographs back onto the cleaned mesh and Texture wraps it, and then export (Ctrl+E) writes OBJ, PLY, glTF, FBX, USD, Alembic, Collada, DXF, STL or 3MF, with the usual options for vertex colours and textures. Masks, AI masking, ortho projections and the point-cloud and camera exports all reach the same engine through the same plugin.
It’s written in Rust, five crates, GTK4 with libadwaita. make install and it’s in your menu; there’s an Arch package too.
Basically, this UI does everything I used the native UI for, but on Linux so that you can actually use it. I’ve not yet implemented things like orthoprojection, because I don’t use it, but that’s next on my list.
With Claude as the developer
I said “I’ve built” above, but let’s be honest, Claude wrote nearly all of the code. Call it slop if you like, but the fact is it’s solving a problem for me. I did the design, the testing, and the nudging. The log reads as a long conversation that mostly works: I ask something like “we should be able to access everything headlessly instead of launching the RS gui in the background, right?”, and Claude answers “yes and no – it is already headless today, that was never the problem”, goes away, and comes back having solved it. The best example was the import that quietly returned 0 images. Claude unpacked Epic’s .deb, found CrossOver all the way down, worked out that the bottle had no JPEG-XL decoder, and fixed it by copying the codec dlls across from the Heroic install’s prefix.
If you want the nitty gritty, the repo contains a PLAN.md where all the findings about RealityScan’s remote interface are kept, and the usage guide is a separate document linked from the README.
The code
It’s up on github, MIT licensed (RealityScan itself is Epic’s, installed separately under its own terms – this is just a frontend, and not affiliated with or endorsed by them):
https://github.com/pfalkingham/RealityScan-LinuxGUI
It’ll find a Heroic Games Launcher install of RealityScan, or Epic’s Linux package, or a distrobox running either, and drive whichever one you point it at.
Please do use it, and file issues if you want it to grow. There’s also a buymeacoffee link on the github repo in case it’s really useful for you.


Leave a Reply