Here’s the original post, and links to all posts
I have previously outlined my goal of testing multiple photogrammetry solutions on a single dataset, and reporting times and results.
I’m using a dataset based on photographs of this Styracosaurus model (I’ve had it since I was quite young):
The dataset has 53 photos in total, and is available from this link. [This will be moved to figshare in due course].
The model is about 12 cm in total length, has texture for the scales, and a reflective brass nameplate on the base. The model was situated on a glass desk, and there may be reflection issues from that.

For this post, I’m using the complete package of MeshRecon: Download links and instructions were covered in a previous post.
I was running version 20150429
I placed all the images in the ‘img’ folder, and altered the run.bat file to read as follows:
cd vsfm
.\VisualSFM.exe sfm ..\img ..\results\output.nvm
cd..

cd meshrecon
.\nvm2sfm.exe ..\results\output.nvm ..\results\output.sfm 0
.\MeshRecon_init.exe ..\results\output.sfm ..\results\MESH_init.ply
.\MeshRecon_refine.exe ..\results\output.sfm ..\results\MESH_init.ply ..\results\MESH_refine.ply 1
cd ..
I.e. I changed the 1 to a 0 for .\nvm2sfm.exe, so that the whole volume was reconstructed.
Alignment and sparse reconstruction was carried out with the included VisualSFM binaries.
Alignment: 113 seconds
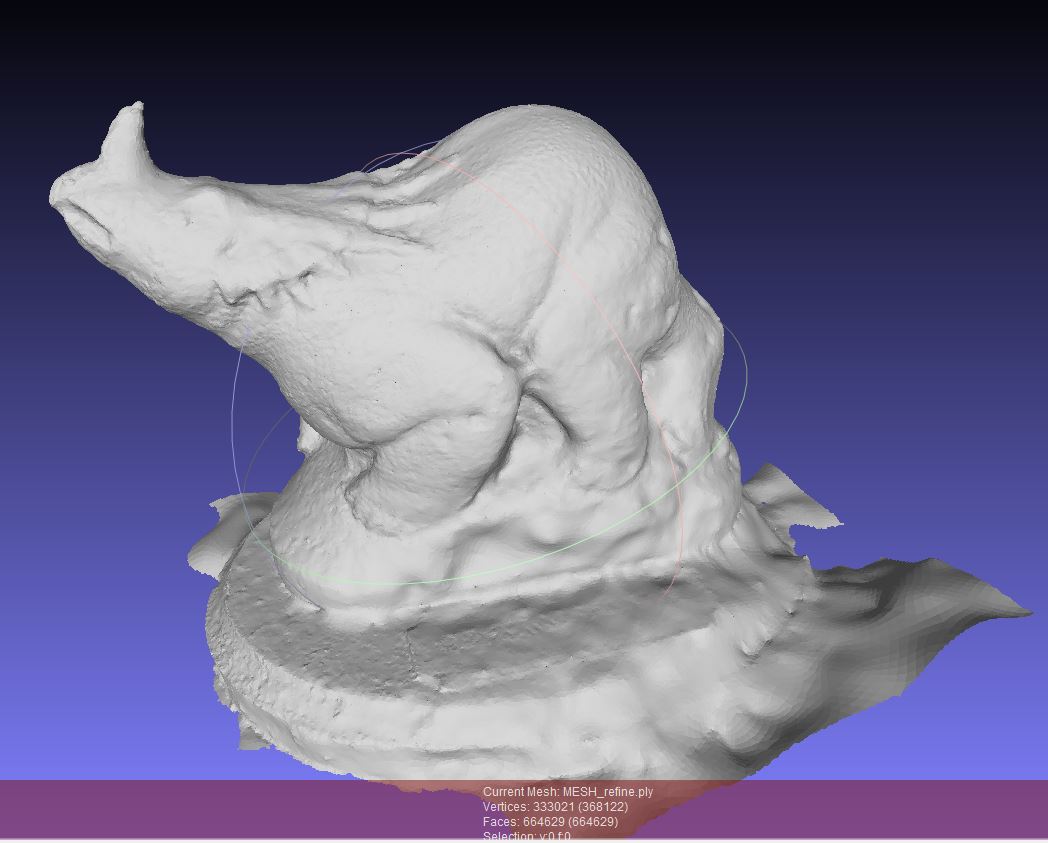
Dense + Mesh Reconstruction: 548 seconds (664561 faces)
I then textured the model using Meshlab after cleaning up some large extraneous triangles (no detailed cleaning):
Texturing: 28 seconds
Total Time: 689 seconds


And here is the model:
Note that if you change the rendering mode to ‘matcap’ you can view the mesh without texture.
The texture generation process in meshlab doesn’t work well with sketchfab – the lines you see joining portions of the texture do not show up in meshlab. I will a) see if I can fix this in meshlab (there is an option for border width) and b) try different texturing programs later.
Summary – MeshRecon (+VisualSFM)
This package is great. It’s easy to use – put images in a folder and the double click ‘run.bat’. It has also produced the best model so far, containing lots of detail without the overly rough surface that photoscan produced on ‘high’. The time taken was also very positive, taking much less than photoscan’s ‘high’ settings (though MeshRecon did produce a mesh with fewer faces, for what it’s worth).
The downside compared with Photoscan is that without delving into .ini files and .bat files, it’s very difficult and unintuitive as to how to change settings and tweak the process. I had to alter the .bat file as the model kept being cut off, and it took a little delving into the documentation to realise it was only reconstructing where all of the cameras could see. That was no good in this case, as there are several views that contain only the head, for instance. I assume this setting is on by default as it makes the reconstruction more robust where the dataset is taken from, say, a turntable.
I’d like to try different texturing methods, but for now I’ll stick with meshlab, as it’s straightforward enough.

Hi, I wonder whether you altered the .ini file in VisualSFM, too? I tried the dataset ( Styracosaurus) and altered the parameter as you did in .bat file, but the result seems not so good as your final result in sketchlab, my reconstructed result in the left side of Styracosaurus was weird. If you have any idea or I did something wrong, please don’t refuse to offer your kind advice.
I don’t think I did for this test. I have done in the past though.
You could try running again, as sometimes it selects a different starting pair. Otherwise, not sure why that’s happening.