In this post, I’ll be taking a look at the Photogrammetry solution from Autodesk – ReCap Photo. This is commercial software, but as with most (all?) of Autodesk’s offerings, an academic email address will get you access for free.
What makes ReCap Photo different to the software I’ve tested before is that all the processing is done in the cloud. That means, the software uploads your photos to Autodesk’s servers, generates a model, then downloads it to your computer. I leave it to you to read the terms and conditions and so on to make sure this is suitable for your own datasets. Obviously it’s not an issue with my Styracosaurus model dataset.
When you download and install ReCap, you can also install ReCap Photo. It’s the latter you want to launch when it’s installed, and not the former.
When you’ve downloaded and started Autodesk ReCap Photo, you are met with this UI:

With the Welcome splash screen dismissed, you want to click on ‘Object’ in the upper left, under create 3D. You’ll notice there’s a little padlock, which means this is a premium feature and you’ll need your Autodesk login, acquired via payment or university email access when you click on it:

Enter those details, and if you have access you’ll be granted with a fairly plain looking screen:

Do as the relatively blank screen tells you, and click anywhere to add photos:

When that’s done, you just click the ‘create’ button. Enter a name for your model, and decide whether you want the software to autocrop the model after. I’m turning it off to make sure I get as much as possible, but you might find this useful if your photos include a large amount of background.

Press start, and you’ll be asked to acknowledge you’ve read the terms and conditions. Which you probably should if your data is sensitive:

You’ll now see the home screen, and at the bottom is the upload status of your project. This will obviously take a variable amount of time depending on your internet connection, as well as the number and size of photos:

When the upload is finished, you’ll see this:

This means that the photos are sitting on Autodesk’s servers, awaiting availability for processing. The time it can take now is entirely variable, and has nothing to do with how good your computer is. There’s also no indication of how long it will take.
When processing starts, the image will change accordingly, and give you a % complete:

In this case, it was processing for about an hour and a half in total. When finished, the icon will look like this:

Click the arrow in the lower right, and your model will start downloading. You choose where to save the model, and then it saves it to that location as a *.rcm file. Again, time taken will depend on model size and the quality of your internet connection.
When it’s downloaded, you’ll see a new model appear under the ‘My Computer’ section:

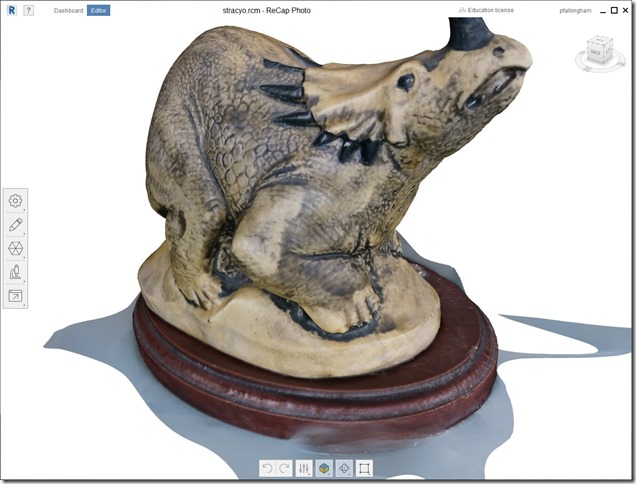
Double clicking it will take you to the editor:

The editor allows you to trim the model, and importantly to export it. The *.rcm file is an autodesk format (I think), so you need to export it to obj or something similar if you want to use it or share it in non-autodesk products.
As for the model itself… As you can hopefully see from the screenshots above and below, the texture is absolutely fantastic:

But we all know textures can be deceiving, so lets take a look at the untextured mesh:

It’s pretty darn good. There’s some smooshing of the base that some of the better softwares I’ve used haven’t had, but the dinosaur itself is really nice, with no holes or obvious issues.
The buttons on the left of the editor will allow you to crop, retopologize (decimate), smooth, sculpt etc.
I’m not doing any of that here, but I will export the model to OBJ. Clicking the relevant button provides this sub-window:

Clearly, you’re able to select firstly the face count (so you can decimate as you export), as well as texture resolution, and if displacement and normal maps are exported too. Re-baking textures can be quite resource intensive, particularly at the highest resolutions.
Conclusion
It’s hard to directly compare times with other software, because it’s all done on a queue-based cloud system. The whole process took an hour in this instance, for what that’s worth, but if the servers are busy queue times could be longer, so your mileage may vary. However, this means that even if you don’t have a powerful computer, you can still process datasets to a high quality, and that’s certainly a major selling point for some people. The resulting models are really excellent, especially the clean textures. I’m not entirely clear what the limits are for the academic license, but I have a 25gb data limit, which is plenty for any photogrammetric model I’ve made in the past. Of course, there’s always the associated issues of legalities/rights etc of having all your photos on someone else’s servers, and you’ll need to look into whether the license/terms are suitable for your needs.

Thank you Dr Peter, for always give us the good personal experiment and result. I have read your comparison of different software which save me lots of time to try it myself for which is better.