
Part 1: Photoscan | Part 2: VisualSFM+MeshRecon | Part 3: VisualSFM+PMVS+Meshlab | Part 4: OpenMVG + MVE | Part 5: MVE | Part 6: ReMake | Part 7: SMVS (+MVE) | Part 8: COLMAP | Part 9: 3DF Zephyr Free | Part 10: MicMac | Part 11: VisualSFM + openMVS, & COLMAP + openMVS | Part 12: Revisiting OpenMVG (with OpenMVS) [updated] | Part 13: Revisiting 3DFZephyr Free (v4.001) | Part 14: AliceVision Meshroom
Current Recommendation: Part 14, AliceVision Meshroom
I have previously outlined my goal of testing multiple photogrammetry solutions on a single dataset, and reporting times and results.
I’m using a dataset based on photographs of this Styracosaurus model (I’ve had it since I was quite young):
The dataset has 53 photos in total, and is available from this link. [This will be moved to figshare in due course].
The model is about 12 cm in total length, has texture for the scales, and a reflective brass nameplate on the base. The model was situated on a glass desk, and there may be reflection issues from that.

I’ve had a few requests to take a look at MicMac. I’ve dabbled with it before, and I’ve seen plenty of praise for it online, but because it – and the website you get it from – are in French, I [like a typical English speaker] haven’t invested much time in trying to suss it out.
Hold on to your pants folks, because I’m going to fumble through. Most of what I’m doing I took from the English language wiki. You can download the latest binaries from here.
As far as I can tell, there’s no interface, and this thing is run entirely from the command line. Default install went to C:\MicMac64bits for me, and for the sake of simplicity [i.e. so I don’t have to call binaries from a different directory] I’ve stuck my folder of photos, “Styrac” in the Micmac binary folder. Not great practice but it’s convenient here.
So I’ll open a command prompt inside the images folder, ‘Styrac’.
As an aside, the most recent version of windows 10, the Creators Update, allows execution of windows binaries from the bash on windows command line, which is ace. As such I’m running everything through bash so I can use the unix ‘time’ command to time how long each stage takes. However, that means the GPU is currently off limits (I think), though to my knowledge MicMac doesn’t leverage the GPU.
Tie Point Matching
The first command to run is:
..\mm3d.exe Tapioca MulScale “.*.JPG” 500 2500
The ‘Tapioca’ command tells Micmac to look for tie points. ‘Mulscale’ means it will first run through the images at 500px resolution (500 pixels on longest side) to find most likely matches, before running at a higher resolution, in this case 2500. Tapioca and Mulscale are case-dependent.
I had a load of errors about my Sony Nex-6 that zoomed by, but it kept on trucking.
Time taken for tie Points Search: 5m 54 seconds
Internal and Relative orientation.
It’s not helping that the MicMac process uses different terms than I’ve come across before… Seems this is a portion of what I’d normally call matching cameras?
The command is:
..\mm3D.exe Tapas RadialStd “.*.JPG” Out=MyFolder
We’re creating a new sub-folder here called “MyFolder” in which ‘stuff’ will be stored (I have obviously not delved into the nitty gritty for this one) – you can call this whatever you want.
Time: 1m 33 seconds
Visualize Relative Orientation
This command just outputs stuff so we can see the cameras and sparse point cloud in meshlab:
..\mm3d.exe AperiCloud “.*.JPG” MyFolder
Time taken: 1m 43 seconds
Here’s said sparse point cloud (AperiCloud_MyFolder.ply) visualized in meshlab:

So far so good, seems everything is in order.
Image Masking
Now we can mask the sparse point cloud. Run:
..\mm3d.exe SaisieMasqQT AperiCloud_MyFolder.ply
This opens a GUI showing the point cloud and cameras:
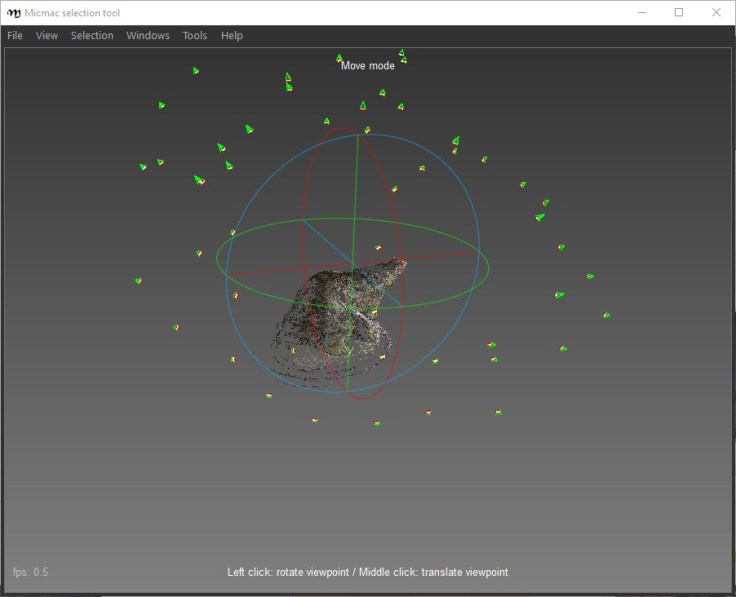
Zoom and move the mouse according the controls at the bottom of the window, and then hit ‘F9’ to change to selection mode, and draw a polygon around the area you’re interested in (in this case, the point cloud actually contains very little that isn’t of interest, so I’m being fairly liberal with my selection). Left click to build the polygon, and right click to close the loop:
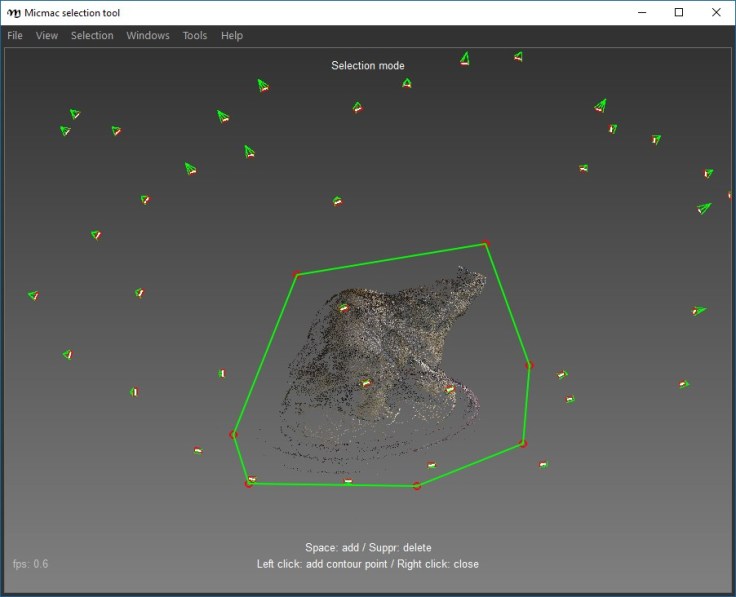
Then go to Selection->add inside polygon to selection. I just choose all the points. Then File->Save Selection Info, leaving two files in your images folder, in this case AperiCloud_MyFolder_polyg3d.xml and AperiCloud_MyFolder_selectionInfo.xml.
Dense Correlation
The command to use is:
..\mm3d.exe C3DC BigMac “.*.JPG” MyFolder
Masq3D=AperiCloud_MyFolder_selectionInfo.xml
Time Taken: 19m 0 seconds
We’ve now created a dense point cloud, which appeared in my Styrac folder as “C3DC_BigMac.ply”. Here it is in Meshlab:
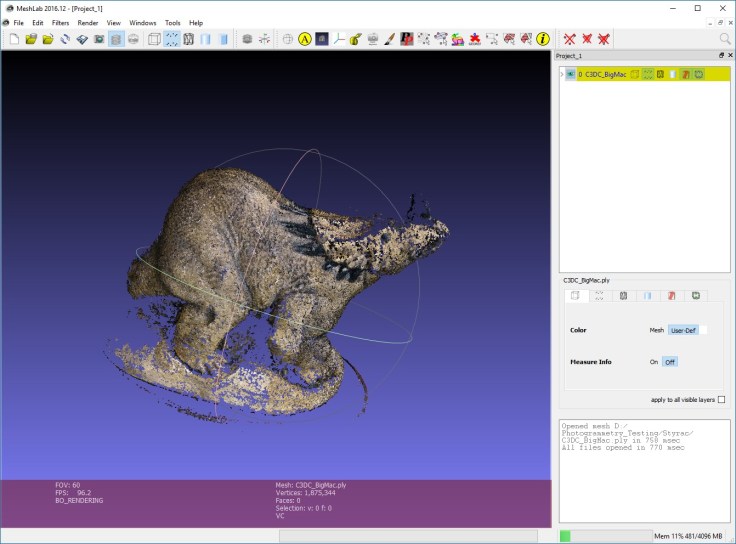
This is pretty poor, especially if we view the other side:
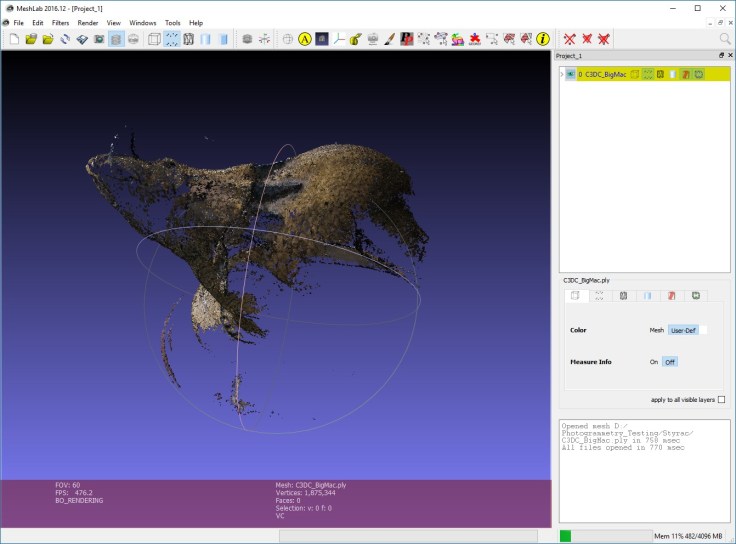
There are tools available on the website (but not in the tutorials) that describe meshing and texturing, but honestly the reconstruction is so poor I’m not going to bother.
Conclusions and notes.
Before commenting on the quality of the model, I want to point out that MicMac saves all intermediate steps and files, and in this case that left >20gb of files in my images folder.
The model is, obviously, pretty poor. Time wasn’t great, and the usability of the tools is the hardest I’ve encountered yet.
Ultimately I can’t recommend MicMac to a novice user when there are so many clearer, easier to use packages available. I have no doubt as to the power of getting into the settings in MicMac, but by god it’s not straightforward to use, and the tutorials and instructions available are not great. If you have plenty of time you could probably get much better results, and I’d be interested to hear from people who’ve run this dataset through Micmac.

Hei!
I have tried to run your dataset in MicMac and ran into some issues :
1) All images are not taken at the same focal according to the EXIFs (25mm and 37mm), which makes me think they might actually all have slightly different focal since a zoom lens can’t really be stable away from its extrema (here that would be 16 and 50mm). Unless specified, MicMac does not try to find a different camera calibration for each image reporting the same focal length, which leads to suboptimal calibration (some form of averaging of all the calibration of the images reporting the same focal). MicMac default behavior is to expect the imagery to be acquired with a camera with a stable internal orientation (the photogrammetric term for the lens and camera calibration).
2) Image quality is not the greatest (ISO 2000 to 3200 on a NEX-6 is quite noisy, and sharpness was an issue, see image DSC09945.JPG for instance) so I had difficulties/failed at finding tie points for the images of the back side of the statue on the side of the plaque.
Removing these images from the bundle returned an acceptable product, with a noticeable hole there…
For this very dataset, MicMac is indeed not the best tool, but I am sure you would have a different conclusion with a different dataset (as some authors have published in scientific journals).
Thanks. Yeah, then dataset is far from ideal, which helps me test robustness of software. I’m sure Micmac can produce strong results with ideal photos – the same would be true of most of the software I’ve tested. My experience has generally been that robustness for variable parameters (e.g. zoom lens) is absolutely vital to making sure multiple lab members can collect data in the field, or in the lab with a range of devices.
OpenMVG suffers similarly with my datasets – it’s very rare I can get a good camera alignment with openMVG.
Thanks for running the dataset through your workflow!
Hello! Quite an interesting report as most posted in your blog! Some kind remarks:
Micmac does demand some time to get to know its capabilities and many modules. However, there is extensive documentation and support can be requested through the English wiki.
The use of classic photogrammetry terms (as noted in the case of photogrammetric orientations), instead of the computer vision equivalents, I believe is just indicative of the developers’ scientific background. Personally, I quite enjoy it!
Micmac is certainly not the first choice for the amateur or someone interested mainly in Close Range Photogrammetry and 3d Modelling. However, it proves quite useful for aerial (and generally outdoor) Photogrammetry applications.
It is quite a headache at start, but, truth being told, available binaries come with an Interface (cerema/aperodedenis for Windows). Most modules can be processed through it.
Anyway,
Thanks Micmac community for developing!
Thanks Dr. Falkingham for testing and posting!
Hello, it may be a bit late to come back to this post but whatever,
I managed to get better results using MicMac and a combination of TexRecon and Blender to get a better texture projection.
The final model is on Sketchfab: https://skfb.ly/6MGNz
As I explain on the sketchfab description, the main difference is that I used the Statue mode for the dense point cloud computation with the C3DC command.
The full list of Micmac commands used is:
mm3d Tapioca All “.*.JPG” 1228 (size of the largest side divided by four)
mm3d Tapas RadialStd “.*.JPG”
mm3d C3DC Statue “.*.JPG” Ori-RadialStd
// some cropping in meshlab
mm3d TiPunch C3DC_Statue_cropped.ply Filter=0 Mode=Statue Rm=1 Depth=8
// Then, to export the orientation for TexRecon
mm3d Apero2NVM “.*.JPG” Ori-RadialStd
The texrecon command used was
texrecon –keep_unseen_faces –write_timings ORI.nvm ../C3DC_Statue_cropped_mesh.ply dino
It took 76s.
Then, all I had to do was to compute better UVs and bake the multiple textures into a single texture file in Blender. I also deleted all of the isolated mesh artifacts to clean up a bit.
The whole command line process managed to take less than 5Go of ram. MicMac seems to be very good managing big datasets (I did some tests with more than 300 images that didn’t seems to use much more ram than this) until the texturing part which is really the ram killer. On my machine it was also not particularly long process, it took about 1 hour from start to end, without using the GPU.
To sum up, I think that MicMac has a hard time with part of the dataset because of how some images get darker and lose constrast for the rear left part of the model. The change of luminosity really seems to bother MicMac. It was also probably the reason why the texture projection with MicMac (Tequila command) produced a bad texture mix on the model in this area.
Anyway, thank you for your posts, I really learned a lot about photogrammetry.
Feel free to contact me if you want more precisions about this.
Thanks so much for the detailed response!